Managers and administrators can combine time off policies into policy groups, which are then assigned to employees. A policy group can contain multiple policies. These assignments are date effective.
Navigation: Menu > Administration > Employee Admin > Time Off > Settings > Time Off Policy
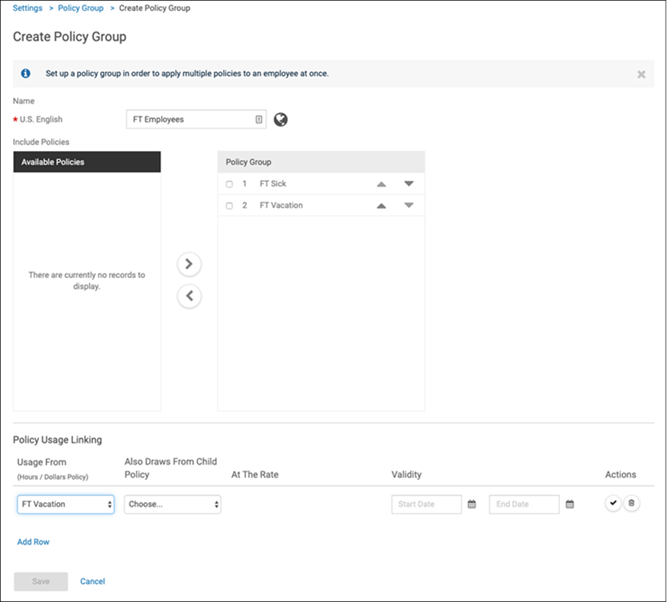
- Select the Policy Groups tab and then select Create.

- Enter a name for the new policy group. As a best practice, use only alphanumeric characters; do not include symbols.
- From the Available Policies pane, select the policy and use the right arrow to move it to the Policy Group pane. In the Policy Group pane, use the up and down arrows to move the policies into the order you would like the policies listed for the employee view.
- If the policy accrues in hours or dollars, complete the optional Policy
Usage Linking section:
- Select Add Row in the Policy Usage Linking section to select a policy from which usage is pulled.
- Select the child policy.
- If the child policy accrues in dollars, select a pay rate.
- Enter the start and end dates.
- Select Save.After groups have been created, you can assign those groups to individual employees. Only one policy group may be assigned to an employee at a given time. However, multiple time off policies are generally required for different groups with different rules (for example, how much time off is accrued, how carryover works, or how the policy maps to Time Classic or Pay).
- From the navigation pane, select My Team.
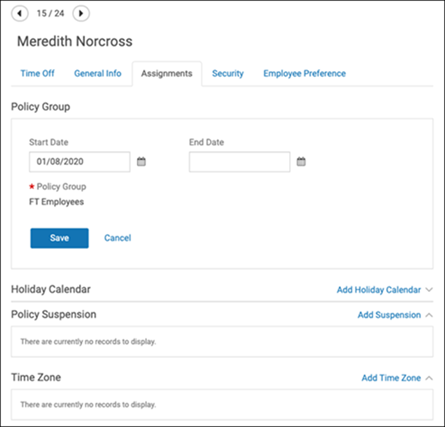
- Select the employee and then select the Assignments tab.

You can assign policy groups and view any policy suspensions that might apply to that employee’s role.
Important:
If Time Classic is not enabled for an employee but the employee will still use Time Off to request time off, be sure the employee is assigned to a time off policy that is not integrated with Time Classic. This required action ensures the employee's request can be approved and sent to payroll.
- Select the Add Policy Group link, or the applicable link next to each section.
- Enter the start date and, if necessary, the end date.
- Select Save.
Note:
If you need to assign policy groups to a large number of employees simultaneously, select Settings and then Data Import.