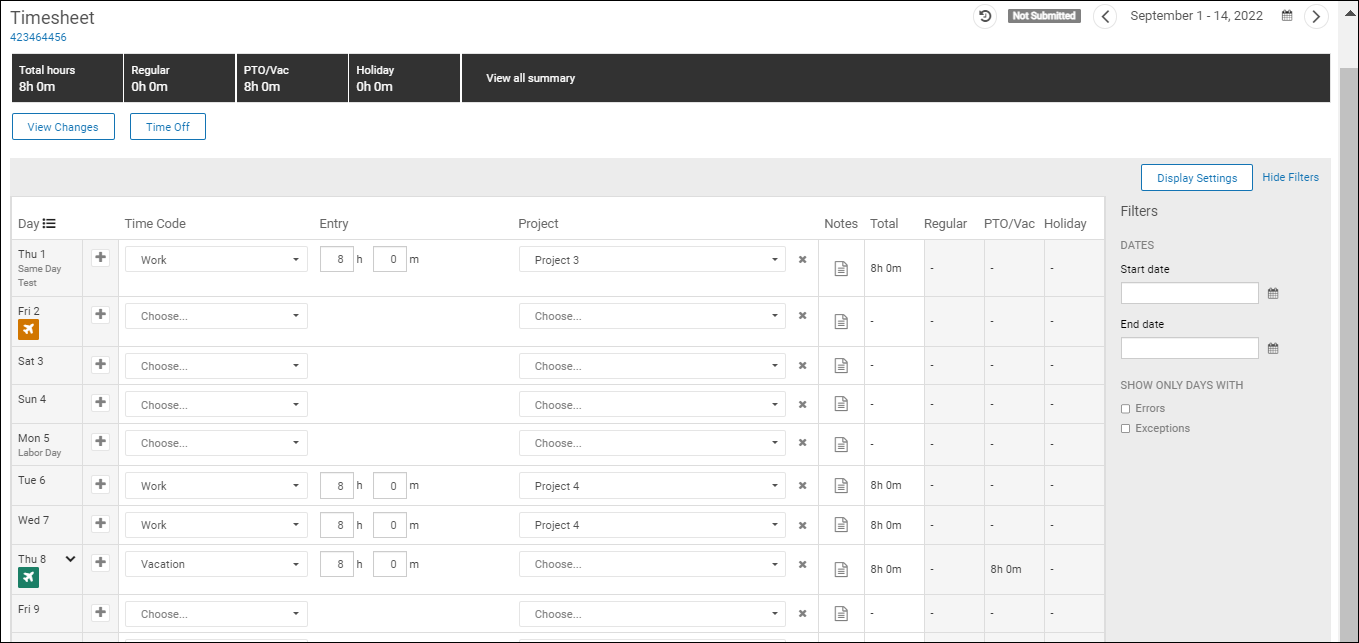
Time Classic simplifies time tracking so you can focus on your work.
Time Classic enables you to:
- View current and previous timesheets, including a summary of time in a graph or list view
- Clock in and out
- Add time-related entries (for example, vacation)
- Add and copy time
- View your requests for time off or request time off
- Submit your timesheet
In addition, all of this can be done via a mobile device.
Navigation: Menu > Myself > Workforce Management Classic > Time Classic
- On the timesheet, use the left and right arrows in the top right corner to select a timesheet to view. Use the horizontal scroll bar at the bottom of the timesheet to view additional columns.

- To show or hide errors and exceptions for a specific time period (for example, until the end of the day or the end of your assigned schedule), select Display Settings. The Display Settings panel includes several options:
- Show all – Show on all days, including future days.
- Hide only future days – Hide on future days only.
- Hide until end of shift – Only show on the current day when the scheduled end time has arrived.
- Hide until end of day – Only show on the current day when the day has ended.
After an option is selected, the timesheet updates immediately and the selection is remembered even after you log out.
Note:
Errors and exceptions will always be shown on prior days, and time off related errors will always be shown on all days.
- To add time to a Duration timesheet:
- Select the date on the timesheet.
- Select the plus sign to add a row.
- Enter the hours and minutes worked.
- Select the time code from the drop-down list.
- Select Save.
- To add time to an Hourly timesheet:
- Select the date on the timesheet.
- Select the plus sign to add a row.
- Enter the entry and exit times.
- Select the time code from the drop-down list.
- Select Save.
If you make an ambiguous time punch, a daylight saving time (DST) column appears and you must select either Before Time Change or After Time Change. If time punches on a timesheet span a DST change, a DST indicator appears in the calculated hours section.
When you edit your timesheets, the only time codes available are those listed for you on your assigned timesheet configuration group. If you have retro edit permissions, you can edit a timesheet if the date is within the retro adjustment period. You’ll receive a notification when your timesheet retro adjustments are approved or rejected or when a retro adjusted timesheet has been commented on or modified.
- To copy time:
- Select Copy From, which is under the Timesheet Header.
- Enter the start and end dates to copy from.
- Enter the date to copy to (starting from the specified date).
- Select Copy.
- Select the Notes icon and complete the pop-up window.
- Enter any notes about an entry. Next, select the day to attach the notes to, and then select Post. These notes are helpful for timesheet tracking purposes. (You can view notes entered by managers or administrators.)
- Select the Delete icon (“X”) next to a note to delete it and then select Post. The EMPLOYEE_DELETE_NOTES permission must be assigned for the Delete icon to appear. You can delete your notes, but you cannot delete manager notes.
- To access the Time Off panel, select the Pending (orange) or Approved (green) Time Off Request icon below the specific date, or select Time Off. The panel displays your planned requests and balances; it does not include canceled or rejected requests.
- View your requests for time off, or request time off.
- Select the Time Off link to open the Time Off dashboard in a separate browser tab.
- To submit your timesheet, select Submit for Approval. Notice that the status of the timesheet then changes to Submitted.You will be notified immediately after your manager approves or rejects the timesheet.