Manage Service Accounts

Service Account Administration

Administer access to web services and their individual methods by creating service accounts. Service accounts are also used in Integration Studio features.

When creating a service account, provide account details including user name, password, and email address. For each web service, specify which types of methods (Add, Delete, View and/or Edit) the account can access. Once you create a service account, a unique User API key is generated for that account. You may distribute the account name, password, email address, User API key, and Customer API key for the company to those developers requiring access to web services.

Manage Service Accounts

Manage service accounts from the Service Account Administration page.

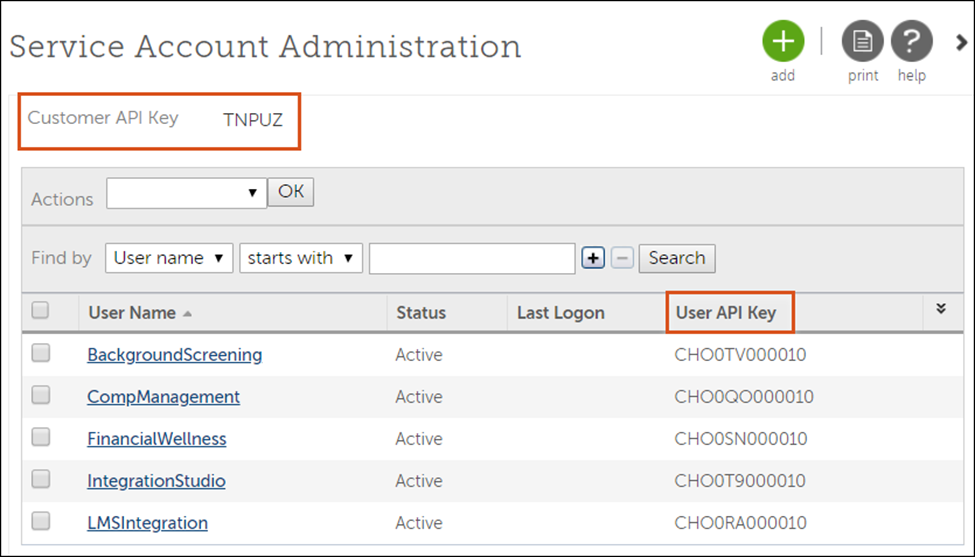
  • View the Customer API key for the master company
  • View service account details including status, last logon date and time, and User API key
  • Add or change a service account
  • Activate or suspend service accounts
Service Account Administration

Add or Change a Service Account

A service account provides the credentials required to integrate with UKG Pro using Web Services, Report Exports, or Integration Studio Designer.

When using Web Services or Integration Studio Designer, a Service Account is required for each of the Web Services you use.

Add or change a service account from the Add/Change Service Account page. This page is accessible from the Service Account Administration page via two navigation paths:

Navigation:Menu > System Configuration > Security > Service Account Administration

Navigation:Menu > Administration > Integration Studio > Integration Studio Dashboard > Service Accounts graphic tile

  1. From the Service Account Administration page, complete one of the following:
    • To add a service account, select Add. The Add/Change Service Account page appears.
    • To change a service account, select the User Name link for the service account from the list.
  2. From the Add/Change Service Account page, enter a user name for the account. The user name must be unique; it cannot be an existing user account name used to access the portal. We recommend that you add the partner name to the end of the recommended user names as shown in the table below.
  3. Enter an email address for the service account.
  4. The Generate New Password box is automatically selected when adding a new Service Account. After entering the remaining required information and selecting Save, a New Password window displays with the randomly generated password. You can copy the password and save it in a secure location. You will not be able to see this password again after closing the New Password page. If the password is lost or forgotten, a new one will need to be generated.
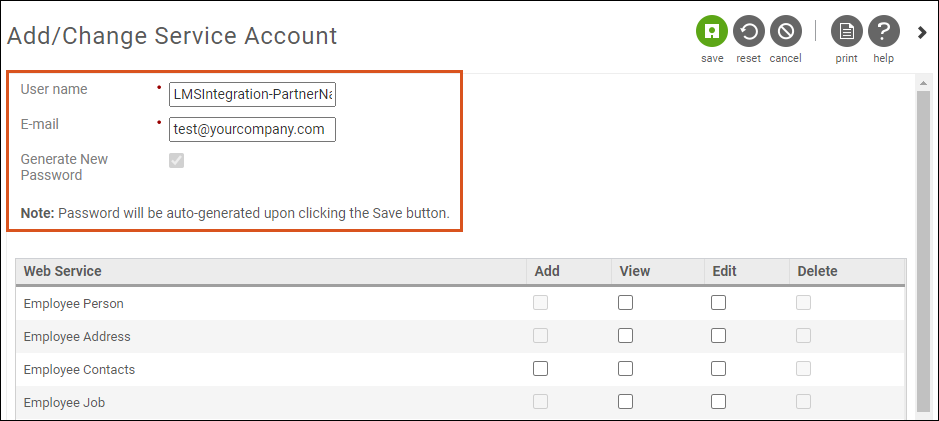
    Add or Change Service Account for LMS integration
  5. For each Web Service, select which types of methods (Add, Delete, View, and/or Edit) the service account will be able to access.
    Note Granting View access allows access to the Find method (if applicable) and Get methods for a Web Service. Some methods are not available for certain Web Services and cannot be selected.

    For the following integrations, ensure that the minimum access required is selected for the associated service account methods:

    Web Service Integrations
    PartnersService Account Method RequiredRecommended UsernameMinimum Access Required

    * Denotes a Partner Integration that is Coming Soon

    Applicant Tracking System

    Greenhouse

    iCIMS connector Powered by The Cloud Connectors

    Jobvite

    Lever

    Taleo connector Powered by Modulus Data

    • Company Configuration Integration
    • Employee Export

    ApplicantTracking-PartnerNameView Access
    Compensation Data

    PayScale

    • Company Configuration Integration
    • Compensation Details

    • Employee Job History

    • Person Details

    • Personnel Integration

    CompData-PartnerNameView Access
    Compensation Management

    HRSoft

    • Company Configuration Integration
    • Employee Compensation Details

    • Employee Employment Information

    • Employee Job History Details

    • Employee Person Details

    • Employee User-Defined Fields

    • Personnel Integration

    CompManagement-PartnerNameView Access
    Employee Verification
    Note For Equifax customers, refer to the Income and Employment Verification from Equifax Integration job aid in the UKG Community Library for more information.

    Equifax US

    Equifax Canada

    • Employee Compensation
    • Employee Pay Statement

    • Employee Phone Information

    • Employee Termination

    • Company Configuration Integration

    • Employee Export

    • Personnel Integration

    • Employee Job History Details

    • Employee Person Details

    • Employee Compensation Details

    EmployeeVerification-PartnerNameView Access
    Expense Management
    Chrome River
    • Company Configuration Integration
    • Employee Direct Deposit

    • Employee Export

    ExpenseManagement-PartnerNameView Access
    Financial Wellness

    Vault

    • Company Configuration Integration
    • Employee Export

    • Personnel Integration

    FinancialWellness-PartnerNameView Access
    Global Payroll

    activpayroll

    CloudPay

    UKG One View

    PayAsia

    Groupo Ono*

    • Company Configuration Integration
    • Employee Compensation Details

    • Employee Job History Details

    • Employee Person Details

    • Employee Export

    • Global Employee Direct Deposit

    • Payroll Integration

    • Personnel Integration

    • Third Party Pay Services

    GlobalPayroll-PartnerNameView Access

    Note: The Third Party Pay Services requires: Add, View, Edit, and Delete Access

    Identity Management

    CyberArk

    ManageEngine

    OneLogin

    Ping

    • Company Configuration Integration
    • Employee Person Details

    • Personnel Integration

    • Note: OneLogin also requires Reports-As-A-Service

    IdentityManagement-PartnerNameView Access
    Integration Platform

    Azure

    NetSuite

    Third Party Benefit Providers

    • Company Configuration Integration
    • Payroll Integration

    • Personnel Integration

    • Employee Direct Deposit

    • Global Employee Direct Deposit

    • Employee Job History Details

    • Employee Person Details

    • Employee Compensation Details

    IntegrationPlatform-PartnerName
    • View Access

    • Edit Access

    Integration Studio / Informatica
    Integration Studio Informatica
    • Employee Self-Service API
    IntegrationStudioView Access
    Job Posting
    Appcast

    TeamWork Online

    Symphony Talent

    • Reports-As-A-Service
    JobPosting-PartnerNameBusiness Intelligence (BI) Access
    Learning Management System (LMS)

    Cornerstone OnDemand

    • Employee Export (for Employee Changes API)
    • Company Configuration Integration (For Organization Levels, Jobs Configuration and Locations Configuration APIs)

    • Development Opportunity Participation Service

    • Development Opportunity Service

    • Development Opportunity Session Service

    LMSIntegration-PartnerNameView Access

    Note: These services require Add, View, Edit, and Delete Access:

    • Development Opportunity Participation Service
    • Development Opportunity Service
    • Development Opportunity Session Service
    Organization Chart

    Ingentis Softwareentwicklung GmbH

    OrgChart Now by OfficeWork Software

    • Employee Compensation Details
    • Employee Person Details

    • Personnel Details

    OrganizationChartIntegration-PartnerNameView Access
    PayCard
    rapid! PayCard
    • Company Configuration Integration
    • Employee Direct Deposit

    • Employee Person

    • Employee Person Details

    PayCardIntegration-PartnerNameView Access
    Scheduling
    Humanity*
    • Company Configuration Integration
    • Employee Export

    • Personnel Integration

    SchedulingIntegration-PartnerNameView Access
    Social Collaboration

    Planned Companies

    Beekeeper

    • Company Configuration Integration
    • Employee Export

    SocialCollaboration-PartnerNameView Access
    Work Opportunity Tax Credits (WOTC)
    HireCredit
    • Employee Pay Statement Service
    • Personnel Integration

    WOTC_PartnerNameView Access
    Additional Functionality to Support Background Screening
    Additional functionality to support Background Screening
    • Company Configuration Integration
    BackgroundScreening-PartnerNameView Access
  6. Select Save. The Service Account Administration page appears with the new or modified service account.

Activate or Suspend Service Accounts

Activate or suspend service accounts from the Service Account Administration page.

Service accounts must be activated to access web services.

Note Once a service account is suspended, you cannot:
  • Access web services
  • Use the service account in Integration Studio Report Exports, Integration Studio Designer (powered by Informatica) connections
  • Log into the portal

Navigation:Menu > System Configuration > Security > Service Account Administration

  1. From the Service Account Administration page, check the boxes for those service accounts you wish to activate or suspend.
  2. From the Actions drop-down list, select either Set Active or Set Suspended.
  3. Select OK. The changed service account status appears for the selected service accounts.

Locate Service Account Information For Integrations

When configuring your integration, take note of these fields from your integration configuration. Provide this information to your partner.

Menu > System Configuration > Security > Service Account Administration

  • Customer API Key
  • User API KeyService Account Administration Customer API Key and User API Key

Menu > System Configuration > Security > Service Account Administration > Select user name for the created account

  • Username
  • Email address
  • Password
    Note The Generate New Password box is automatically selected when adding a new Service Account. After entering the remaining required information and selecting Save, a New Password window displays with the randomly generated password. You can copy the password and save it in a secure location. You will not be able to see this password again after closing the New Password page. If the password is lost or forgotten, a new one will need to be generated.
    Username, email, and password web services

Menu > System Configuration > Security > Web Services

  • Home URL for web services

    Business Intelligence Web Service End Point

Submit an Administrative Case to Access Business Intelligence (BI)

A service account does not automatically have access to Business Intelligence (BI). Before a service account can access BI via Reports-as-a-Service or Report Exports, your company's SaaS Focal Contact must submit an administrative case in the UKG Community Library to request this.

Note Partner integrations do not typically require access to Business Intelligence. Follow the steps below if your partner solution does require access to BI.

When creating the Administrative case to request a new user, ensure you include the following:

  • In the Create SaaS New User Request section, enter a valid first name, last name, and e-mail address for a user.
  • In the Create SaaS New User Request - Access Rights section, select Yes for Cognos.
  • For the Cognos Business Intelligence Role, select the Security Administrator role
  • After you create the case, include the following information in the Comment field:
    • Instructions requesting the assignment of the UKG Pro BI Consumer role to your web services account
    • The name of your web services account