Manage Your Timesheets
Employee Timesheet Overview
Time Management provides you with the ability to review timesheets and related history based on specific pay periods. This information helps ensure that timesheet punches are accurate and up-to-date.
Depending on your company's setup, you may have access to either an hourly or detailed timesheet, or have the option to toggle between the two.
To access your timesheet, go to Myself and select Time Management. Then select the Attendance category and the Timesheets tab.
- Not Yet Submitted – Indicates the timesheet is in an Open status.
- Agreed or Disagreed – Indicates the timesheet is in a Submitted status, based on your selection.
- NA – Applies only when your administrator has selected the Break/Meal Premiums option for your employee access group during timesheet configuration.
The Summary section shows up to five tables:
- Adjustment – When this option is checked, it shows any adjusted hours from prior pay periods that will be applied to the current pay period. Shows the pay codes, hours, earnings, deductions, and work period for the adjustment.
- Pay Matrix – Shows the pay code, pay ID, hours, rate, and payment amount. Select the icon to the right above the table to view the Pay Matrix Detail Summary, which includes any pay matrix calculations.
- Weekly Summary – Provides a weekly breakdown of all paid hours during the weeks that are contained within the pay period, even if the employee is in a bi-weekly or semi-monthly pay period.
- Accrual – Displays your accrued and used hours for vacation or paid time off (PTO).
- Point System – If your company uses the Point System Module, it shows any points that have been added for infractions. For example, one-quarter of a point may be added for a tardy or a point may be added for an unexcused absence. Supervisors, managers, and administrators have an option to override these points if they deem it necessary.
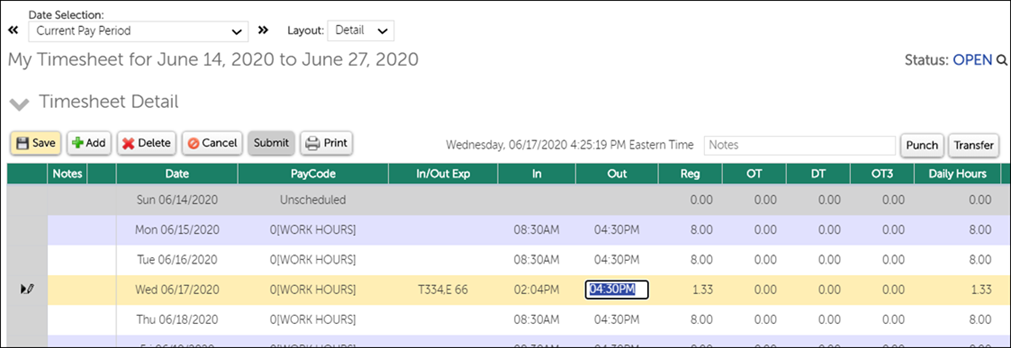
In the Timesheet Detail section, the Action Bar includes Submit, Print, Punch, and Transfer. The Punch button appears only if it is configured and if the timesheet is in an Open status. The timesheet refreshes after a punch.
You can review regular, overtime, and total hours, earnings and deductions, regular and overtime pay by pay code.
When you submit the timesheet, if configured, you may be required to confirm that the submitted hours are true and accurate. Based on the timesheet, checks are in place to validate and detect any missing punches. If these are present, you will be required to make corrections before submitting the timesheet.
If enabled, you can roll back your own timesheet from SUBMIT status to OPEN status, provided the timesheet has not yet been approved by the supervisor. Selecting Undo Timesheet Submission returns the timesheet to OPEN status; you can then make changes and resubmit the timesheet. The Undo option remains visible on the timesheet until the supervisor approves it, at which time that confirmation message and Undo option disappear.
The Timesheet Punch feature contains the current date and time along with the ability to enter notes for the punch. When notes are entered, they are concatenated together into the timesheet Notes field. You can also view a schedule summary, displaying your scheduled organization levels for today, the total hours scheduled for today, and the quick summary of hours worked so far this week.
Select a pay period from the Pay Cycle drop-down list to view related timesheet information. When configured, you can choose your timesheet view, either Detailed or Hourly, using the Layout drop-down list.
View Attendance and Schedules with Date Filters
Date filters allow you to quickly review schedules and attendance by pay period or a specific date range.
Pages that allow you to use date filters contain a Display or Date Selection drop-down list. The Timesheet Detail section displays information for the selected date.
Employees and supervisors can use the date filter to view time on the Timesheet page. Supervisors and administrators will see many more pages with the date filter. These pages include the Summary and Timesheet pages in the Attendance menu and the Summary page in the Scheduler menu.
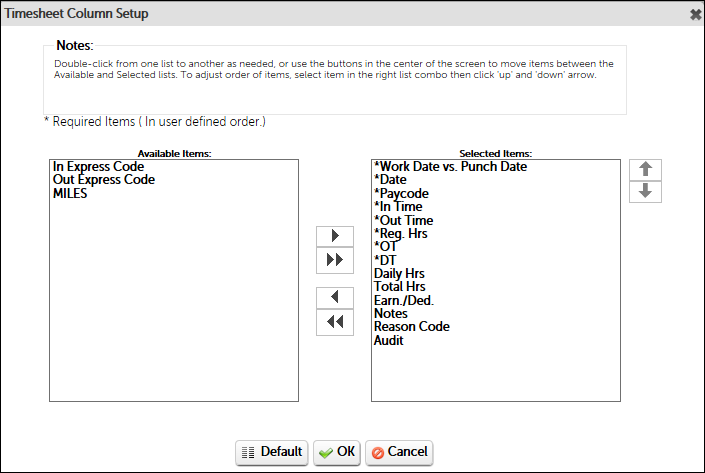
Select and Reorder Timesheet Columns
You can select and reorder the columns that appear on a timesheet.
The timesheet page is self-contained and scrollable. For ease of use, the first two columns are locked:
- Work Date vs. Punch Date
- Date
-
From the Timesheet Detail section, select the
Columns button. The Timesheet Column Setup
window appears.
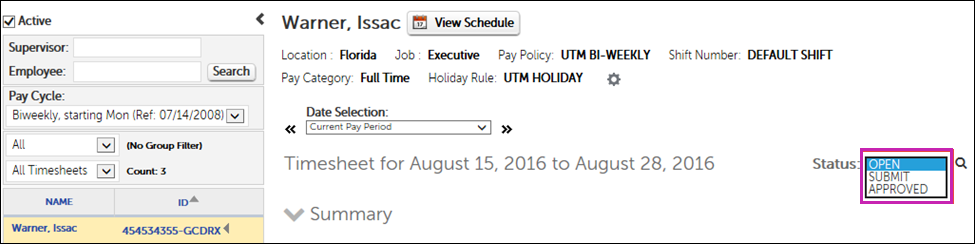
Timesheet Status
You can change the status of a timesheet to any level within your maximum approval level. The displayed statuses that you can select from are based on your role type.
Set Group Filters
If your company has enabled the Group Filtering feature, you can set group filters from your timesheet.
- On the timesheet under the Things I Can Do section, select the Set My Group Filters link. The Set Group Filter Options window appears.
- Select the filter options from the left and use the right arrow to move them to the right. Only those values in your access group are available for selection.
- Select Save.
Clock In and Out
As an employee, you can use the Time Clock Entry feature to punch your time.
Other forms of time entry include using a hardware time clock or entering punches on the timesheet in Time Management.
Add or Correct a Timesheet Punch
Employees can enter In or Out time directly to their timesheets as well as make applicable corrections, if configured by their employer.
- At the applicable In or Out field, enter
the time to add a new punch or correct an inaccurate punch.
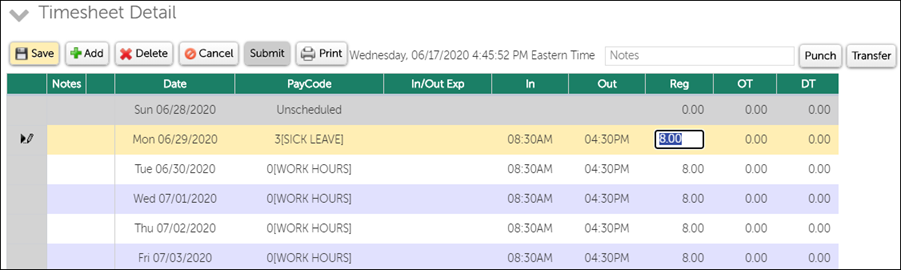
Add Non-Worked Time to Timesheets
Employees can enter time directly to their timesheets to add non-worked hours, such as vacation or sick time.
- At the Reg field, enter the number of hours.
Update an Hourly Timesheet
Employees can enter time directly to their hourly timesheets as well as make corrections.
Depending on your company's configuration, you may have access to either an hourly or detailed timesheet, or have the option to toggle between the two.
Copy an Hourly Timesheet
Pay codes and pay groups can be copied from a previous pay period on an hourly timesheet.
- On the timesheet, select the pay period in the Date Selection field.
- In the Timesheet Detail section, select Copy to copy the previous pay period to the displayed pay period. A message appears stating that all existing data for the displayed pay period will be permanently removed.
- Select OK.
Submit a Timesheet
Employees submit their timesheets to their supervisors for review and approval.
If there are unsaved changes on a new or existing timesheet, the Submit button remains disabled until the Save button is selected.
Attestation Statement
When Print is selected from a timesheet, the same attestation language that appears on the electronic version appears on the printed version too.
The employee signature line appears below the attestation statement. The statement is defined on the Advanced Timesheet page (Access > Advanced > Timesheet > Timesheet Submission > Timesheet Submission section).
Undo a Timesheet
If the Undo feature is configured, you can undo your timesheet after it is submitted, and prior to supervisor approval. You can then make changes and resubmit the timesheet.
The Undo option remains visible on the timesheet until the supervisor approves it, at which time that confirmation message and Undo option disappear.
- Select the Attendance category, and then select Timesheets.
- If the timesheet is in SUBMIT status, select the Undo Timesheet Submission link. The timesheet returns to OPEN status. From here, you can modify the timesheet as needed, and resubmit.
© 2023 UKG Inc. All rights reserved. For a full list of UKG trademarks, visit https://www.ukg.com/trademarks. All other trademarks, if any, are the property of their respective owners.
This document and all information contained herein are provided to you "AS IS" and UKG Inc. and its affiliates (collectively "UKG") make no representation or warranties with respect to the accuracy, reliability, or completeness of this document, and UKG specifically disclaims all warranties, including, but not limited to, implied warranties of merchantability and fitness for a particular purpose. The information in this document is subject to change without notice. The document and its content are confidential information of UKG and may not be disseminated to any third party. No part of this document or its content may be reproduced in any form or by any means or stored in a database or retrieval system without the prior written authorization of UKG. Nothing herein constitutes legal, tax, or other professional advice. All legal, tax, or other questions or concerns should be directed to your legal counsel, tax consultant, or other professional advisor. All company, organization, person, and event references are fictional. Any resemblance to actual companies, organizations, persons, and events is entirely coincidental.