Employee Voice: Launch a Survey

Launch a Survey

Overview

When you’re ready to launch a survey, you can create a collection to identify who to send the survey by using an employee list.

A survey can have multiple collections. You can create collections for different locations, employee groups, or languages. If you plan to send the same survey questions each year, you may want to use the same survey, but create a new collection each year.

Note Before you send the survey, we recommend that you create a test collection and send it to a small group of employees to test the survey. Once you know everything is working as intended, create a collection to send to the intended audience.

This guide reviews how to:

  • Create a collection
  • Configure authentication settings
  • Distribute the survey link
  • Send a reminder email
  • Cancel an invitation email
  • Pause or resume a collection
  • Edit a participant list
  • Reset a participant's survey
Note We do not recommend making changes to the survey text once it's been distributed.

Create a Collection

There are three types of collections:

  • Manual Collection – select employees from the employee directory, generate a random list from the employee directory, or upload a pre-made list from a spreadsheet.
  • Automatic Triggered Collection by Hire Date – send a survey to an employee on a specified number of days after their hire date. This feature is typically used for onboarding surveys.
  • Automatic Triggered Collection by Termination Date – send a survey to an employee on a specified number of days before or after their termination date. This feature is typically used for exit surveys.

Create a Manual Collection

Manual collections can be made up of select employees from the employee directory, a random list generated from the employee directory, or a pre-made list uploaded from a spreadsheet.

To create a manual collection:

Navigation:Menu > Surveys > select survey name > Collect Responses

  1. From the Collect Responses tab, select Collect Responses
  2. From the How Would You Like to Collect Responses window, select Select Collect responses manually.
  3. From the Collector Details page, select the Pencil icon to enter a title for the collection.
  4. Complete one of the following options:
    OptionNext Steps
    To select all employees in the current directory

    In the Participant List section, select Create a Custom List of Employees.

    In the Include in Participation section, from the drop-down list, choose Select All Employees in the Current Directory.

    In the Exclude from Participation section, check the By Name or Email box to select individual employees to exclude. Then, from the Select Survey Participants By Name or Email window, search for and select one or more employees. Then, select Confirm.

    Select Save.

    Collector Details page of a survey, Participant List section, Create a Custom List of Employees is selected. Image shows Select All Employees in the Current Directory in the drop-down list. The Exclude From Participation By Name or Email box is checked, with Chase Bins excluded.
    To select some employees from the current directory

    In the Participant List section, select Create a Custom List of Employees.

    In the Include in Participation section, from the drop-down list, choose Select Some Employees From the Current Directory.

    Check the By Filter Group box to select employees using fields in the employee directory. Then, from the Select Survey Participants by Filter Group window, select an employee directory field and the values to include.

    Check the By Name or Email box to select individual employees. Then, from the Select Survey Participants By Name or Email window, search for and select one or more employees. Then, select Confirm.

    In the Exclude from Participation section, check the By Name or Email box to select individual employees to exclude. Then, from the Select Survey Participants By Name or Email window, search for and select one or more employees. Then, select Confirm.

    Select Save.

    In the Build a Survey Participant List From your Employee Directory section, the Create a Custom List of Employees option is selected. In the Include in Participation section, the Select Some Employees From the Current Directory option is selected, and the By Filter Group box is checked with the Work Location: London selected. In the Exclude From Participation section, the By Name or Email box is checked with Donat Labadie and Rayna Batz selected.
    To generate a random list of employees

    In the Generate a Randomized List From the Employee Directory section, enter the number of people to which you want to send the survey.

    Select Save.

    In the Build a Survey Participant List From Your Employee Directory section, the Generate a Random List of Employees option is selected. In the Generate a Randomized List From the Employee Directory section, the Number of People is set to 100.
    To upload a premade list of employees
    From the Import List of Desired Recipients window, drag and drop an Excel or CSV file to the box or select Choose File.
    Note The imported file must contain a column with the heading, EmpNo, or a column with the heading, Email.

    Select Save.

    Once the list of employees is generated, the Participant List section displays the number of employees who will receive the invitation to participate in the survey.

Create an Automatic Triggered Collection by Hire Date

Automatic Triggered Collections by Hire Date sends a survey to an employee on a specified number of days after their hire date.

To configure an automatic triggered collection by hire date:

Navigation:Menu > Surveys > select survey name > Collect Responses

  1. From the Collect Responses tab, select Collect Responses.
  2. From the How Would You Like to Collect Responses window, select Collect responses by employee's hire date.
    Note If this option is not available, the employee directory does not have a field to capture the hire date.
  3. From the Collector Details page, select the Pencil Icon to edit the title of the collection.
  4. In the Survey Participants section, determine which employees should be included in the survey. The (Currently [number]) text displays the total number of employees eligible to receive the invitation email. By default, all employees in the current directory are included, but you can use Add Eligible Group to refine this list to limit it to only some employees (e.g., send the survey to employees in a specific location).
    Note For onboarding surveys: By default, the number shown includes all active employees in the current directory.The (Currently [number]) text is highlighted in the Survey Participants section
  5. Optional: To modify the eligible participants, select Add Eligible Group.
    • To specify which employees to include: Go to the Include in Participation section. From the drop-down list, select one of the following options:
      • Select All Employees in the Current Directory
      • Select Some Employees from the Current Directory
        • If Select Some Employees from the Current Directory is chosen, then select one or both of the following checkboxes:
          • Select the By Filter Group checkbox to select employees using fields in the employee directory. Then from the Select Survey Participants by Filter Group window, select an employee directory field and the values to include.
          • Select the By Name or Email checkbox to select individual employees. Then from the Select Survey Participants by Name or Email window, search for and select one or more employees. Select Confirm.
    • To specify which employees to exclude: In the Exclude from Participation section, select the By Name or Email checkbox to select individual employees to exclude.
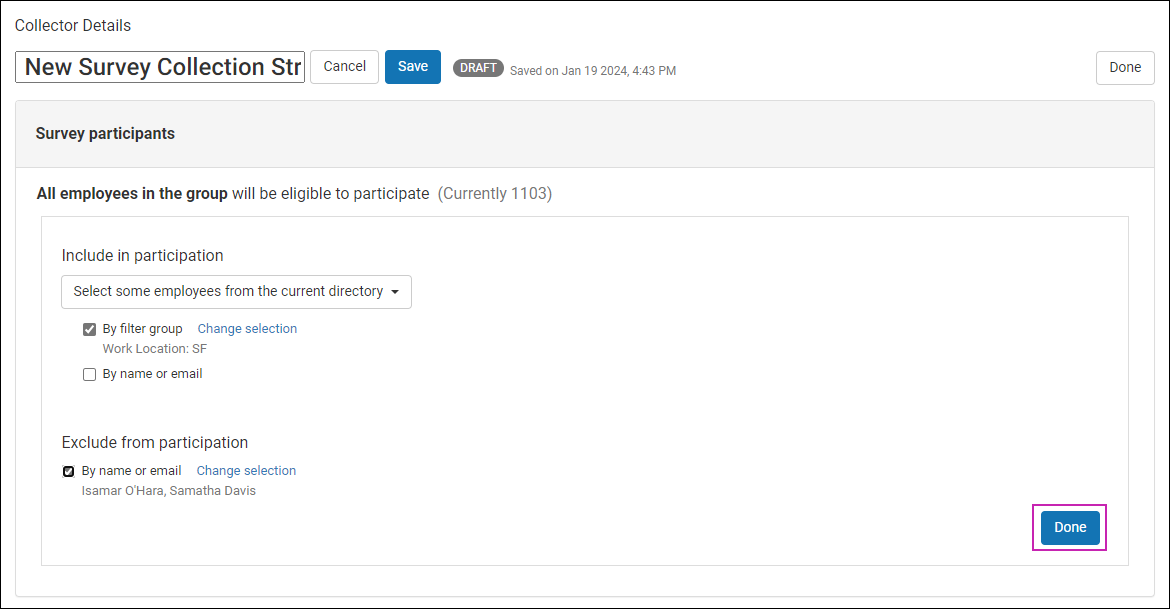
    Select Done when finished. The (Currently [number]) is not updated until you select Done
    Note The survey will be sent only to employees who meet the participation criteria and the triggered date window. For example: If the invitation email is triggered to be sent 30 days after an employee's hire date, then the system will send the invitation email to new hires going forward (or those within that 30-day window); the system will not send the invitation email to more tenured employees.
    .The Done button is highlighted in the Survey Participants section
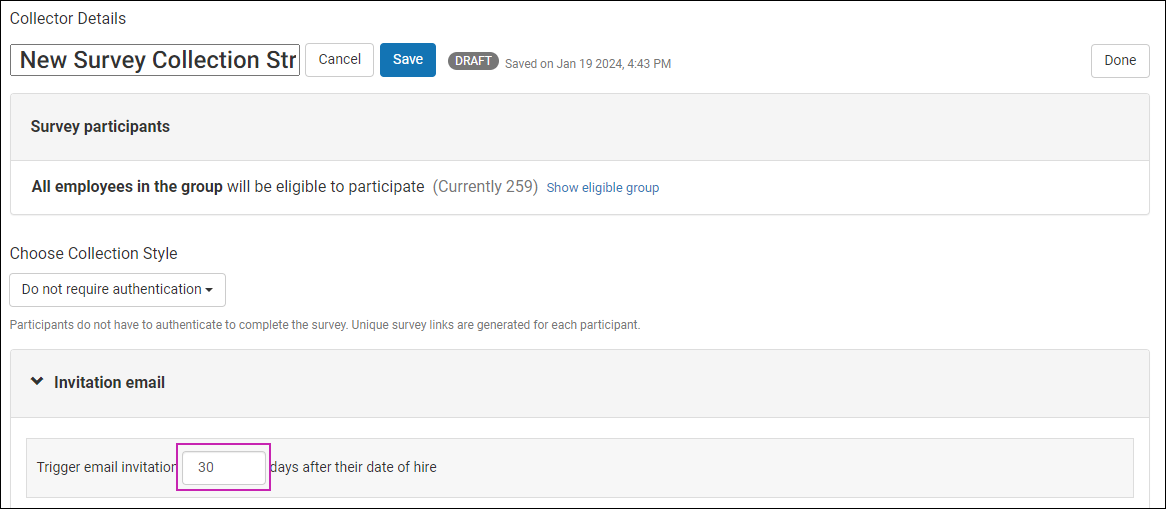
  6. In the Invitation Email section, enter the number of days after the employee’s hire date to send the email.
    Collector Details page of a survey, Invitation Email section. Image show the text, Trigger Email Invitation 30 days After Their Date of Hire.
    Note UKG Employee Voice uses the Date of Hire field in the employee directory to automatically trigger sending an email with the survey link to the new hire. If Employee Voice is integrated with UKG Pro, Employee Voice uses the Date of Original Hire field.

Create an Automatic Triggered Collection by Termination Date

Automatic Triggered Collection by Termination Date sends a survey to an employee on a specified number of days before or after their termination date.

To configure an automatically triggered collection by termination date:

Navigation:Menu > Surveys > select survey name > Collect Responses

  1. From the Collect Responses tab, select Collect Responses.
  2. From the How Would You Like to Collect Responses window, select Collect responses by employee's termination date
    Note If this option is not available, the employee directory does not have a field to capture the termination date.
  3. From the Collector Details page, select the Pencil Icon to edit the title of the collection.
  4. In the Survey Participants section, determine which employees should be included in the survey. The (Currently [number]) text displays the total number of employees eligible to receive the invitation email. By default, all employees in the current directory are included, but you can use Add Eligible Group to refine this list to limit it to only some employees (e.g., send the survey to employees in a specific location).
    Note For exit surveys: By default, the number shown includes all active and terminated employees.The (Currently [number]) text is highlighted in the Survey Participants section
  5. Optional: To modify the eligible participants, select Add Eligible Group.
    • To specify which employees to include: Go to the Include in Participation section. From the drop-down list, select one of the following options:
      • Select All Employees
      • Select Some Employees
        • If Select Some Employees is chosen, then select one or both of the following options:
          • Select the By Filter Group checkbox to select employees using fields in the employee directory. Then from the Select Survey Participants by Filter Group window, select an employee directory field and the values to include.
          • Select the By Name or Email checkbox to select individual employees. Then from the Select Survey Participants by Name or Email window, search for and select one or more employees. Select Confirm.
    • To specify which employees to exclude: In the Exclude from Participation section, select the By Name or Email checkbox to select individual employees to exclude.
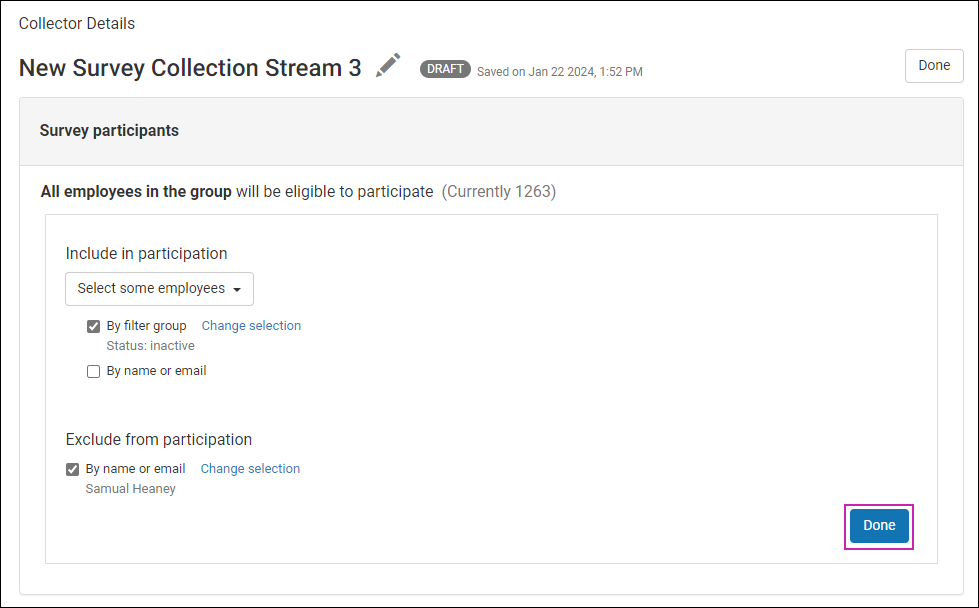
    Select Done when finished. The (Currently [number]) is not updated until you select Done
    Note The survey will be sent only to employees who meet the participation criteria and the triggered date window. For example: If the invitation email is triggered to be sent 5 days after an employee's termination date, then the system will send the invitation email only to terminated employees exactly 5 days after their termination date; the system will not send the invitation email to non-terminated employees.
    .The Done button is selected in the Survey Participants section
  6. In the Invitation Email section:
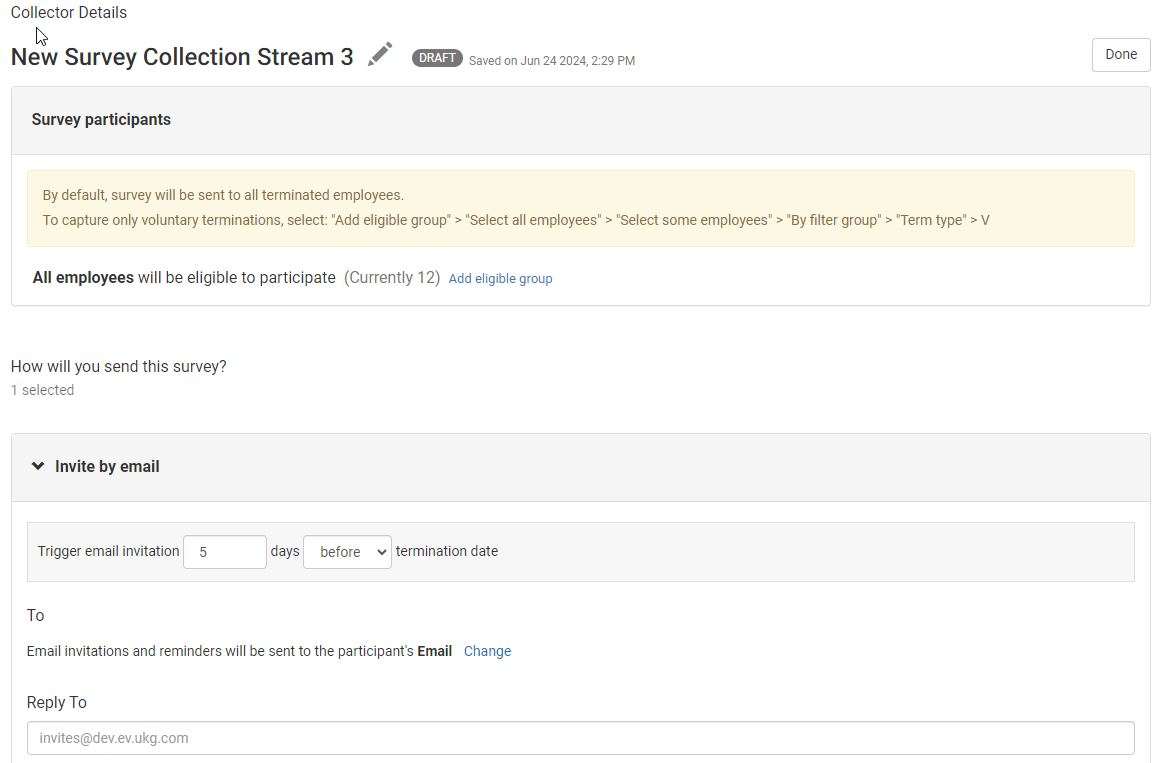
    1. Enter the number of days before or after the employee’s termination date to send the email.
    2. Select Before or After.
      Collector Details page of a survey, Invitation Email section. Image shows the text, Trigger Email Invitation five days After Termination Date. Warning message displays the text, “You are sending the invitation for this survey after the employee termination date. Employees may not receive this survey if they no longer have access to their email address.”
      Note
      • UKG Employee Voice must know about the termination before the survey trigger date. For exit surveys to be sent before termination, future dating must be turned on in UKG Pro.
      • If you do not enter terminations into UKG Pro solutions (or your employee directory) immediately, we recommend configuring Employee Voice to send the survey 7–12 days after the termination date.
      • An invitation will not be sent if an employee is terminated due to death.
      • If Employee Voice is integrated with UKG Pro, an invitation can be sent before a termination date.

Configure Authentication Settings

When Employee Voice is integrated with UKG Pro solutions or initiated with Single Sign-On (SSO), collections can be configured to require participants to log in to complete the survey.

This configuration enables you to provide one survey link to all participants. Another option is to configure the collection to not require participants to log in to complete the survey. This configuration provides a unique link for each participant.
To configure authentication settings:

Navigation:Menu > Surveys > select the survey > Collect Responses > select the collection

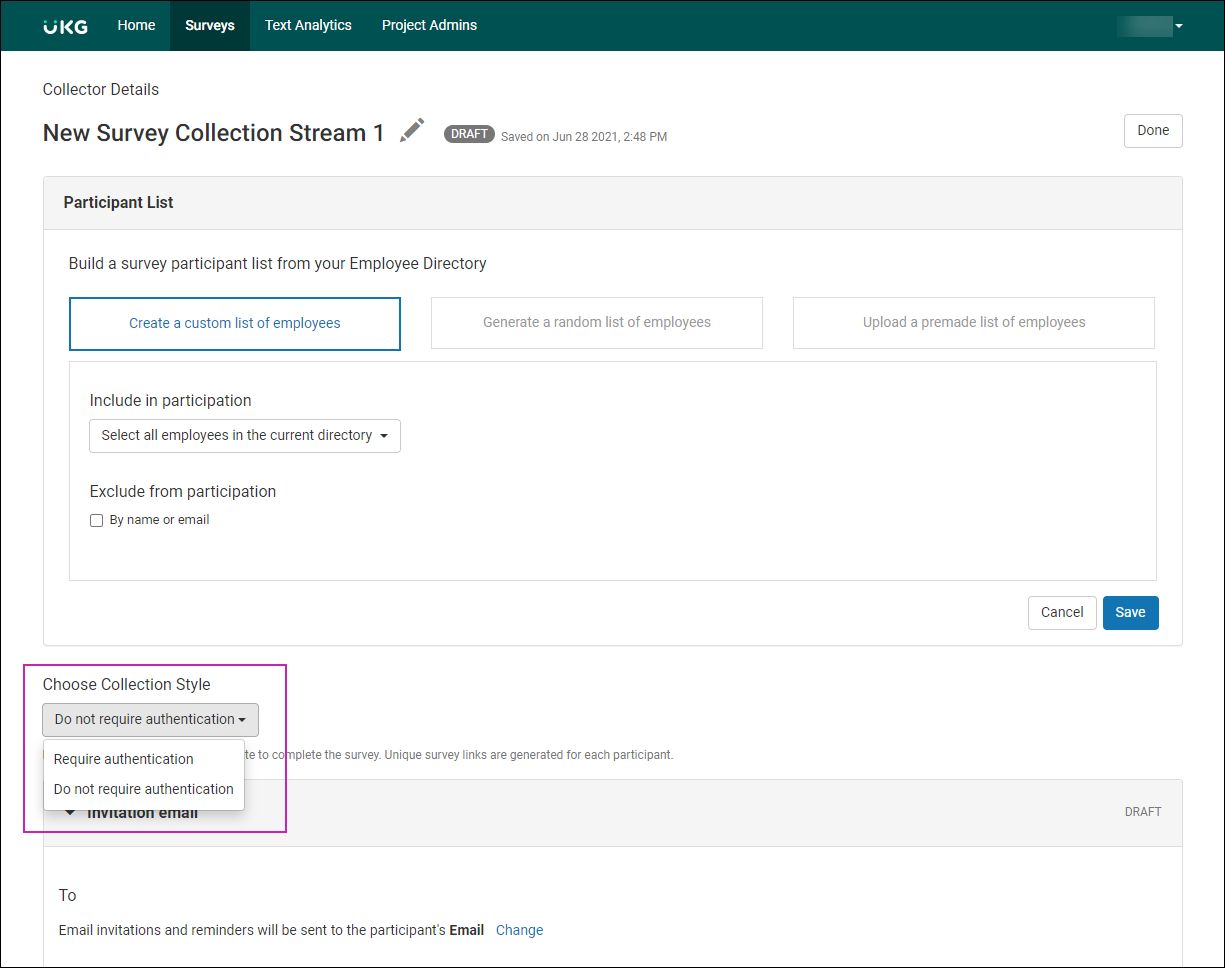
In the Choose Collection Style section, from the drop-down list, select one of the following options:
  1. Require Authentication – participants are required to log in to complete the survey. All participants receive the same survey link.
  2. Do Not Require Authentication – participants do not have to log in to complete the survey. Each participant receives a unique survey link.
    Collector Details page of a survey, Choose Collection Style section. Drop-down list displays two options: Require Authentication and Do Not Require Authentication.

Distribute the Survey Link

The survey link can be distributed to employees via email or using an alternate method, such as text message, internal chat application, or embedded within a web page.

Distribute the Survey Link via Email

The default method for distributing a survey is via email. The email invitation is configured in Employee Voice and can be scheduled to be delivered on a specific date.

To edit an email invitation and schedule delivery:

Navigation:Menu > Surveys > select the survey > Collect Responses > select the collection

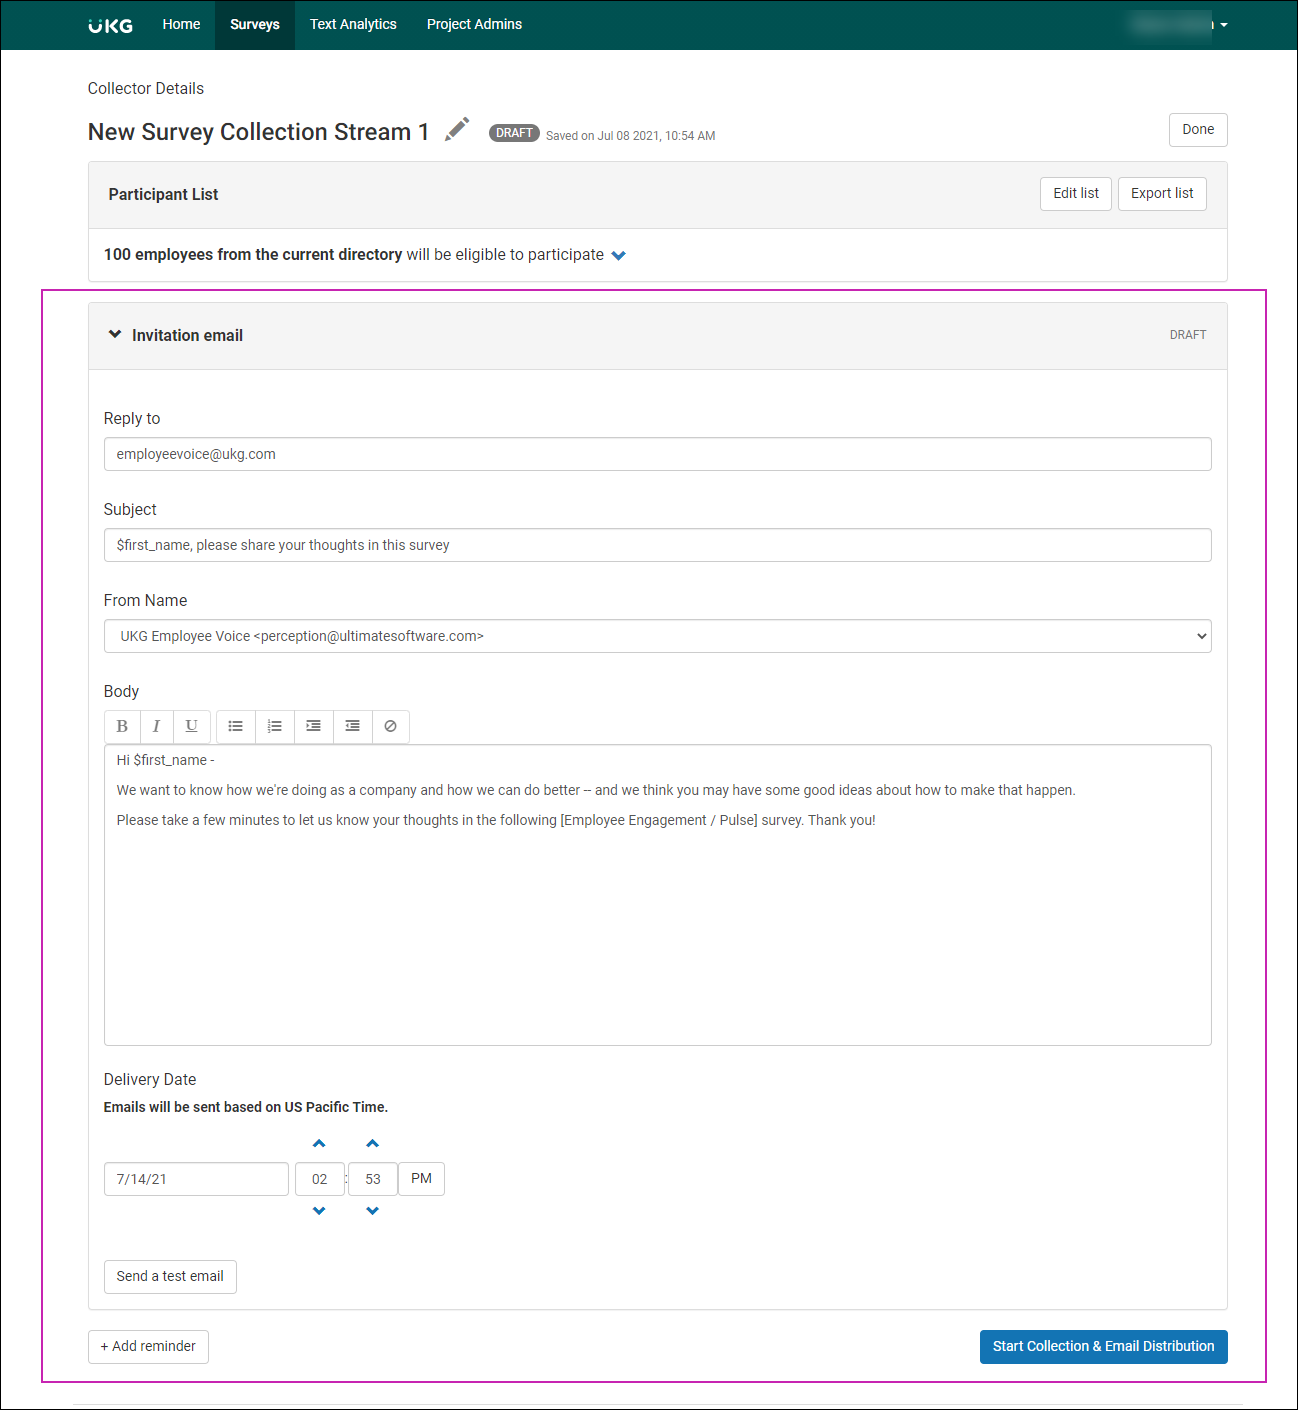
  1. From the Collector Details page of the collection, in the Invitation Email section, at the To field, select an email address to send the invitation.
    Note The option to select an email address only displays if Employee Voice is integrated with UKG Pro or you have a secondary email address field in your employee directory.
  2. Enter the Reply To, Subject, and Body fields, as needed.
  3. At the Delivery Date field, enter a date and time to send the survey.
    Note Invitations are sent on Pacific Time, unless the Time Zone field in the employee directory is changed. If Employee Voice is integrated with UKG Pro solutions, the time zone field cannot be changed.
  4. Select Send a Test Email to preview the email. From the Send a Test Email window, enter your email address, and then select Send Test Email.
  5. Select Start Collection & Email Distribution to send the survey to the selected employees.
    Collector Details page of a survey. Invitation Email section displays Reply To, Subject, From Name, and Body text fields. Delivery Date field allows for date and time. There is a button to send a Test Email.

Distribute the Survey Link Using an Alternate Method

There are alternate ways to send a survey link instead of using email:

  • Send the survey link via text message. Bulk text messaging websites can also be used.
  • Send the survey link using an internal chat application, such as Chatter.
  • Embed the survey link within a web page.
  • Embed the survey link within a time-clock system or other application.
  • Add the survey link to the UKG Pro Homepage using gadgets.
  • Send the survey link via Community Broadcast for Employee Voice surveys that are anonymous or marked identifiable and SSO enabled.

To distribute the survey link using an alternate method:

Navigation:Menu > Surveys > select the survey > Collect Responses > select the collection

From the Collectors Details page, one of the following displays:
  • If the collection is configured to require authentication, one survey link is provided to all participants in the Link to Survey section.
    Note It is recommended that employees log in to your SSO prior to selecting the survey link.
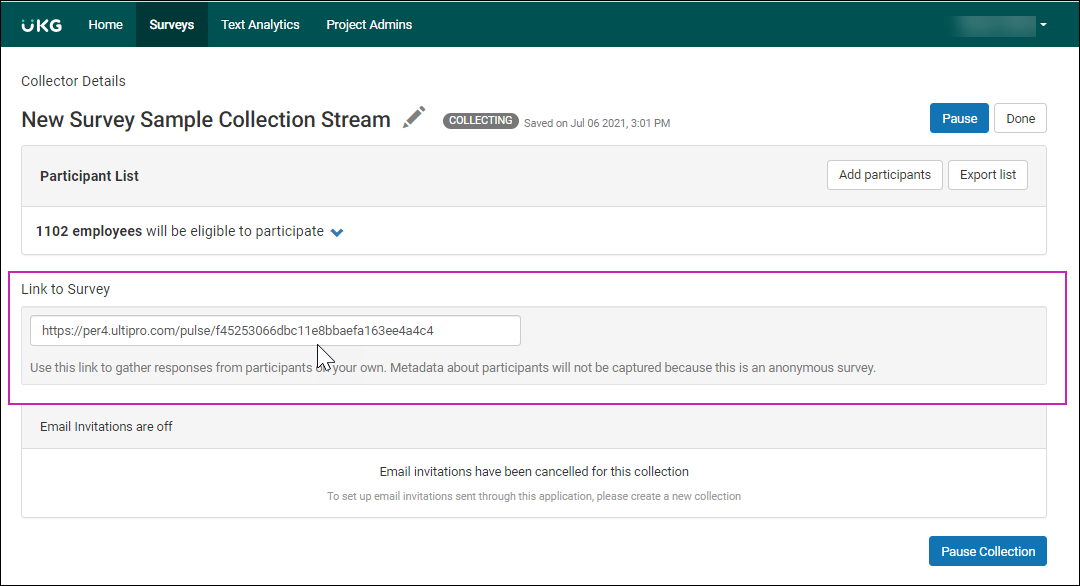
    Collector Details page of a survey. Link to Survey section displays a survey link and the warning message “Responses will not be captured until Collector is started.”
  • If the collection is configured to not require authentication, each participant receives a unique survey link that can only be used by that employee. At the Participant List section, select Export List to get a list of all recipients and their unique link.Collector Details page of a survey. Participant List section displays two buttons: Edit List and Export List.

Cancel an Invitation Email

Invitation emails can be canceled for manual collections and automatic triggered collections if your configuration uses SSO or the survey was configured to be anonymous.
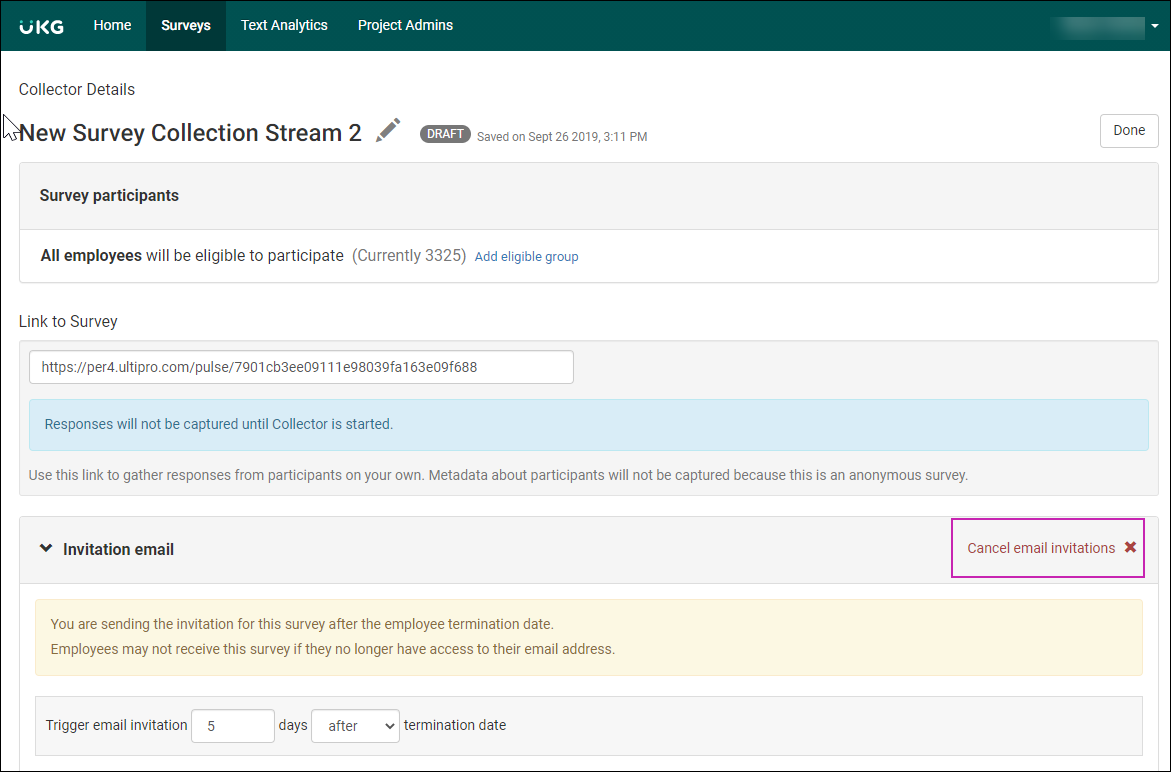
To cancel an invitation email:

Navigation:Menu > Surveys > select the survey > Collect Responses > select the collection

In the Invitation Email section, select Cancel Email Invitations.
Collector Details page of a survey. Invitation Email section displays the button Cancel Email Invitations.

Send a Reminder Email

Reminder emails can be sent to improve the survey response rate.

To send a reminder email:

Navigation:Menu > Survey > select the survey > Collect Responses > select the collection

  1. From the Collector Details page, select Add Reminder.
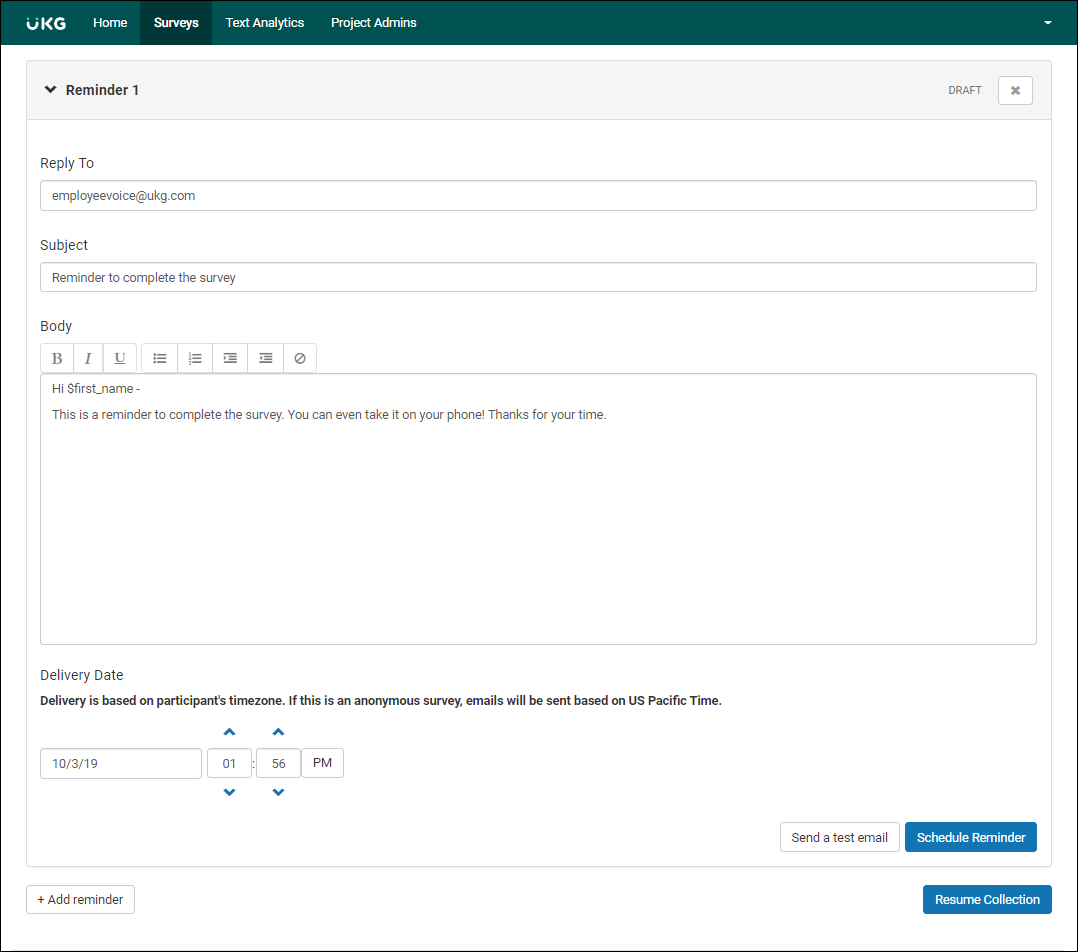
  2. From the Reminder box, enter the Reply To email address, Subject, and Body, as needed.
  3. At the Delivery Date field, enter a date and time to send the reminder.
  4. Select Send a Test Email to preview the email. From the Send a Test Email window, enter your email address, and then select Send Test Email.
  5. Select Schedule Reminder.
    Collector Details page of a survey. Reminder section displays Reply To, Subject, and Body text fields. Delivery Date field allows for date and time. There are two buttons: Send a Test Email and Schedule a Reminder.

Pause or Resume a Collection

Once a collection is started, it will continue to receive responses unless the collection is paused.

Any report using the collection continues to change as new responses are submitted. The only way to create a static report is to pause the collection.

If a collection is paused, the survey links are deactivated, and employees can no longer take the survey.

To pause a collection:

Navigation:Menu > Surveys > select the survey > Collect Responses > select the collection

  1. From the Collector Details page, select Pause.
    Collector Details page of a survey. There are two buttons: Pause and Done.
  2. To resume collection, from the Collector Details page, select Resume.

Edit a Participant List Before a Collection is Started

To edit a participant list before the collection is started:

Navigation:Menu > Surveys > select the survey > Collect Responses > select the collection

  1. In the Participant List section, select Edit List.
  2. Make changes, as needed.
  3. Select Save.
    Collector Details page of a survey. Participant List section displays two buttons: Edit List and Export List.
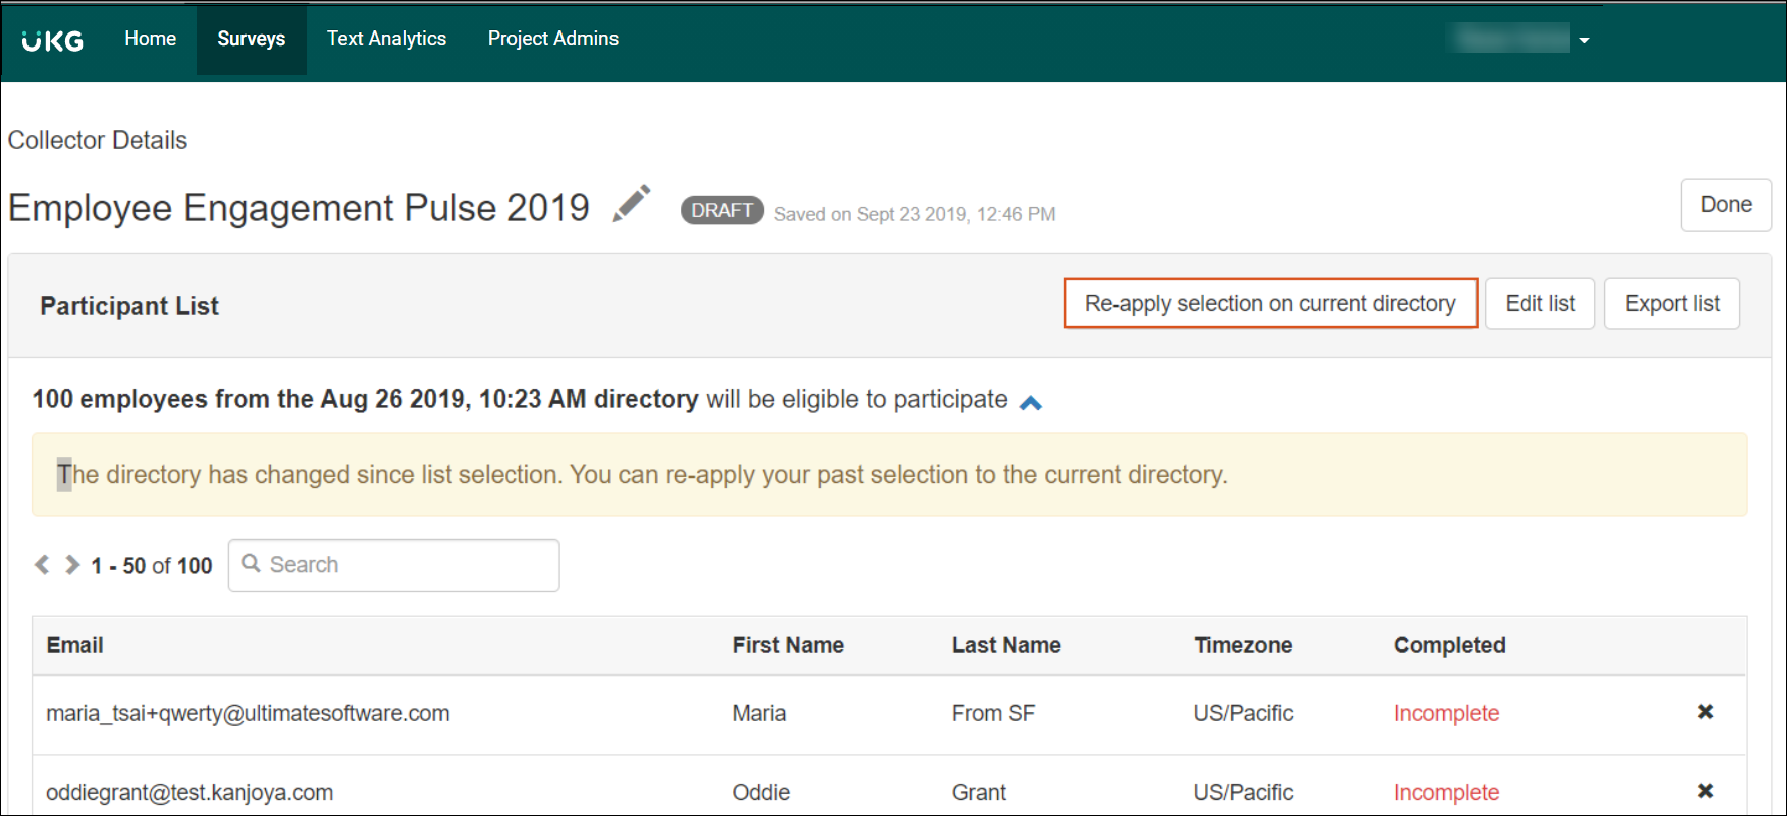
    Note If the employee directory is updated after the participant list is created, but before the invitation email is sent, the participant list does not automatically update. To update the participant list with the new employee directory, select Re-Apply Selection on Current Directory.Collector Details page of a survey. Participant List section displays three buttons: Re-apply Selection on Current Directory, Edit List and Export List.

Edit a Participant List After a Collection is Started

To edit a participant list after the collection is started:

Navigation:Menu > Surveys > select the survey > Collect Responses > select the collection

  1. From the Collector Details page, select Pause.
    Collector Details page of a survey. There are two buttons: Pause and Done.
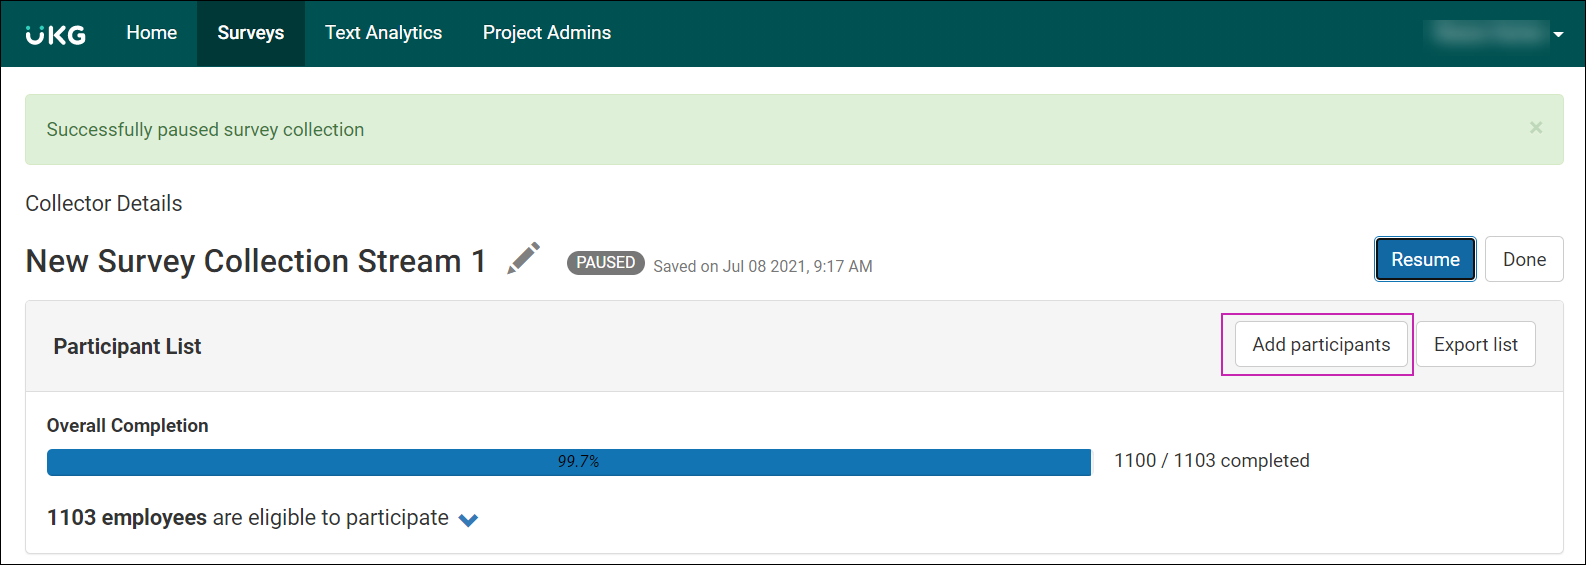
  2. In the Participant List section, select Add Participants.
    Collector Details page of a survey. Participant List section displays two buttons: Add Participants and Export List.
    (Select to play, and again to stop.)
  3. From the Select Survey Participants by Name or Email window, search for one or more employees to add.
  4. Select Confirm.
  5. Select Resume to resume collecting responses.

Reset a Participant’s Survey

Once a participant’s survey responses have been submitted, the responses cannot be changed. However, the Account Administrator can reset the participant’s survey link, which deletes the submitted responses and allows the participant to start the survey over.

To reset a participant’s survey:

Navigation:Menu > Surveys > select the survey > Collect Responses > select the collection

  1. From the Collector Details page, at the Participant List box, select the number of employees.
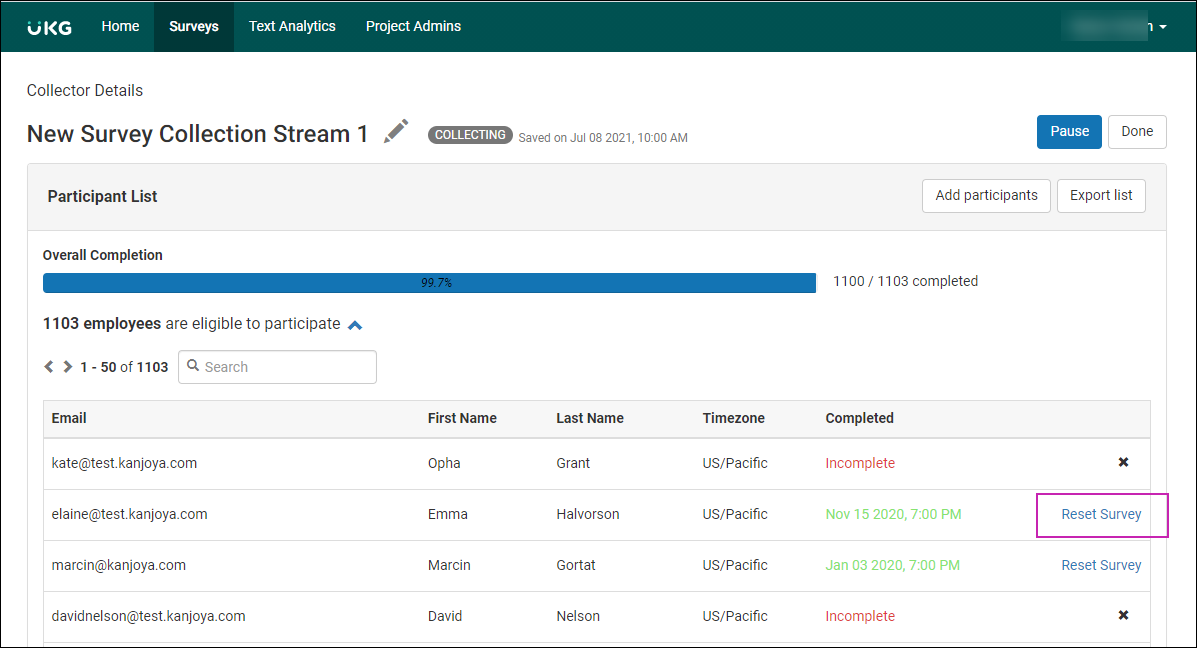
  2. For the employee you wish to reset, select Reset Survey.
    Collector Details page of a survey, Participant List section. A table displays a list of participants, including Email, First Name, Last Name, Time Zone, Completed Date and Time. Each line also includes a link to Reset Survey if the survey was completed.