Configure an Open Enrollment Session

Configuration Process

The Session Setup work event is used to configure open enrollment sessions. There are seven configuration pages in this work event.

Infographic listing the seven steps in the Session Setup work event.
  1. Define Session page: defines information about the open enrollment session, such as code, description, plan year, status, session open and close dates, the pending effective date, messaging for employees, general session settings, and more.

  2. Deduction/Benefit Groups page: defines the deduction/benefit groups eligible for the open enrollment session.

  3. Add Group page: defines the benefit and deduction stop dates for the current deductions and the benefit and deduction start dates for the new deductions for the selected deduction/benefit group.

  4. Types page: defines which deduction/benefit types will be available in the open enrollment session for the selected deduction/benefit group.

  5. Plans page: defines which deduction/benefit plans will be available in the open enrollment session for the selected deduction/benefit group.

  6. Qualifiers page: defines additional qualifying criteria that employees must meet to be eligible for the open enrollment session (in addition to qualifiers configured in the Deduction/Benefit Groups business rule).

  7. Session Summary page: enables you to review the dates, deduction/benefit types, deduction/benefit plans, benefit options, and qualifiers configured for the open enrollment session.

Note You must be assigned the Benefits Administrator role to configure an open enrollment session.
Important Before configuring an open enrollment session, complete the Pending Effective Date Estimator to determine how many open enrollment sessions are needed and the best pending effective date for each session.

Configure the Define Session Page

The Define Session page in the Session Setup work event defines information about the open enrollment session, such as code, description, plan year, status, session open and close dates, the pending effective date, messaging for employees, general session settings, and more.

Navigation:Menu > Administration > Benefits Admin > Open Enrollment Setup > Current Sessions

  1. From the Current Sessions page:
    • To create a new open enrollment session, select Add from the Actions drop-down list and select OK, or select the Add (Plus) icon.
    • To edit an open enrollment session, select the session's description.

    The Session Setup work event displays.

  2. From the Define Session page, in the Session Description session, complete the following fields.
    1. At the Code field, enter a code for the session (up to 10 characters).
    2. At the Description field, enter a description for the session.
    3. At the Plan Year field, enter the plan year.
    4. From the Status drop-down list, select one of the following options:
      • Incomplete: The session is available for editing. Only benefits administrators have access to the session.

      • Test: The session is available for testing. Only benefits administrators have access to the session.

      • Live: The session is available for employee election. All eligible employees have access to the session upon the Session Open date.

      Important Once the session status is set to Live, many of the settings in the Session Setup work event can no longer be edited. To prevent errors, you should also not make changes to the benefit related business rules after a session is set to Live.
  3. In the Dates section, enter dates for this session.
    1. At the Session Open field, enter the date when this session becomes available to employees.
    2. At the Session Close field, enter the last date the session is available to employees.
    3. At the Pending Effective Date field, enter the pending effective date as determined by the Pending Effective Date Estimator.
    Important Do not change the pending effective date after you've already saved your open enrollment session configuration.
    If you need to change the pending effective date, complete the following steps.
    1. Create a new open enrollment session.

    2. Copy the information from your existing session to the new session and enter the new pending effective date.

      (From the Define Session page, in the Template section, select the session that needs to be changed from the Choose a Previous Session drop-down menu.)

    3. Delete the session with the incorrect pending effective date.

  4. In the Template section, you can select a previous open enrollment session to use as a template. This feature pre-populates content from a previous session that you can update, as needed.
    1. From the Choose a Previous Session drop-down list, select a previous session to copy.
    2. In the Choose Items to Copy list, select the boxes for items you want to copy.
    3. Select Copy.
    4. From the Confirm Copy window, confirm the session you want to copy, and select Yes.
    5. A message appears explaining that the session may take some time to copy. Select Yes to close the message.
  5. In the Messages section, enter messages that display to employees during the open enrollment session. Messages can be customized with basic and HTML formatting and can include tables, links, images, and attachments.
    1. Employee Welcome Message: displays on the About Open Enrollment page
    2. Beneficiaries and Dependents Message: displays on the Verify Beneficiary and Dependent Information page
    3. Confirm Your Elections or Changes Message: displays on the Confirm Your Elections or Changes page.
    4. Confirmation Message: displays on the Confirmation page
    Note To remove formatting from word processing programs after pasting text into the message HTML editor, select the Clean Word Formatting button in the formatting toolbar.
  6. In the Administrator Options section, complete the following fields.
    1. From the Benefit Options Display Order By drop-down list, select how benefit options display to employees. This only applies to deduction/benefit plans that use benefit options (such as medical, dental, and vision plans).
      • Option Cost (Employee): lists benefit options from least to greatest cost

      • Option Name: lists benefit options in alphabetical order

      Medical plan in an open enrollment session. The Benefit Options section is highlighted. It shows four benefit options in order from least cost to greatest cost.
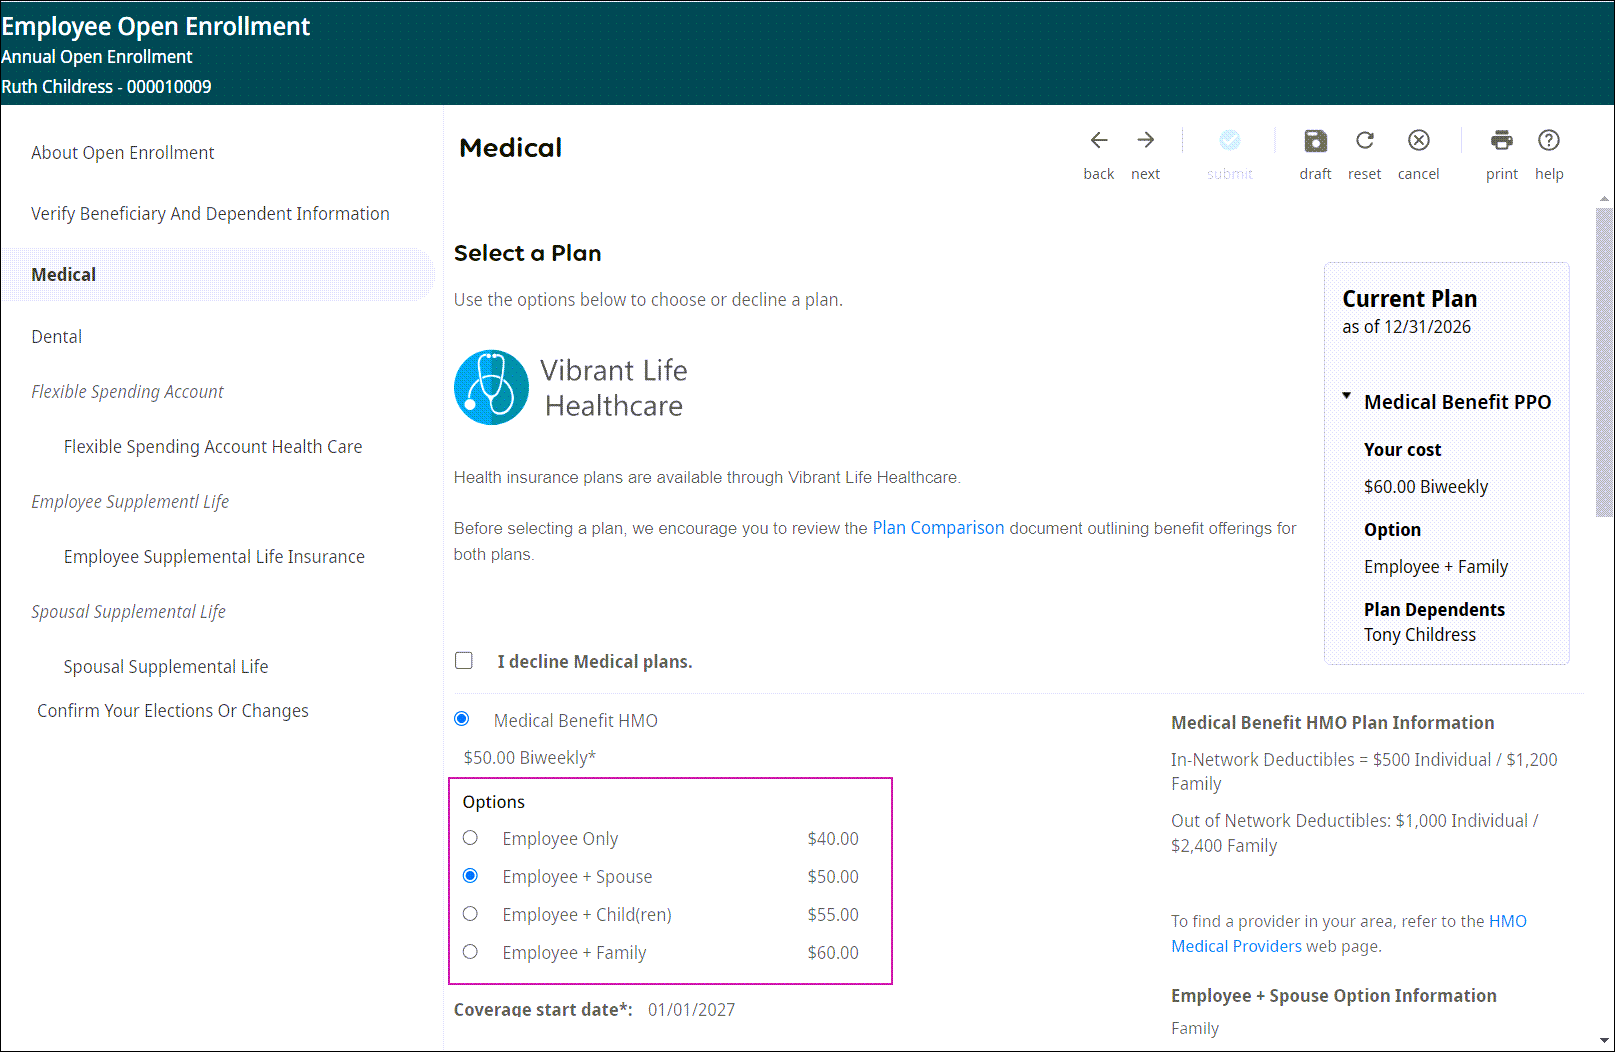
      Note If Option Cost (Employee) is selected and two benefit options have the same employee cost, the options sort alphabetically.
    2. Select the Use Existing Deduction Start Date When Re-Enrolling in a Plan box to use an employee's existing deduction start date when they re-enroll in a plan.
    3. Select the Use Existing Benefit Start Date When Re-Enrolling in a Plan box to use an employee's existing benefit start date when they re-enroll in a plan.
      Note

      This option is selected by default. We do not recommend deselecting this option unless there is a specific reason to do so. When this option is not selected, 1095-C data integrity issues can occur which can cause problems for ACA reporting.

    4. Select the Use Existing Deduction Stop Date When Cancelling an Already Cancelled Plan box to keep the existing deduction stop date when ending a plan that has already been ended for some employees.
    5. Select the Use Existing Benefit Stop Date When Cancelling an Already Cancelled Plan box to use the existing benefit stop date when ending a plan that has already been ended for some employees.
      Note This option is selected by default. We do not recommend deselecting this option unless there is a specific reason to do so. When this option is not selected, 1095-C data integrity issues can occur which can cause problems for ACA reporting.
    6. Select the Display Days Remaining in the Session box to add a message to the About Open Enrollment page that indicates how many days are remaining in the open enrollment session.

      "You currently have # days remaining to submit your elections for this open enrollment session."

      Note The message is system provided and not configurable.
    7. Select the Allow Employees to Add and Edit Beneficiaries and Dependents Within the Session box, if needed.
      • Selected: Employees can add and edit their beneficiaries and dependents from the Verify Beneficiaries and Dependents page while completing their open enrollment session.

        Changes made from the Verify Beneficiaries and Dependents page will not require approval, even if workflow approvals are configured on the Add/Change Contacts business process.

      • Not Selected: Employees can view their beneficiaries and dependents on the Verify Beneficiaries and Dependents page within an open enrollment session, but must add and edit their beneficiaries and dependents from the Contacts page in the employee record.

        Changes made on the Contacts page, may require approval before appearing in an open enrollment session, if workflow approvals are configured on the Add/Change Contacts business process.

    8. Select the Allow Employees to Modify Elections During the Active Session box, if needed.
      • Selected: After an employee submits their elections, the employee's Confirm Your Elections or Changes page displays a Modify Elections button that enables employees to modify already submitted elections during the open enrollment session window (between the session open and close dates).

      • Not Selected: The Modify Elections button does not display. However, a benefits administrator can re-open an employee's open enrollment session for them to make changes.

    9. Select the Allow Employees to Keep Existing Benefit Plan Enrollments Including Those of the FSA Type (Passive Enrollment) box to enable the Active or Passive window.
      Passive or Active window. The text above the radio buttons is highlighted.
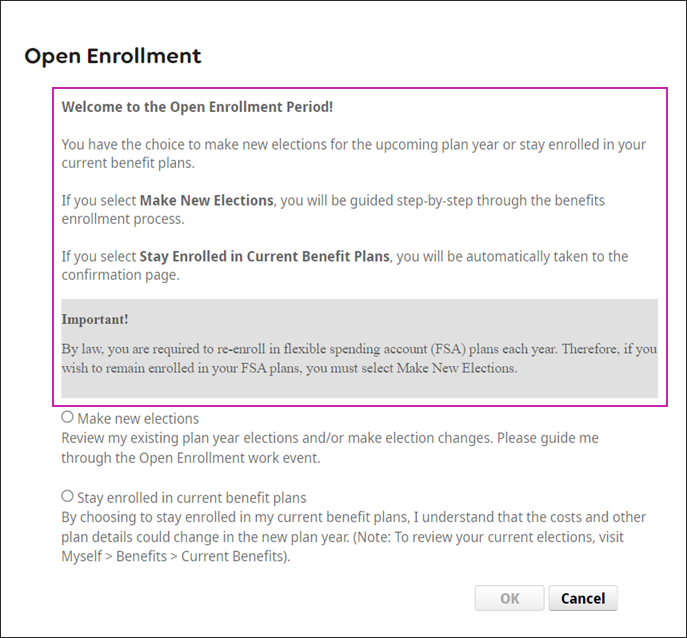
      • Selected: The Passive or Active window appears giving employees the option to make new elections or stay enrolled in their current benefits. If they choose to stay enrolled in their current benefits, they bypass the election pages and skip directly to the confirmation page.

        When this box is selected, the Passive Enrollment Message field appears in the Session Setup work event. Enter a message to display at the top of the Passive or Active window.

      • Not Selected: The Passive or Active window does not display.

      Important By law, employees are required to re-enroll in flexible spending account (FSA) plans each year.
      If you offer FSA plans and want to enable the Passive or Active window, you have two options.
      • Option 1: Configure one open enrollment session that includes all of your plans and provide clear messaging on the Passive or Active window that if they want to remain enrolled in their FSA plans, they cannot select the Stay Enrolled in Current Benefit Plans option.

      • Option 2: Configure two open enrollment sessions. One session will include your FSA plans and will not use this feature. A second session will include all of your other plans and will use this feature.

      Regardless of the option you choose, we recommend that you provide clear communication to employees so that they know that if they want to stay enrolled in their FSA plans, they must select the Make New Elections option.

  7. Select Next.

    The Deduction/Benefit Groups page appears.

Configure the Deduction/Benefit Groups Page

The Deduction/Benefit Groups page in the Session Setup work event defines the deduction/benefit groups eligible for the open enrollment session (which is how employees are assigned to the session).

Note At least one deduction/benefit group with at least one deduction/benefit plan is required to activate an open enrollment session.

Navigation:Menu > Administration > Benefits Admin > Current Sessions > Add or select a session > Next (Define Session page)

From the Deduction/Benefit Groups page:
  • To add a new deduction/benefit group, select Add.
  • To make changes to an existing group, select the group title.

The Add Group page appears.

Configure the Add Group Page

The Add Group page in the Session Setup work event defines the benefit and deduction stop dates for the current deductions and the benefit and deduction start dates for the new deductions for the selected deduction/benefit group.

Navigation:Menu > Administration > Benefits Admin > Current Sessions > Add or select a session > Next (Define Session page) > Add (Deduction/Benefit Groups page)

  1. From the Add Group page, from the Benefit Group drop-down list, select a deduction/benefit group to add.
  2. In the Stop Benefits/Deductions section:
    1. At the Stop Benefits field, enter the Stop Benefits date from the Pending Effective Date Estimator. This date is the coverage stop date for existing benefits and deductions.
    2. At the Stop Deductions field, enter the Stop Deductions date from the Pending Effective Date Estimator. This date is the deduction stop date for existing benefits and deductions.
  3. In the Start Benefits/Deductions section:
    1. At the Start Benefits field, enter the Start Benefits date from the Pending Effective Date Estimator. This date is the coverage start date for new benefits and deductions.
    2. At the Start Deductions field, enter the Start Deductions date from the Pending Effective Date Estimator. This date is the deduction start date for new benefits and deductions.
  4. Select Next.

    The Types page appears.

Configure the Types Page

The Types page in the Session Setup work event defines which deduction/benefit types will be available in the open enrollment session for the selected deduction/benefit group. You will also configure decline options and if employees are required to make an election for each type.

Navigation:Menu > Administration > Benefits Admin > Current Sessions > Add or select a session > Next (Define Session page) > Add or select a group (Deduction/Benefit Groups page) > Next (Add Groups page)

  1. From the Types page, select the box next to each deduction/benefit type that should be included in the open enrollment session for the selected deduction/benefit group.
  2. At the Display Order field, enter the sort order number to define the order the deduction/benefit types display to employees during the open enrollment session. If a display order is not designated, the types appear in alphabetical order.
    Select Save to reorder the deduction/benefit types on the Types page.
    Note If you are using plan contingencies, ensure that the type for the parent plan displays before the type for the child plan.
  3. In the Employee Election Is Required column, select the box for each deduction/benefit type that requires employee action.
    • Selected: Enrollment in deduction/benefit plans assigned to this type is required.

      In the open enrollment session, the employee must select one of the plans assigned to this type or select the option to decline the type.

      If the employee does not make a selection for this type, the Submit button is disabled and the employee will not be able to submit their elections for the session.

    • Not Selected: Enrollment in deduction/benefit plans assigned to this type is not required.

      If the employee does not select a plan assigned to this type or select the option to decline the type in the open enrollment session, they will keep their current elections.

      If the employee does not make a selection for this deduction/benefit type, they will still be able to submit their elections for the session.

  4. For each selected deduction/benefit type, check one of the following boxes:
    • Do Not Allow Decline: Employee must enroll in one of the plans assigned to this type.
    • Decline by Benefit Plan: Employee must individually decline each plan.
    • Decline by Benefit Type: Employee can decline all plans by declining the type.
    Important Ensure your decline preferences are correct before setting the status of a session to Live. Once a session is live and one employee makes an election, you cannot change these settings.
  5. Select Save.
    The deduction/benefit types are reordered.
  6. Select Next.
    The Plans page appears.

Configure the Plans Page

The Plans page in the Session Setup work event defines which deduction/benefit plans will be available in the open enrollment session for the selected deduction/benefit group. You will also configure decline options for each plan and benefit options for plans that use option rates.

Navigation:Menu > Administration > Benefits Admin > Current Sessions > Add or select a session > Next (Define Sessions page) > Add or select a group (Deduction/Benefit Groups page) > Next (Add Groups page) > Next (Types page)

  1. From the Plans page, select the box next to each deduction/benefit plan that should be included in the open enrollment session for the selected deduction/benefit group.
    Note Plans only display on the Plans page if they are assigned to one of the deduction/benefit types selected on the Types page, and the plan is assigned to the selected deduction/benefit group.
    If a plan is not available for selection on the Plans page, check the following:
    • Verify the plan is assigned to the selected deduction/benefit group in the Deduction/Benefit Groups business rule.

    • Verify the plan is assigned to one of the deduction/benefit types selected on the Types page in the Deduction/Benefit Plans business rule.

  2. At the Display Order field, enter the sort order number to define the order the deduction/benefit plans display to employees during the open enrollment session. If a display order is not designated, the plans appear in alphabetical order.

    Select Save to reorder the deduction/benefit plans on the Plans page.

    Note If you are using plan contingencies, ensure that the parent plan displays before the child plan.
  3. At the Configurable Benefit Options field, select the applicable benefit options. This field is only available for plans that use option rates.
    Note If the Configurable Benefit Options field is left blank, all benefit options assigned to the plan in the Deduction/Benefit Plans business rule will be available during open enrollment.
  4. In the Employee Can Decline Plan column, select the box for deduction/benefit plans that the employee can decline.
    Note
    • If the Allow Multiple Deductions box in the Deduction/Benefit Type business rule is selected, you can select the Employee Can Decline Plan box for one or more plans in the type.

    • If the Allow Multiple Deductions box in the Deduction/Benefit Type business rule is not selected, you can only select the Employee Can Decline Plan box for one of the plans. The plan that is selected will be recorded as the declined plan on the employee record.

  5. In the Display Deduction Start Date column, select the box to display the deduction start date to the employee during the open enrollment session for the deduction/benefit plan.
    Note When the Use Existing Deduction Start Date When Re-Enrolling in a Plan box is selected, and the employee:
    • Is currently enrolled in the deduction/benefit plan, the deduction start date from the employee's record displays.

    • Is not currently enrolled in the deduction/benefit plan, the deduction start date configured on the Deduction/Benefit Groups page of the open enrollment Session Setup work event displays.

    If the Use Existing Deduction Start Date When Re-Enrolling in a Plan box is not selected, the deduction start date configured on the Deduction/Benefit Groups page of the open enrollment Session Setup work event displays, regardless of if the employee is currently enrolled in the plan or not.

  6. Select Next.
    The Qualifiers page appears.

Configure the Qualifiers Page

The Qualifiers page in the Session Setup work event is an additional way to define which employees are eligible for the open enrollment session.

Any qualifiers configured in the Deduction/Benefit Groups business rule for the selected groups will be listed here. You can also add additional qualifiers for the open enrollment session from this page.

Only employees included in the selected deduction/benefit group, who also meet this additional qualifying criterion, are eligible for the open enrollment session.

Navigation:Menu > Administration > Benefits Admin > Current Sessions > Add or select a session > Next (Define Session page) > Add or select a group (Deduction/Benefit Groups page) > Next (Add Groups page) > Next (Types page) > Next (Plans page)

  1. From the Qualifiers page, select the Add (Plus) icon.
  2. From the Qualifier drop-down list, select a qualifier.
  3. At the Value or From and To fields, select or enter the applicable qualifier information.
    Note If the same qualifier type is used twice, an "or" relationship is implied between the qualifiers. If different qualifier types are used, an "and" relationship is implied between the qualifiers.
  4. Select Next.
    The Deduction/Benefit Groups page appears.
  5. From the Deduction/Benefit Groups page, you can add and configure another deduction/benefit group or select Next to finish configuring the session.
    If you select Next, the Session Summary page appears.

Review the Session Summary Page

The Session Summary page in the Session Setup work event enables you to review dates, deduction/benefit types, deduction/benefit plans, benefit options, and qualifiers configured for the open enrollment session.

Navigation:Menu > Administration > Benefits Admin > Current Sessions > Add or select a session > Next (Define Session page) > Add or select a group (Deduction/Benefit Groups page) > Next (Add Groups page) > Next (Types page) > Next (Plans page) > Next (Qualifiers page) > Next (Deduction/Benefit Groups page)

  1. From the Session Summary page, review the details for the open enrollment session.
    • Select Back to return to a page to make changes.
    • Select Print to print a detailed summary of the open enrollment session.
  2. Select Finish to complete the open enrollment session configuration and close the window.