Prepare Form Data Files and Manifest for Submission
Prepare Form Data Files and Manifest for Submission
ACA Forms Preparation for IRS Submission
All ACA Information Returns filed electronically with the IRS must include the Form Data File(s) that are downloaded from UKG Pro. Each Form Data File must have an accompanying Manifest file that you create.
After you download the Form Data Files from UKG Pro, the extracted Form Data Files may require additional data updates to meet IRS reporting requirements and recommendations, including, but not limited to:
- Renaming the Form Data Files (XML) (recommended)
- Applying any late-breaking IRS reporting requirements to ensure compliance
Additionally, after the Manifest file is created according to IRS requirements, the Manifest must also be updated with information specific to the associated Form Data File(s).
To edit the Form Data Files (XML) or create/edit the Manifest file, an XML editor is required.
Form Data File (XML) Naming Conventions
The Form Data File (XML) exported from UKG Pro is automatically assigned a filename that enables you to identify the associated ALE, tax year, and date and time of file generation. For filing, the IRS recommends a different Form Data File filename to easily locate the Form Data File in cases where errors must be corrected.
The transmitter is responsible for renaming the XML file based on the naming convention recommended by the IRS. Refer to the IRS publication, AIR Composition and Reference Guide, for naming convention information (Section 3.3).
| Source | File Naming Convention | Example |
|---|---|---|
| UKG Pro | A static indicator (PPACA), the ALE Name, the Tax Year, and the Date and Time (in GMT time) the file is generated | PPACA-UEL Corporate-2015-03222016063848 |
| IRS | The form type, a static indicator (Request), the Transmitter's TCC, the Date and Time (in GMT time) the transmitter submits the file | 1094C_Request_BY02G_20140101T010102000Z.xml |
Manifest File Creation and Updates
Transmitters must create and upload the Manifest file that accompanies the Form Data File (XML). All ACA Information Returns must include these two required files.
Refer to the latest versions of the following resources on the IRS.gov website for more information regarding the requirements of the Manifest file:
- Affordable Care Act (ACA) Information Returns - AIR Submission Composition and Reference Guide
- Affordable Care Act Information Returns AIR Schemas Business Rules
After creating the Manifest file, the Manifest file must be updated with required information specific to the vendor (UKG) and the associated Form Data File. These required elements include:
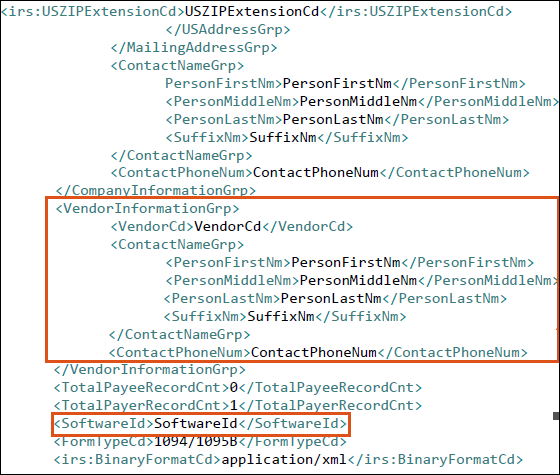
- UKG Vendor Information (VendorInformationGroup)
- UKG's Vendor ID (SoftwareId)
- The Form Data File's SHA256 Checksum (ChecksumAugmentationNum)
- The Form Data File's total byte size (AttachmentByteSizeNum)
Enter this required information in the Manifest file before filing with the IRS.
The Manifest file must also contain the UTID, which uniquely identifies the transmission. For information on the UTID, refer to the Affordable Care Act (ACA) Information Returns - AIR Submission Composition and Reference Guide (Section 3.4.2).
Required Vendor and Software ID Information for the Manifest File
The elements in the <VendorInformationGrp> section and <SoftwareId> section must be completed in the Manifest file.
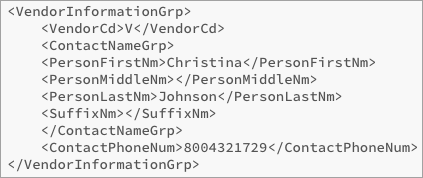
These elements relate specifically to UKG as the vendor. The UKG vendor contact is Christina Johnson; the UKG SoftwareId for the 2023 Software ID: 23A0017140.
UKG's SoftwareId is subject to change each tax year.
Use the information as follows to update the <VendorInformationGrp> section of the Manifest file.
| <VendorInformationGrp> Elements | UKG Field Values |
|---|---|
| VendorCd | V |
| PersonFirstNm | Christina |
| PersonLastNm | Johnson |
| ContactPhoneNum | 8004321729 |
Generate the Form Data File's SHA256 CheckSum for the Manifest File
The Manifest file requires the SHA256 checksum of the Form Data File. This value must be entered in the <ChecksumAugmentationNum> element, located near the bottom of the Manifest file.
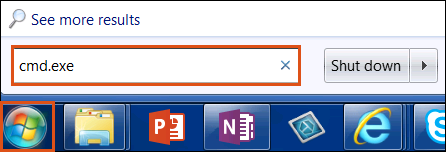
The SHA256 checksum is a unique identifier associated with actual Form Data File (XML) and it is used to verify data integrity. After you save the Form Data File to your computer, you can obtain the SHA256 checksum of the Form Data File. The steps to obtain the SHA256 checksum depend on whether you use a Windows or Mac computer.
-
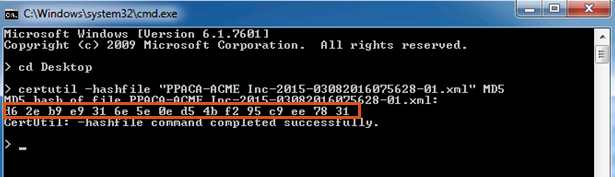
Navigate to the Windows Command Processor by selecting Start and typing 'cmd.exe' in the Search field.
-
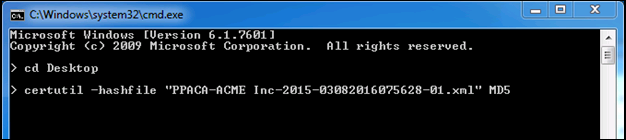
Replace FILENAME with the name of your file. The image contains an example.
-
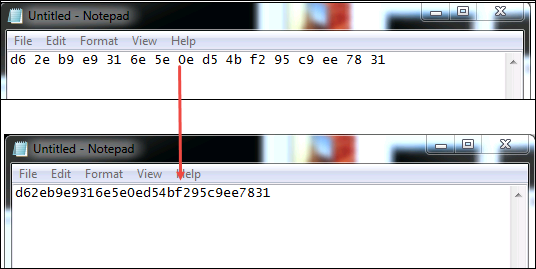
Press Enter on your keyboard. The checksum appears in the second line of the results but it has spaces in it that must be removed.
-
Copy the second line of the results by selecting the top left corner of the window and selecting Edit > Mark.
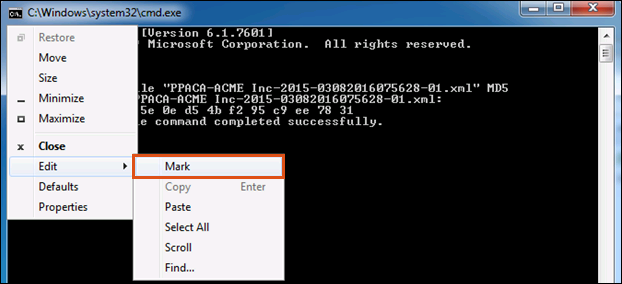
-
Remove all spaces between the numbers. The resulting value is the checksum.
Generate The Form Data File's SHA256 Checksum On A Mac Computer
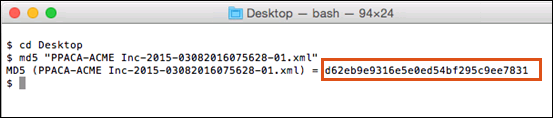
If you are using a Mac computer, follow these steps to generate the Form Data File's SHA256 checksum.
-
Replace FILENAME with the name of your Form Data File. The image contains an example.

-
Press Return on your keyboard. The checksum appears to the right of the equal sign.
Obtain the Form Data File's Byte Size on a Windows Computer
The Manifest file requires the Form Data File byte size. This value must be entered in the <AttachmentByteSizeNum> element, located near the bottom of the Manifest file.
- Copy the Form Data File (XML) to your Windows Desktop.
- Right-click on the file and select Properties. The Size field displays the total bytes in parenthesis.
- In the manifest, enter the total bytes (without commas) in the <AttachmentByteSizeNum></AttachmentByteSizeNum> element.
Obtain The Form Data File's Byte Size On A Mac Computer
If you are using a Mac computer, follow these steps to generate the Form Data File's byte size on a Mac computer.
- Copy the Form Data File (XML) to your Mac Desktop.
- Control-click on the file and select Get Info. The Size field displays the total bytes.
- In the manifest, enter the total bytes (without commas) in the <AttachmentByteSizeNum></AttachmentByteSizeNum> element.
Submit the ACA Form Data File (XML) to the IRS
The IRS website provides a UI Channel that enables a Transmitter to upload the Manifest file and the associated Form Data File.
The number of records that can be included in the Form Data File is limited to a 100-MB file size. UKG Pro generates the files below the IRS size threshold for individual upload, as needed. Through the ISS-US channel, the transmitter must provide a Unique Transmission Identifier (UTID) in the transmission's Manifest file along with the Transmission file(s).
After you upload the Manifest and transmission files successfully and the IRS validates the files, the IRS displays a Receipt ID to the transmitter. Employers use the Receipt ID to retrieve the acknowledgment after the IRS processes the transmission. The Receipt ID is used with other identifiers to uniquely identify records within a transmission.
See applicable IRS documentation for the validation process, validation failure, and error messages.
Filing Process Outline for Self-Filers
This table contains an outline of the filing process, including the original filing cycle for self-filers.
| Original Filing Cycle | ||
|---|---|---|
| Step # | Task | Description |
| Step 1 | Generate and download original Form Data File in UKG Pro | Each time the user generates a Form Data File for an ALE, new unique identifiers (submission ID and record ID) are created. IDs used in the Form Data File are not stored. |
| Step 2 | Create original Manifest file manually | Refer to the latest Affordable Care Act (ACA) Information Returns - AIR Submission Composition and Reference Guide on the IRS.gov website for more information regarding the requirements of the Manifest file. |
| Step 3 | Log into the IRS UI Channel to upload original Manifest and Form Data File | Upon successful transmission of XML, the IRS returns a Receipt ID. Maintain the Receipt ID with the transmission and protect it from loss or deletion. |
| Step 4 | Log in to UKG Pro and manually change the status to FILED on the Self-Filing and History page. | Self-filer must manually update UKG Pro with the current IRS filing status. |
| Step 5 | Log into IRS UI Channel and retrieve the status of the transmission. | Retrieve the status of the transmission. |
| Step 6 | If status is Accepted, update the filing Status on the Self-Filing and History page to Accepted. | Self-filer must manually update UKG Pro with the current IRS
filing status. No further action is needed unless an error is found or an additional record must be added to the filed ALE. (Refer to the Correction Process for Self-Filers Guide for more information.) |
| Step 7 | If the IRS status is Rejected, resubmit the file. Depending on the error, proceed with one of the options noted in the Description. | The self-filer must correct the cause of the error.
The self-filer must correct data in UKG Pro and regenerate the Form Data File. Edit the regenerated Form Data File and enter the element, OriginalUniqueSubmissionId, with the submission ID of the rejected file. |
| Step 8 | If status is Accepted with Errors, complete the Correction process to create corrected Forms to file. | Refer to the Correction Process for Self-Filers guide for more information. |
© 2023 UKG Inc. All rights reserved. For a full list of UKG trademarks, visit https://www.ukg.com/trademarks. All other trademarks, if any, are the property of their respective owners.
This document and all information contained herein are provided to you "AS IS" and UKG Inc. and its affiliates (collectively "UKG") make no representation or warranties with respect to the accuracy, reliability, or completeness of this document, and UKG specifically disclaims all warranties, including, but not limited to, implied warranties of merchantability and fitness for a particular purpose. The information in this document is subject to change without notice. The document and its content are confidential information of UKG and may not be disseminated to any third party. No part of this document or its content may be reproduced in any form or by any means or stored in a database or retrieval system without the prior written authorization of UKG. Nothing herein constitutes legal, tax, or other professional advice. All legal, tax, or other questions or concerns should be directed to your legal counsel, tax consultant, or other professional advisor. All company, organization, person, and event references are fictional. Any resemblance to actual companies, organizations, persons, and events is entirely coincidental.