Process Retroactive Payments
Retroactive Payments
The Retroactive Pay feature automatically identifies eligible employees, calculates the retroactive amount, and includes the payment on employees' pay cheques. This feature minimizes the need to calculate and apply a retroactive salary increase/decrease manually.
The retroactive pay calculation determines the difference between the employee’s new pay rate and the employee’s pay history. The calculated difference is then multiplied by the employee’s hours for the affected period. This calculation considers the employee’s rate factor, if applicable, so retroactive pay can calculate for regular or overtime hours. For salaried employees, the employee’s new per period pay rate is subtracted from the historical per period pay rate to calculate and payout the difference.
Retroactive pay does not calculate for coefficient overtime, shift differential amounts, or for employees who have changed from an hourly to a salaried job.
Retroactive pay automatically calculates after processing an employee salary change with a previous effective date. A retroactive pay transaction considers the pay periods processed after the effective date of the salary change and gathers information from the payroll history tables. A salary decrease appears as a negative retroactive pay amount.
Retroactive pay calculates using historical payroll data. If your earnings were not marked as Include In Retroactive Pay in the past, the retroactive pay does not calculate correctly. If you haven’t marked your earnings to Include in retroactive pay before now, contact your support team to update historical data.
Retroactive Payout Earnings Configuration
Before calculating retroactive pay, create a retroactive payout earnings code to use specifically for paying out retroactive payments.
For example, create an earnings code labeled RETRO – Retro Pay.

Specific earnings can be identified on an employee’s cheque by creating and assigning retroactive payout earnings. For example, you can create retroactive payout earnings for Retro Regular, Retro Overtime, and Retro Vacation. These payout earnings are used when paying out retroactive payments for the associated earnings. Assigning retroactive payout earnings to earnings codes enables you to itemize the payouts on an employee’s pay cheque.
If retroactive payout earnings are not defined, UltiPro uses the default retroactive pay earnings.
Configure Retroactive Payout Earnings
Retroactive payout earnings must be configured with various characteristics.
- Calculation rule is Flat amount
- Do not select to Include Earnings in Retroactive Pay. Do not attempt to pay retroactive amounts for retroactive payout earnings codes.
- Do not flag the Retroactive Payout earning to include in Overtime Arrears.
- Do not use a tax category with an offset deduction.
- Establish any other settings you want to apply to this earnings code, such as a per pay cheque maximum.
- Assign new earnings codes to the appropriate earnings groups.
Assign Retro Earning for Retroactive Earning Payout
When calculating retroactive payments, UltiPro includes all earnings codes configured to be include in Retroactive Pay calculations.
Verify that the correct earnings are configured to be included in retroactive pay and assign the retroactive payout earnings, if needed.
In this scenario, assign the RETR-Reg Retro earning code as the retroactive payout when Reg - Regular Pay is calculated.
- From the Earnings business rules, select your earnings.
- From the Detail step, verify the Retroactive Pay box from the Include Earnings In section. The Retroactive Pay Earnings section appears.
- Select unique Payout Earning For Retroactive Pay
- Select Save.
Enable Retroactive Pay
Retroactive payments requires a default earnings payout to apply to any earnings included in the retroactive payment without a specific payout earning defined.
Enable the Retroactive Payment feature from the Retroactive Pay Settings page.
The earnings populated in the Default payout earning for retroactive pay drop-down list adhere to these conditions:
- Earnings with a calculation rule of Flat Amount
- Earnings not flagged to include overtime in arrears
- Earnings not assigned to an offset deduction
-
Select Save.

Retroactive Pay Management
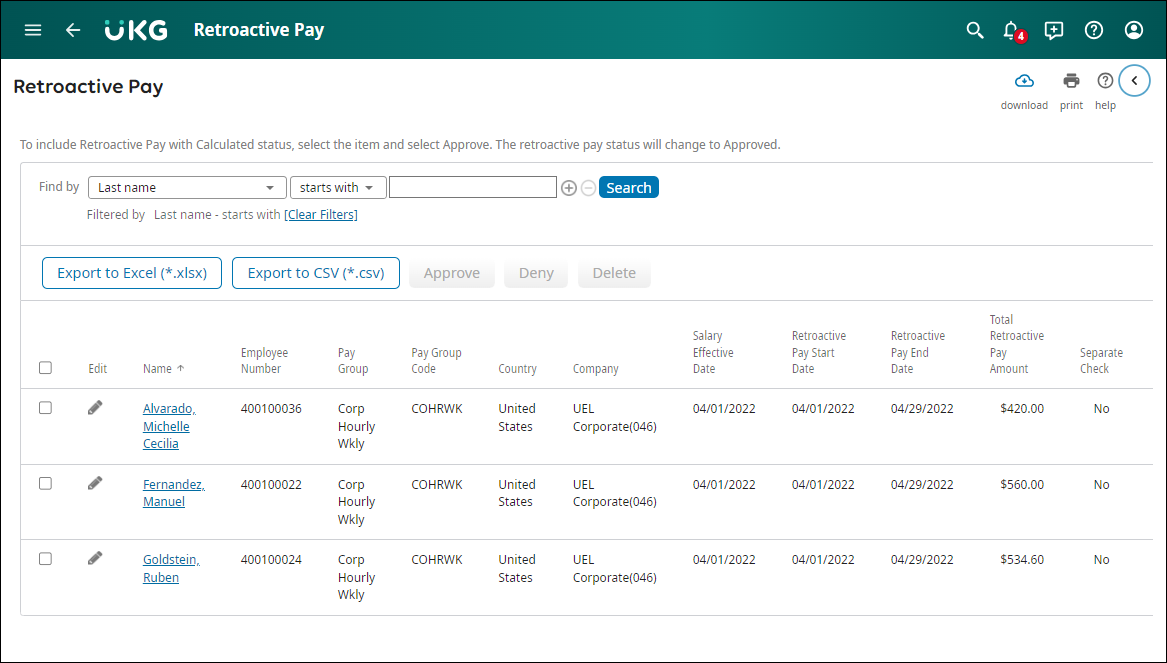
The Retroactive Pay page (Menu > Administration > Payroll Processing > Retroactive Pay) is populated with employees eligible for a retroactive payment.
There are three conditions necessary to initiate a retroactive payment transaction:
- Must complete a salary change or salary and job change work event
- Must update the employee’s salary (percent change or new rate)
- Must have a salary change effective date before the current pay period
From this page, view the employees eligible for retroactive payments and the associated retroactive pay period. If needed, export a list of retroactive payments to Excel or CSV format.
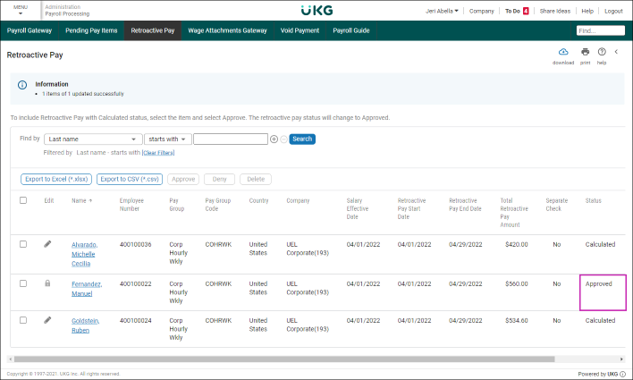
You can also Approve, Deny, or Delete a retroactive payment by selecting these actions at the top of the page. Only approved retroactive payments are available to process in payroll. Denied retroactive payments are not processed; Deleted retroactive payments are removed from this page.
If an employee's current payroll is open, then two retroactive pay records will display. One for all the pay periods prior to the current pay period with a status of Calculated and a second with a status Pending Payroll. If there are no earnings in history marked to be included in retro pay for the period then the status will be Not Qualified.
When a salary change results in a salary decrease, negative retro pay earnings display.
Retroactive Pay Options
To change the retroactive pay for an employee, select Edit (pencil icon) to view the retroactive pay options.
The retroactive pay options available include:
- Change Start Date of the retroactive period
- Change End Date of the retroactive period
- Include Retroactive Pay on Separate Cheque
The retroactive payment start and end dates are automatically populated from the effective dates of the salary change and the current payroll pay period. Changes to the retroactive pay Start Date or End Date recalculates the total retroactive pay amount and overrides any changes made on Retroactive Pay Details.
Negative Retroactive Payments cannot be paid on a separate cheque. Include Retroactive Pay on Separate Cheque option is not available when the retroactive pay is a negative amount.

Select the employee's name to view the Retroactive Pay Details page. This page provides the earnings details for each pay period affected by the retroactive salary change. The retroactive payout earnings assigned to the employee's earnings appear in the Retroactive Pay Earning column.
If no retroactive payout earning is assigned to an earning, the default retroactive payout earning is used. Only earnings flagged to be included in retroactive payments appear in this calculation.
Retroactive Pay calculates using historical payroll data. If your earnings were not marked as Include In Retroactive Pay in the past, the retroactive pay does not calculate correctly.
Retroactive Pay Details Page
The Retroactive Pay Details page displays the retroactive pay for employees and all the information associated with the original pay. If needed, you can edit the retroactive pay earning amount, start, and end dates or hours.
Edit these fields from the Retroactive Pay Details page:
- Retroactive Pay Earning Amount
- Adj Earn Period Start Date
- Adj Earn Period End Date
- Hours - The hours field is informational only and does not affect the retroactive pay amount
At the top of the page, the Total Retroactive Pay Amount is calculated from the total of individual pay earnings. This total is updated as changes are made to the retroactive payment details and saved.

Process Retroactive Pay
To pay employees' retroactive payments, verify the employees from the Retroactive Pay page have an Approved status. You can then include all approved retroactive payments in the next payroll.
Retroactive payments appear on employees' regular or additional checks during regular or off-cycle payrolls.
© 2023 UKG Inc. All rights reserved. For a full list of UKG trademarks, visit https://www.ukg.com/trademarks. All other trademarks, if any, are the property of their respective owners.
This document and all information contained herein are provided to you "AS IS" and UKG Inc. and its affiliates (collectively "UKG") make no representation or warranties with respect to the accuracy, reliability, or completeness of this document, and UKG specifically disclaims all warranties, including, but not limited to, implied warranties of merchantability and fitness for a particular purpose. The information in this document is subject to change without notice. The document and its content are confidential information of UKG and may not be disseminated to any third party. No part of this document or its content may be reproduced in any form or by any means or stored in a database or retrieval system without the prior written authorization of UKG. Nothing herein constitutes legal, tax, or other professional advice. All legal, tax, or other questions or concerns should be directed to your legal counsel, tax consultant, or other professional advisor. All company, organization, person, and event references are fictional. Any resemblance to actual companies, organizations, persons, and events is entirely coincidental.