Correction Process for eFilers
Correction Process for eFilers
Correction Process for Electronically Filed ACA Returns for E-Filers
Applicable large employers (ALEs) can use UKG Pro's correction process to correct previously filed ACA returns and file additional forms for missed individuals, when needed.
The correction process can only be initiated after original files have been transmitted electronically to the Internal Revenue Service (IRS) and the ALE filing status is Accepted or Accepted with Errors.
When the IRS, the employer, or employee finds an error after the original Form Data Files have been filed and accepted by the IRS, complete the correction process in UKG Pro to produce corrected forms.
When to Start the Correction Process for E-Filers
E-Filers must monitor the filing status on the eFiling and Form Statuses page (Reporting > ACA Manager > Filing and History). In cases of filing errors, the filing status on the page is updated automatically to Accepted with Errors.
As an E-Filer, a returned status of Replacement Requested means that the original filing was rejected by the IRS and has not been filed. Because the original filing was not accepted, a correction process is not needed at this point. Submit a case with your ACA Benefits Specialist to receive follow up instructions.
To correct and finalize the Form 1095-C and/or Form 1094-C data, you must:
- Request Federal Error Data
- Initiate the correction process for an ALE
- Create additional and/or corrected Forms 1095-C via the Offer of Coverage page or using the import templates
- Regenerate Forms 1095-C and Forms 1094-C and review
- Make any additional changes to Forms 1095-C or Form 1094-C and regenerate, as needed
- Finalize Form 1094-C
- Print and/or distribute corrected forms, as needed
- Approve the ALE for e-filing for ACA Services to file the forms on your behalf
Request Federal Error Data
To download and review your Accepted with Errors information from the IRS:
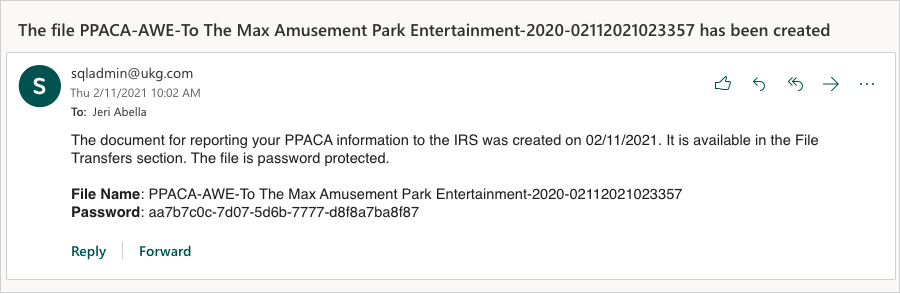
- Select Request Federal Error Data. You will receive an email when the request is
completed. The email contains a password required to open the file.
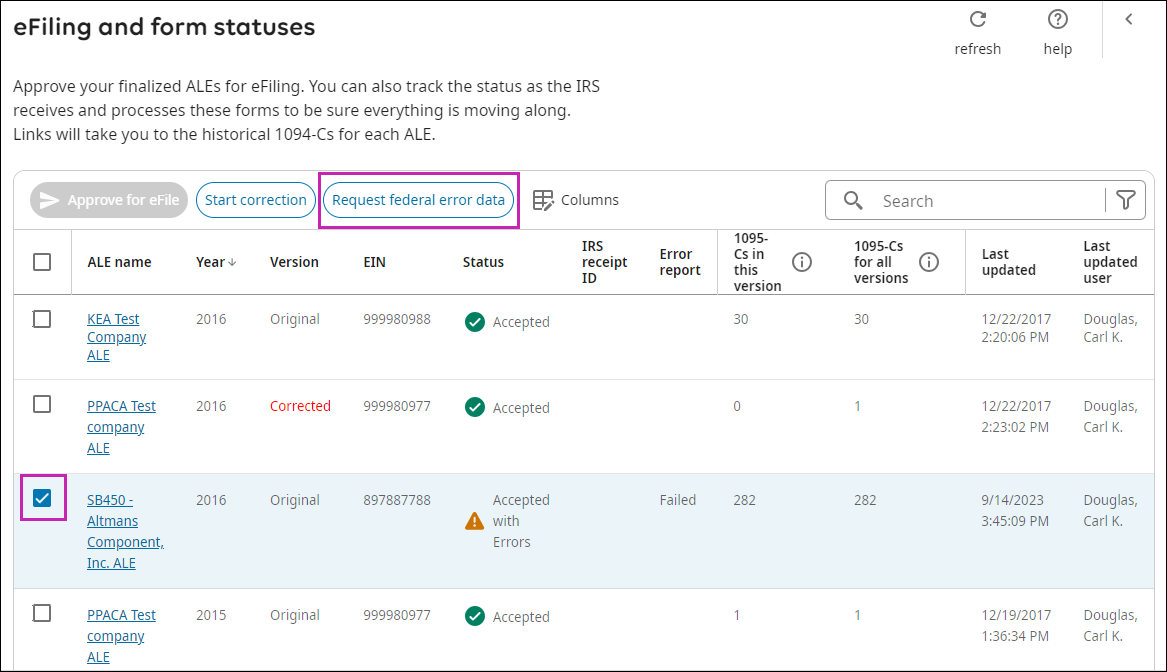
- To open the file, use the password provided in the email. The subject of the email will
display the file name. If you requested multiple ALE error files, you will receive a
separate email and password for each ALE.
Initiate the Correction Process for Form 1095-C
Administrators can correct data for previously filed returns by initiating the correction process.
To correct Forms 1094-C or 1095-C, the correction process must be started for the ALE from the eFiling and Form History page. After the correction process is started, Forms 1094-C and Forms 1095-C can be corrected. To correct a Form 1095-C, make changes directly on the Offer of Coverage page or use the Business Intelligence Import Templates option.
Be sure to monitor the status column on the e-Filing and Form Statuses page.
- From the eFiling and Form Statuses page, check the ALE Name box.
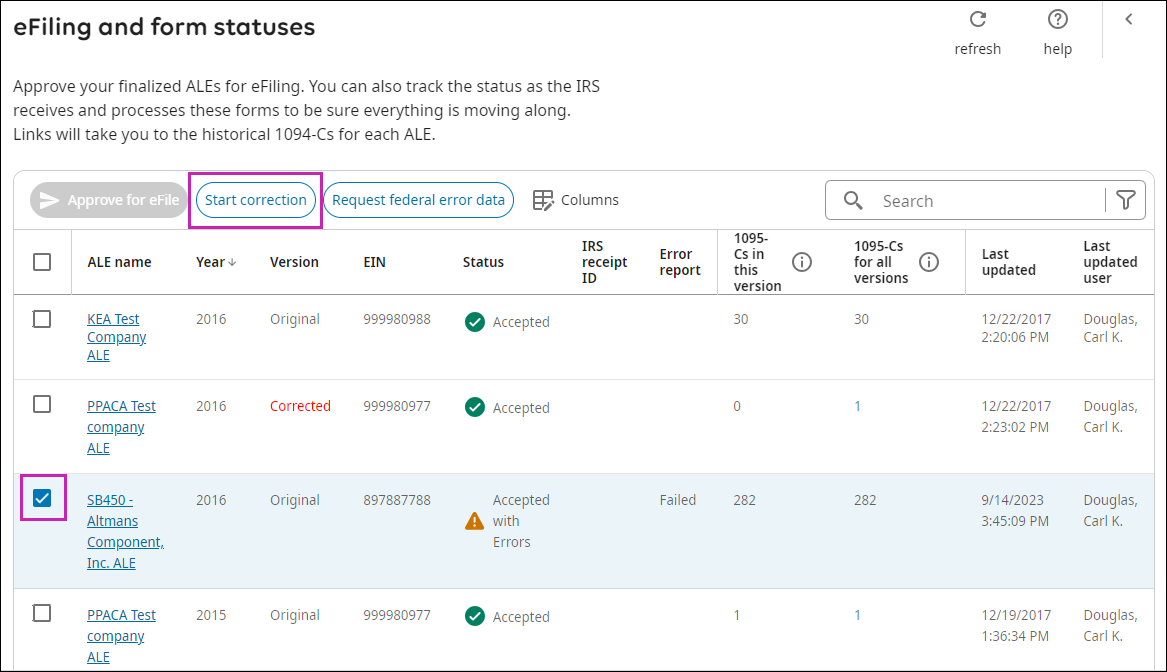
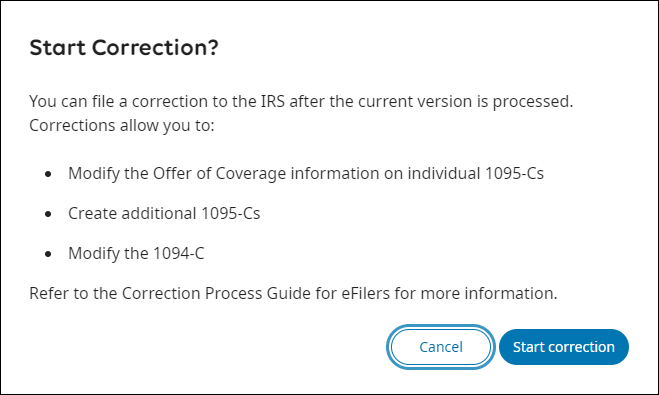
- Select Start Correction. An information message appears.
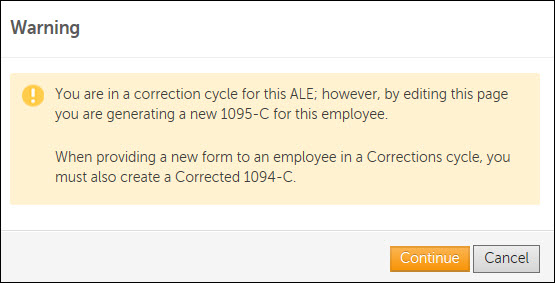
Create Additional Forms 1095-C
Create additional Forms 1095-C for employees or non-employees (not included in the original IRS filing) from the Offer of Coverage page or with the import templates. The ALE must be regenerated and finalized
The system creates an additional Form 1095-C (Not Corrected) and a Corrected Form 1094-C to update the total number of Forms 1095-C for the ALE.
-
Select Edit. A warning message appears.
Modify Form 1095-C to Correct IRS Reported Errors
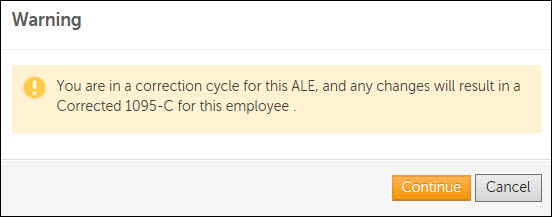
Modify Form 1095-C for employees or non-employees (who were included in the original IRS filing) from the Offer of Coverage page or with the import templates to correct IRS reported errors.
When Forms 1095-C are modified, the ALE must be regenerated and finalized.
-
Select Edit. A warning message appears.
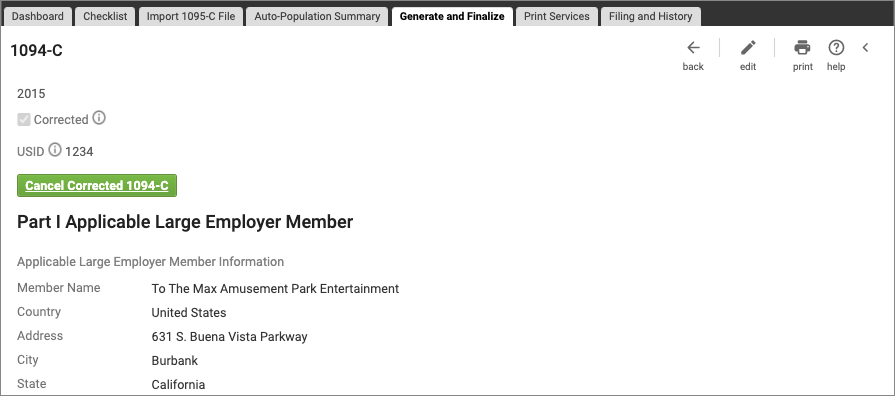
Correct Form 1094-C
Follow the steps outlined to correct Form 1094-C.
After a Correction process has been started, corrections can be made to Form 1094-C when:
- Changes are only needed to Form 1094-C.
- Changes are needed to Form 1095-C that then require changes to Form 1094-C.
- Additional Forms 1095-C are created due to the impact to the Total Numbers field on Form 1094-C.
- Select Continue. The Corrected box is checked automatically.
Generate Corrected and Additional Forms
Once data corrections have been saved, generate corrected and additional forms from the Generate and Review Forms page.
- Select the Total 1095-C's link to verify the employee and non-employee Forms 1095-C generated. Note
If you are a self-filer, you must select the Total 1095-C's link to enter the URID or USID for each corrected or additional Form 1095-C. If you engaged UKG's ACA Filing Services, this information is not needed.
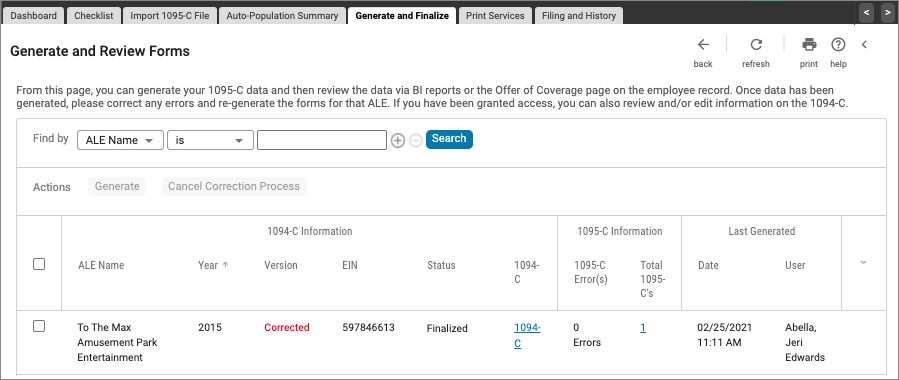
If changes are needed, you can edit the employee's Offer of Coverage page or use the import templates. Generate the forms again once changes are completed.
Cancel Corrected or Additional Forms 1095-C
During the Correction process, you can cancel additional or corrected Forms 1095-C if they are no longer needed.
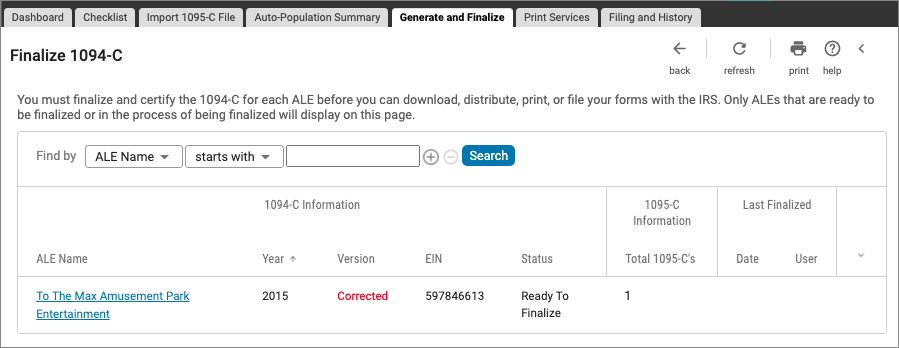
Finalize Corrected Forms
When all corrections/additions are complete, you must finalize and e-sign the corrections for the Applicable Large Employer (ALE) from the Finalize 1094-C page.
- From the Finalize 1094-C page, select the ALE name to finalize.
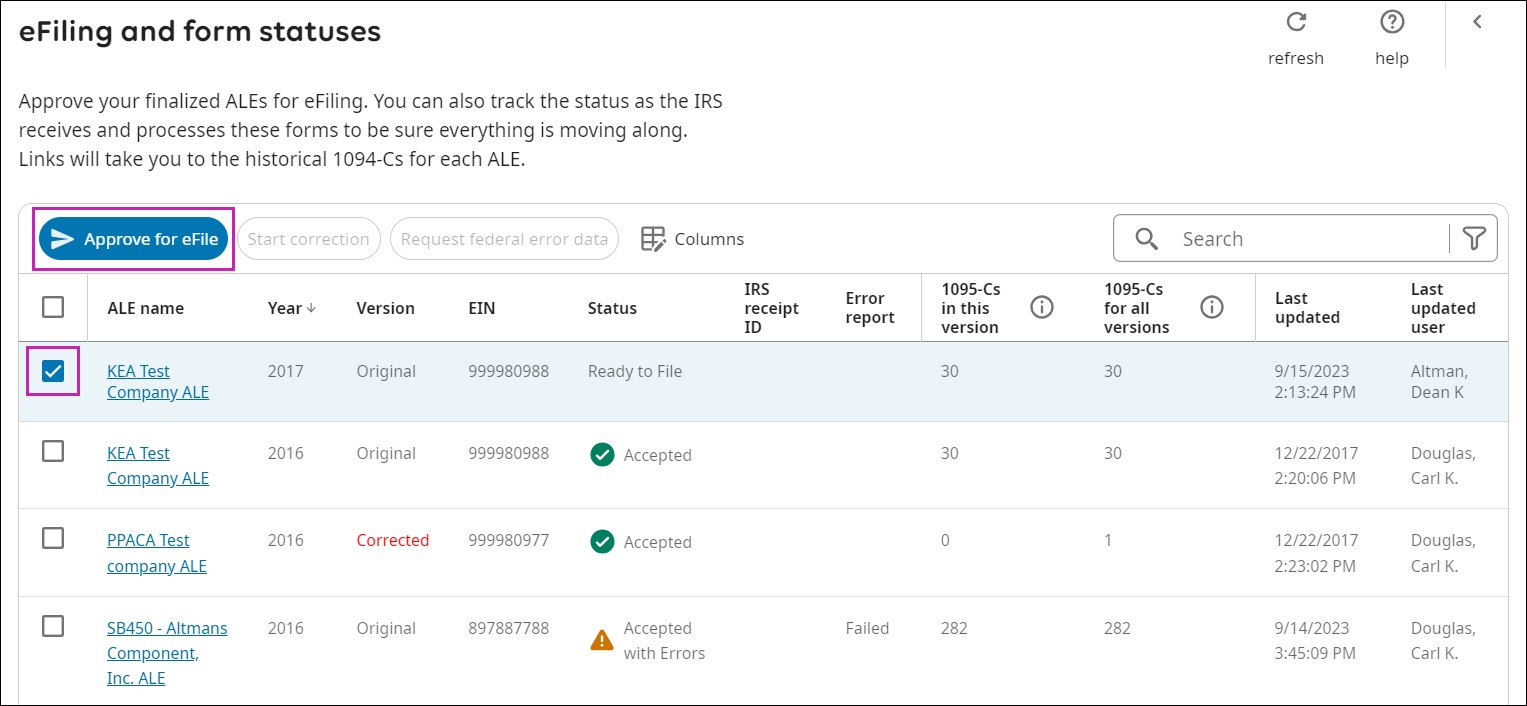
Approve for eFiling
After you have finalized either the original or corrected version of an ALE, you must approve the forms for eFiling. After forms are approved, ACA Employer Services will file the forms on your behalf.
When the status of an ALE changes to Accepted with Errors, make your corrections and approve for eFile within 45 days.
- Select Approve for eFile. The status initially updates to Pending while the file is queued for submission. Once the file is successfully queued for federal filing, the status changes to Submitted for eFiling. For a description of each eFiling status, refer to the Monitor eFiling Status Guide.
© 2023 UKG Inc. All rights reserved. For a full list of UKG trademarks, visit https://www.ukg.com/trademarks. All other trademarks, if any, are the property of their respective owners.
This document and all information contained herein are provided to you "AS IS" and UKG Inc. and its affiliates (collectively "UKG") make no representation or warranties with respect to the accuracy, reliability, or completeness of this document, and UKG specifically disclaims all warranties, including, but not limited to, implied warranties of merchantability and fitness for a particular purpose. The information in this document is subject to change without notice. The document and its content are confidential information of UKG and may not be disseminated to any third party. No part of this document or its content may be reproduced in any form or by any means or stored in a database or retrieval system without the prior written authorization of UKG. Nothing herein constitutes legal, tax, or other professional advice. All legal, tax, or other questions or concerns should be directed to your legal counsel, tax consultant, or other professional advisor. All company, organization, person, and event references are fictional. Any resemblance to actual companies, organizations, persons, and events is entirely coincidental.