Transfer Data for Integrations
Transfer Data
The Transfer Data menu item provides functions that enable you to add, edit, run on demand, schedule, and delete interfaces.
You can also monitor the status of an interface that is scheduled to run from the Monitoring tab. This menu option can be used to manage Carrier Network integrations, Employee History exports, and Employee Setup exports.
The Transfer Data menu provides two tabs:
- Interfaces - lists template descriptions for exports and their scheduled frequency with a schedule start date. Export output options are displayed for either file delivery and file transfers. Interfaces can also be run on-demand from this page.
- Monitoring - lists the exports and the date/time when last executed with the current status and informational message. The user who initiated this export name appears with their component company.
Data Transfer Interfaces Management
Manage data transfer interfaces using the Manage Interfaces page.
The information on the page includes template descriptions and whether a scheduled export is configured for file delivery and file transfers. In addition, you can delete an existing interface or run an interface session on-demand (even if the interface is currently scheduled).
If your organization is using the UKG Pro Carrier Network (UCN) for benefits integrations, UCN templates are available in the Template drop-down list. You can create an interface session for any of your UCN exports.
You can complete the following tasks from the Manage Interfaces page for interface sessions:
- View a summary list of configured interface sessions and related information
- Add or change a data transfer interface session
- Delete an existing data transfer interface session
- Run a data transfer interface session on demand
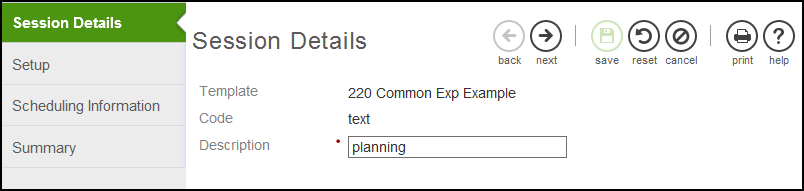
Add or Change Interface Session Details
Add or change interface session details from the Session Details page.
-
If you change an interface session, only the description can be modified from the Session Details page. The Template and Code field values cannot be modified in an existing interface session.
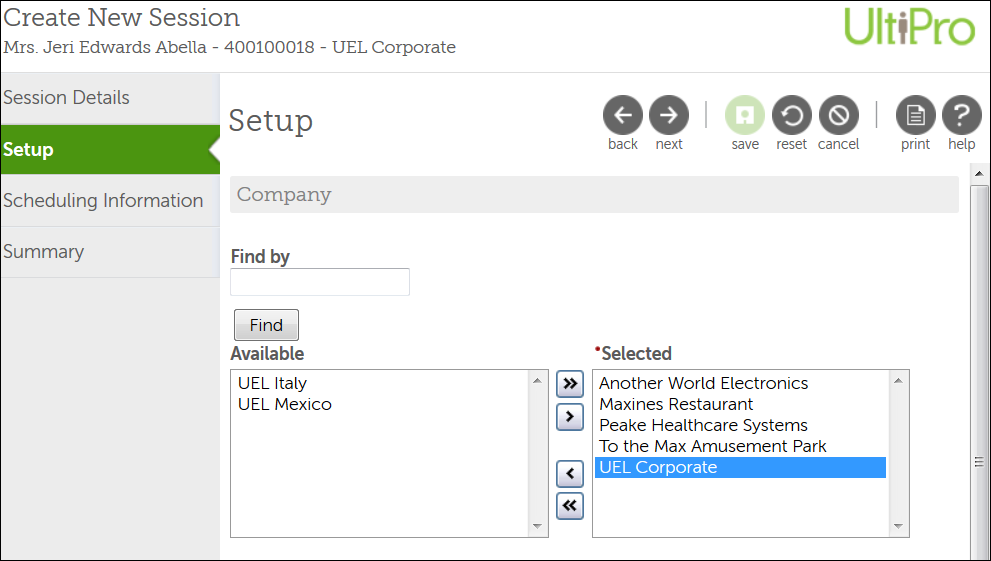
Add or Change Interface Session Setup
Add or change interface session configuration information on the Setup page.
-
Select the component companies that are included use the interface session.
-
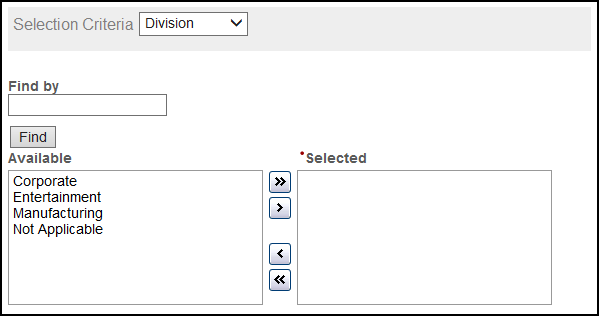
Select the criteria used for this interface session from the Selection Criteria drop-down list. Selection Criteria includes organization levels 1 through 4, pay groups, locations, job codes, and projects as defined for your organization. You can also accept the default value of None.
-
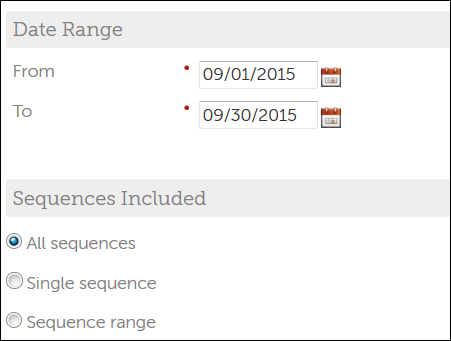
In the Sequences Included section, when your criteria is by pay group select to use all sequences, a single sequence, or a sequence range to ensure that the regular and supplemental payrolls for the selected pay groups are accurately included in the export. If your criteria is not pay group, accept the default of All Sequences.
 Note
NoteSequence numbers available are 1 through 9. Regular payrolls are assigned a sequence of 1. Supplemental payrolls, including adjustment payrolls, are assigned a sequence number from 2-9 as they are created.
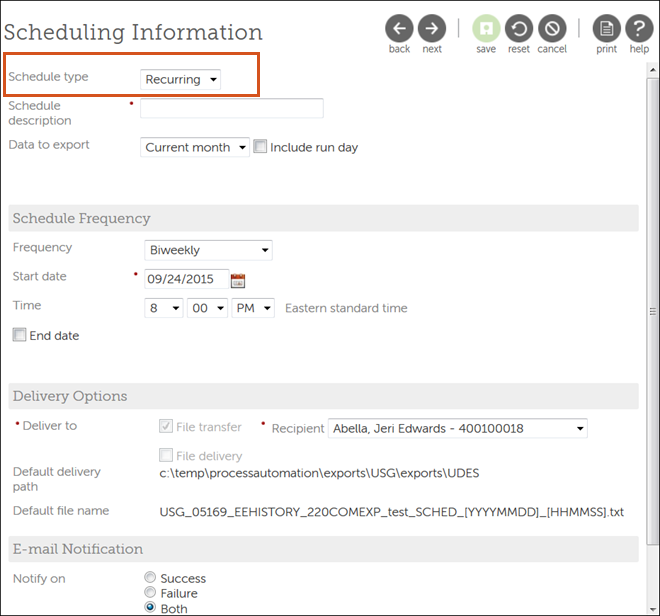
Add or Change Interface Scheduling Information
Add or change scheduling information for each interface session from the Scheduling Information page.
- Select the schedule frequency from the Schedule Type drop-down list. The Scheduling Information page updates with fields associated to the selected schedule type.
- None - allows this interface session to be run as on-demand only as often as is desired from the Manage Interface page.
- One-Time - allows this interface session to be scheduled to be run once. When the interface has run once as scheduled, on-demand access only is available unless the one-time schedule is modified. The Delivery Options section is not available. E-mail notifications to UKG Pro users are available for success and/or failure notifications.
- Recurring - allows this interface session to be scheduled on a recurring basis. The Delivery Options section is available for delivery either via File Transfer or File Delivery (requires UKG Pro Data Exchange Services - UDES to be configured). E-mail notifications to UKG Pro users are available for success and/or failure notifications.
Review and Submit Interface Session Information
Review the information entered on the Summary page.
- From the Summary page, review the information.
- Select Back to return to the applicable page and make necessary changes.
- Select Next to return to the Summary page.
- Select Save.
- View the new or changed interface session from the Manage Interfaces page.
Running Interface Session Exports
Run interface session exports from the Run page.
- From the Manage Interfaces page, select the Run icon for an interface session.
- From the Run page, select the component companies to be used in the session export.
- Select selection criteria from the Selection Criteria drop-down list.
- Enter a date range.
- Select to use all sequences, a single sequence, or a sequence range.
- Select Run.
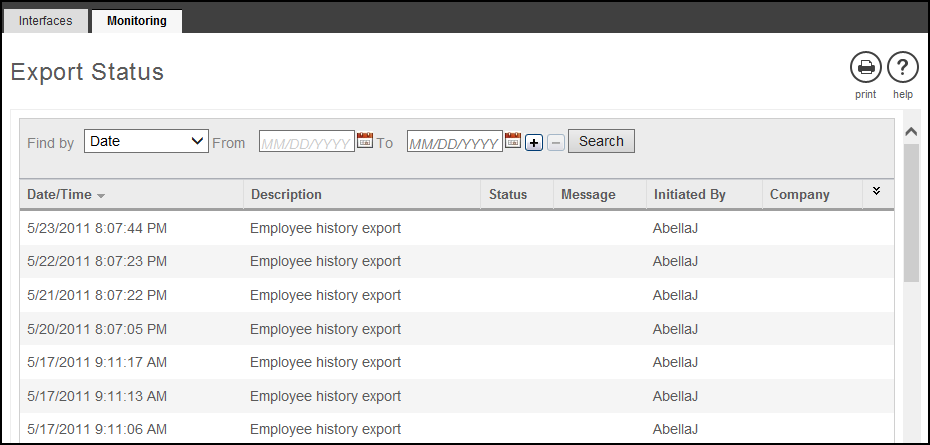
Data Transfer Interface Status
Monitor the status of interfaces that have exports scheduled from the Export Status page.
Navigate to Menu > Administration > Transfer Data > Monitoring to view the Export Status page.
The Export Status page includes the date and time the interface was run and the data exported, a description of the export, the status and an informational message. The name of the user that initiated the export and the component company of the user is included for some exports.
Use the Activity Log from Integration Studio to monitor exports for UKG Pro Carrier Network (UCN).
© 2023 UKG Inc. All rights reserved. For a full list of UKG trademarks, visit https://www.ukg.com/trademarks. All other trademarks, if any, are the property of their respective owners.
This document and all information contained herein are provided to you "AS IS" and UKG Inc. and its affiliates (collectively "UKG") make no representation or warranties with respect to the accuracy, reliability, or completeness of this document, and UKG specifically disclaims all warranties, including, but not limited to, implied warranties of merchantability and fitness for a particular purpose. The information in this document is subject to change without notice. The document and its content are confidential information of UKG and may not be disseminated to any third party. No part of this document or its content may be reproduced in any form or by any means or stored in a database or retrieval system without the prior written authorization of UKG. Nothing herein constitutes legal, tax, or other professional advice. All legal, tax, or other questions or concerns should be directed to your legal counsel, tax consultant, or other professional advisor. All company, organization, person, and event references are fictional. Any resemblance to actual companies, organizations, persons, and events is entirely coincidental.