Payroll Processing Guide
Payroll Processing Overview
Payroll Processing
Payroll processing is a multi-step process that a company uses to pay its employees. Payments include employees' salaries, bonuses, deductions, wage attachments, and taxes.
When processing a payroll, you are in control every step of the way. Whether you need to update an employee’s earnings, create an additional check, or import a time clock file, you have the flexibility to process your payrolls accurately.
There are several processes and steps available to process your payroll from start to finish:
| Process | Step |
|---|---|
| Start Payroll |
|
| Create Batches |
|
| Bring in Pay Data |
|
| Calculate Payroll |
|
| Finish Payroll |
|
| Create and Print Reports |
|
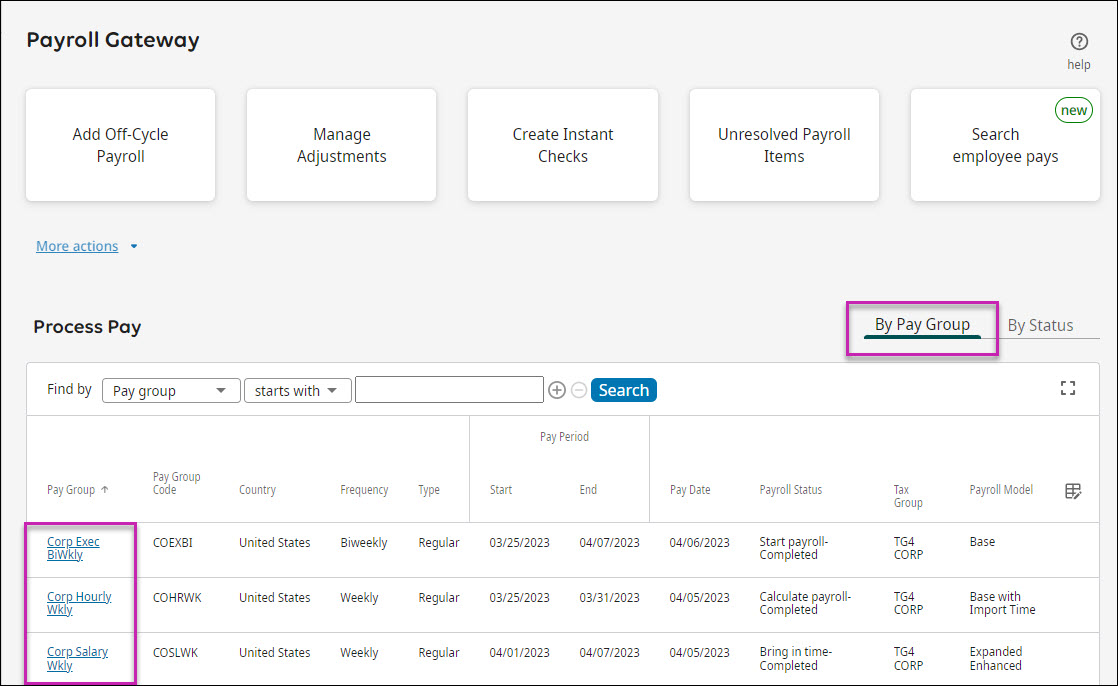
Process Payroll by Pay Group
Payroll by Pay Group
From the Process Pay section of the Payroll Gateway, use the view By Pay Group to process a single payroll at a time. When you only have a few payrolls to process, or you need to make many edits to the payroll, process the payroll by pay group.
To process a single payroll, select the pay group link from the Process Pay section. The Payroll Overview page appears.
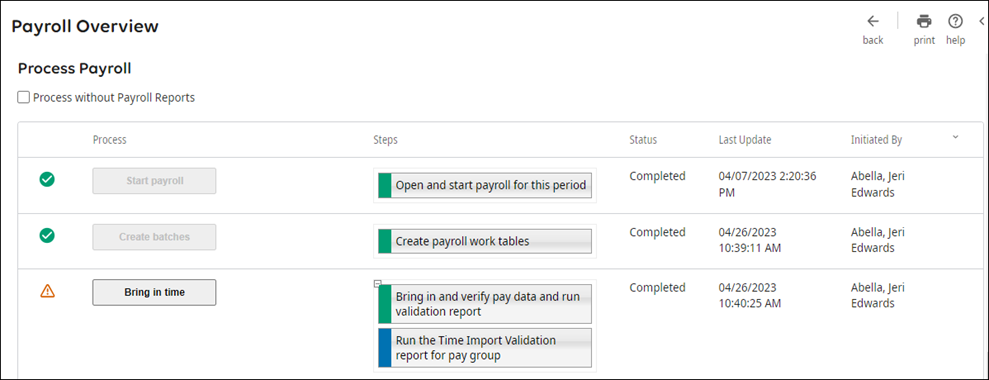
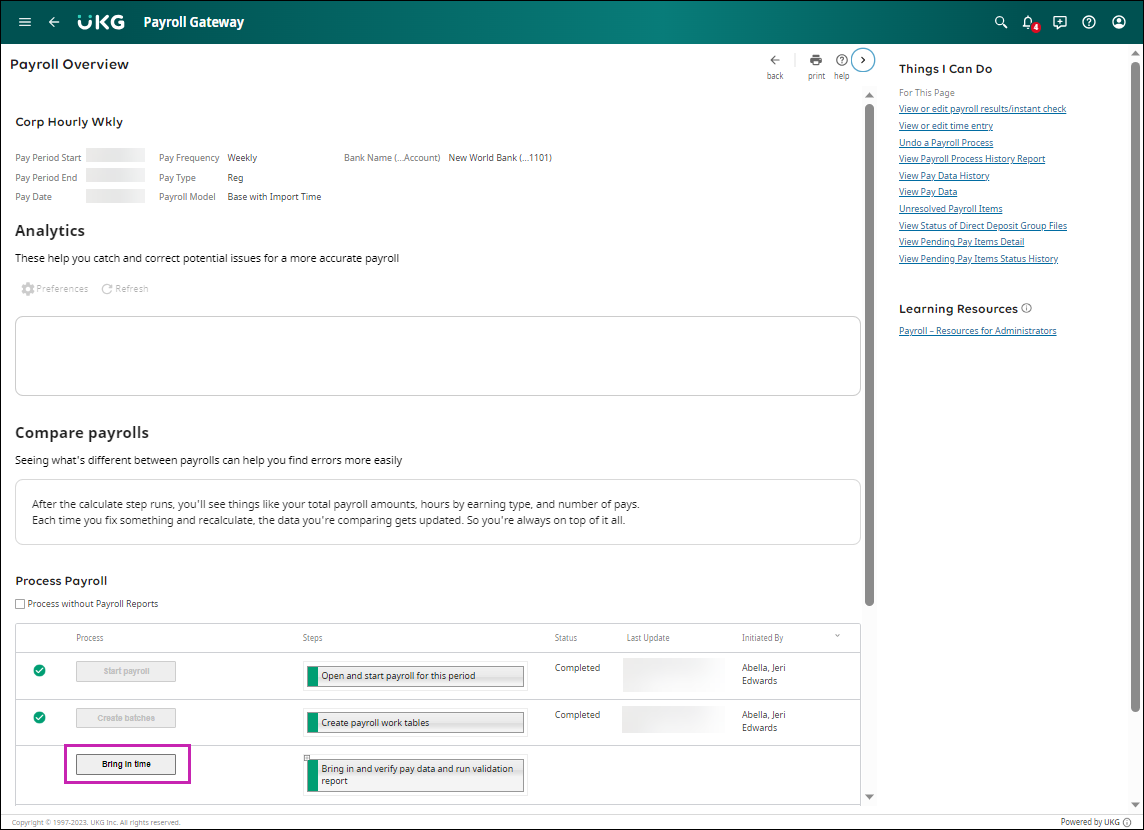
The Payroll Overview page displays important payroll information and the processes needed to run the payroll successfully. Depending on the payroll model, your payroll has a specified list of steps for processing employee payments.
As each step is processed successfully, a green check mark appears on the left side of the step. If there was a problem, a warning indicator appears next to the step, and you cannot move forward until the problem is resolved.
Employee Maintenance
Employee Maintenance
Before you open your payroll, there are several administrative tasks to perform and audit reports to review to ensure a smooth payroll process.
Complete Employee Maintenance
Before starting the payroll process, ensure that all employee maintenance is up-to-date, including:
- Hire new employees
- Submit job changes
- Submit terminations
- Submit employee company transfers
- Submit deduction/benefit changes
- Submit direct deposit changes
- Submit tax changes
- Submit pending items
- Submit pre-payroll imports
- Submit workflow approvals
- Submit updates to PTO plans
Update employee records and ensure that all permanent changes are completed before creating batches.
Submit all updates requiring workflow approval. If workflows with effective dates within the pay period are not approved before creating batches, the workflow request is not reflected in the payroll.
Complete Pre-Payroll Audits
Before beginning your payroll process, complete a payroll audit and verify your payroll and employee information.
The Payroll Gateway page provides an overview of your pay groups, pay calendar, and payroll reports. The gateway also provides direct access to complete payroll functions from the Actions buttons and the More actions links at the top of the screen.
From the Process Pay section, validate your pay group information, including:
- Frequency
- Type
- Start, End, Pay Date
- Payroll Status
- Payroll Model
Select the pay group to view the Payroll Overview page. You can complete the following:
- Edit the payroll model (the selected payroll model remains the payroll model for the pay group until it is changed again)
- Review the payroll steps and reports generated for each step (select the step’s Plus icon)
- Review the processing dates
- Review the bank assigned to this pay group
- Process payroll without generating payroll reports, if needed
Generate People Analytics reports to audit your human resource and payroll information. There are several audit reports available in People Analytics (Open Menu > Content > Team Content > UltiPro BI Content > UltiPro BI for Core HR and Payroll > _UltiPro Delivered Reports > _Workplace Custom Reports).
You may have customized reports that were created for your company. Edit this area to include company-specific reports to generate in People Analytics (Open Menu > Content > Team Content > zzzCompany Folders > (your company name) > UltiPro).
View the Pay Details for Payroll
Check your pay data before you run payroll to ensure the data appears as expected. From this page, you can also check for any discrepancies or errors found in recently close payrolls.
- Under Time and Pay Details, Select View Pay Details for Payroll.
Open Payroll
Open Payroll
Payroll settings are configured from the Start payroll step. To open your payroll, select the Start payroll step.
An employee's payroll must be open to void a payment. Only employees with an open payroll are available to select to void a payment.
-
Select the payroll options that apply:
- Direct deposits are active for this payroll - Activates direct deposit for your payroll. If this box is unchecked, the payroll does not include any direct deposit payments.
- Regular pay is active for this payroll - Activates regular pay for your employees. If this box is unchecked, regular pay is not automatically included in the payroll and no regular pay checks are created for autopaid employees.
- Compensation Management data is processed with this payroll (0 records available) - Includes salary adjustments submitted through Compensation Management. The number of available records to include in the payroll is provided in the parenthesis.
- Pending Pay Items are processed with this payroll (0 records currently available. If pending pay items are submitted before payroll work tables are created this count will change.) - Includes any submitted Pending Pay Items. The number of available records to include in the payroll is provided in the parenthesis. If Pending Pay Items are submitted after Start Payroll, there may be more Pay Items included in the payroll than reported on the Start Payroll page.
- Include approved Retroactive Pay with this payroll - Includes retroactive payments submitted through Retroactive Pay page. Only retroactive payments with an approved status are included in the payroll.
- Minimum wage validations are active for this payroll - The local minimum wage validation automatically reviews each hourly tipped employee's pay check and validates the pay rate according to statutory requirements.
Create Batches
Create Batches
Create batches copies a snapshot of your employees’ pay records and creates a temporary table for processing payroll.
All employee maintenance should be completed before this step. Once you create the payroll batch table, any changes made to an employee’s payroll data must be manually updated on the employee’s pay checks.
- All updates requiring workflow approval or Pending Pay Items must be submitted before the Create Batches step. If workflows with effective dates within this pay period are not approved before creating batches, the workflow request will not be reflected in this payroll in process.
- In some payroll models, the Bring in Time process includes PTO requests for this pay period and time for autopaid employees and occurs before the Create Batches step.
- Automatic pay is added to employees' pay for employees configured to be paid automatically.
- Scheduled earnings and deductions are added to employees' pay check for Active employees.
Bring in Pay Data
Bring in Pay Data
There are several ways to bring in employee earnings and deductions into your payroll. Once your employees' pay data is entered into payroll, calculate the payroll to reveal any exceptions.
Bring in Pay Data
Process and import pay data files to enter employee hours or amounts for your payroll. Use templates to import payroll data from an outside source to employee pay checks.
The Bring in and verify pay data steps are available according to the selected payroll model. You can bring in time and verify pay data for multiple templates. The selected template includes specific columns to import payroll data (for example, earnings hours, deduction amounts, or allocations). Before importing pay data, verify the file format and complete the following:
- Remove special characters from filenames (*!~?-&).
- Find and replace any spaces or punctuation from fields.
- Remove spaces from files except for the header row.
- Save the file as a CSV or TXT file format.
Once configured, UKG ProTime Management provides employee pay data files to import from the Bring in Pay Data step. The Time for Payroll Processing page enables you to view or delete listed Time Management files that have been uploaded (Menu > Administration > Payroll Processing > Payroll Gateway > select a pay group > Things I Can Do > View Time for Payroll Processing).
The Bring in and verify pay data and run validation report step automatically generates a Time Import Validation report for each file that is imported as well as the pay group. Review the reports from the Completed tab of the Standard Reports page (Menu > Administration > Reporting > Standard Reports > Completed). If the report is blank, there are no import exceptions.
- Confirm the filename and template in the Selected Files section.
- Select the Exceptions link, as needed, to view error details associated with the import file.
Import Pay Data Validation Tools
Multiple resources and reports are available to help you validate time import data and correct exceptions to ensure accuracy.
The following items are available to help you verify data in the import file:
| Tool Name | Description |
|---|---|
| Pay Data History Page | Accessed from the Payroll Overview page > Things I Can Do, this page provides details of the imported pay data files. This page indicates if the data has been imported successfully or if it includes exceptions. |
| View Pay Data Page | Accessed from the Payroll Overview Page > Things I Can Do, this page populates after you process the Bring in Pay Data step and then clears after you complete the Submit step. This information supplements the Time Clock Balancing report details, so both can be used to validate your pay data. Employee details appear based on your security settings. |
| Time Import Exceptions Report | Accessed from the Exceptions link on the Payroll Overview page (Menu > Administration > Payroll Processing > Payroll Gateway > select pay group), includes errors that occurred during the time clock import. If the link does not appear, there are no import exceptions. |
| Time Clock Balancing Report | Accessed from the Standards Reports page (Menu > Administration > Reporting > Standard Reports > Completed), includes a summary of all employee data that was imported via the time clock import. |
Validate Imported Pay Data
Verify the pay data Import file by checking the imported information with employee changes made since the Bring in Pay Data step was completed.
The Verify Pay Data step automatically generates two standard reports, Time Clock Import Validation and Time Clock Balancing.
- From the Payroll Overview page, select Verify Pay Data. Review the two standard reports generated for each verified pay data file.
- Select Cancel Pay Data & Lose Changes, as needed, to delete all imported earnings, deduction, and tax information. After completing this step, you can initiate the Bring In Pay Data step again.
- Select Submit Pay Data and Calculate Payroll to submit valid imported information to the payroll batches. After this step is completed, the imported data is deleted from the temporary tables.
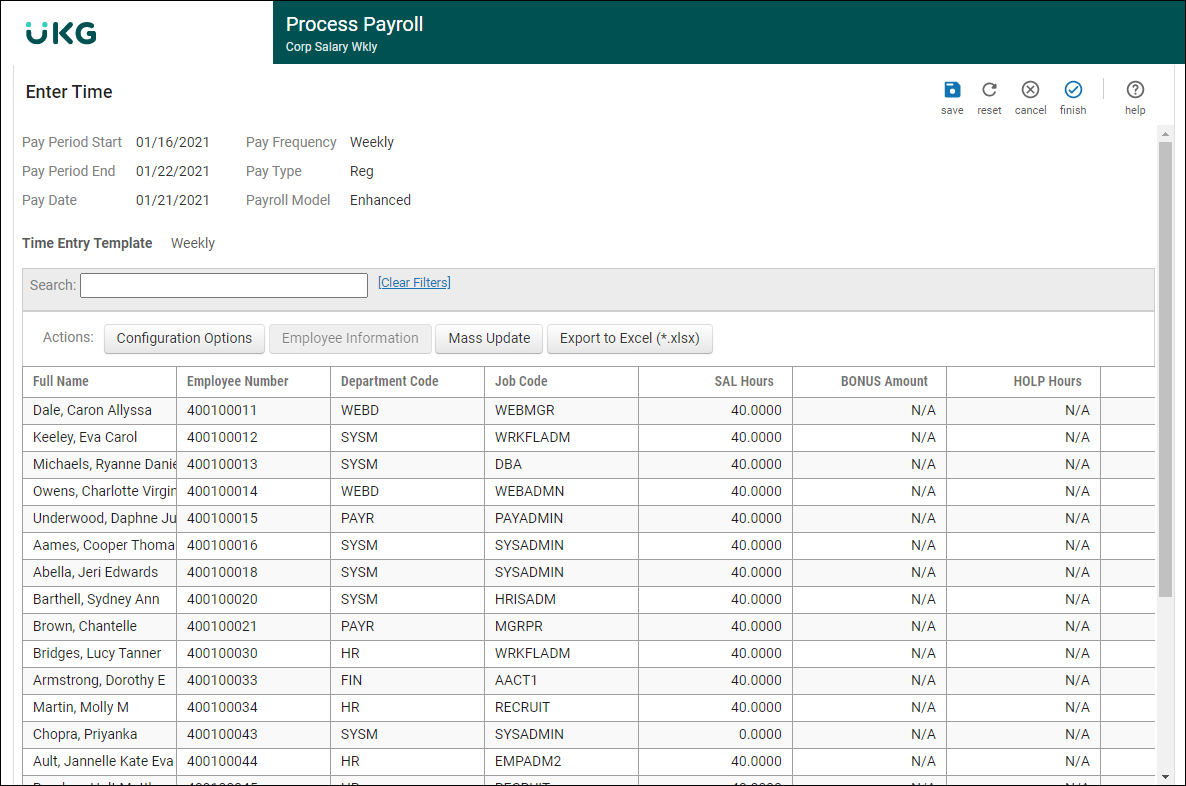
Modify Time Entry
Manually modify imported time details for employees to ensure accuracy with time entry totals and payroll-related information.
The Bring in Time and Verify Time Entry steps are available according to the payroll model. These steps bring in time for autopaid employees. Once the time is imported, review and modify the time associated with each employee in the pay group in the Time Entry section of the View or Edit Time Entry page.
The Time Entry Worksheet enables payroll processors to input and submit time (earnings, deductions, and hours worked) using a designated time entry template. The worksheet looks similar to a spreadsheet and can include rows of employee names, columns of earnings or deductions, and cells for data entry.
The Verify Time Entry step automatically generates the Web Time Entry Exceptions standard report. Review the report from the completed tab of the Standard Reports page (Menu > Administration > Reporting > Standard Reports > Completed).
- From the Enter Time page, complete the following tasks:
- Review time entry totals.
- Enter payroll information (hours, earnings, and deductions) for employees.
- Add additional checks for employees.
- Delete current time entry information.
Calculate Payroll
Calculate Payroll
Before finalizing your employees' payments, audit your employee information and enter any outstanding adjustments. The payroll is unable to finish with any exceptions or discrepancies to employees' pay checks.
Submit Pay Data and Calculate Payroll
Submit pay data to the payroll batch tables and calculate payroll.
The gross-to-net amounts are calculated for all checks in the payroll batch tables. The Submit Pay Data and Calculate Payroll step automatically generates the following standard reports:
| Report | Description |
|---|---|
| Pre-Check Exceptions | Provides an audit of the current payroll with potential issues to employee payments. Review for any inconsistencies before printing checks. If the report is blank, there are no import exceptions. |
| Payroll Edit Detail Listing | Provides information that can be used to verify that the payroll data was correctly entered or imported for the current pay period. |
| Pre-Check Detail Listing | Provides a detailed list of each employee pay information. Use this report to find data errors after finalizing payroll, but before posting information to the history tables. The report provides employee information not included in the payroll edit listings but does not provide employer information. Review the Pre-Check Summary Liability Listing report to view employer information. |
Review these reports from the completed tab of the Standard Reports page (Menu > Administration > Reporting > Standard Reports > Completed).
- From the Payroll Overview page, select Submit Pay Data and Calculate Payroll. The payroll calculates each pay's gross-to-net amounts.
- From the Available page, review the generated reports.
- As you make updates to employee payroll data, you can select Calculate payroll as many times as necessary.
Manually Modify Pays
Manual Adjustments
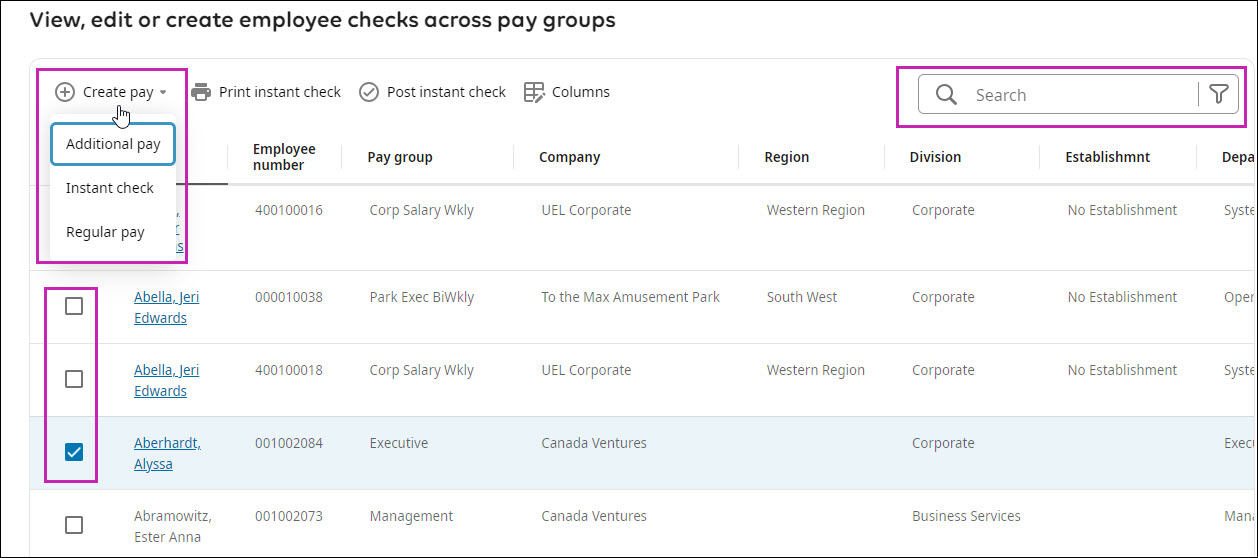
Use the View or edit payroll results/instant check page to perform additional payroll actions:
- Create, post, and print instant checks
- Modify employee pay check details (changes made directly to the Pay Detail page do not permanently update the employee's record)
- Add additional pays, such as for bonus or travel reimbursement
- Add Regular pays to employees without a regular pay check (such as terminated employee's final payment)
Instant checks are on-demand checks and can be created with or without running payroll.
Modify individual employee pays from the Pay Detail page.
If the web access rights are enabled, add eligible earnings and deductions directly to the employee's record and pay from the Pay Detail page. The Earnings or Deduction tab enables you to update employees' pay information without navigating away from the payroll. Updates made from the Earnings or Deduction tab of the Pay Detail page permanently update the employee's record.
Manually Modify Pays
You can view the payroll results to modify pay items manually, delete an item, or delete an entire pay, as needed.
Search for Employee Pays Across Pay Groups
You can leverage the Search Employee Pays Action card on the Payroll Gateway to help facilitate convenient access to your employee pay data across pay groups. From here, you can perform manual adjustments to pays.
- Select the Employee name link to manually modify the pays in the View/Change Employee Pay Check page.
 Note You can search for and view only the employees for whom you have the appropriate security access. In addition, you can add pays only for payrolls that are in progress.
Create an Instant Check from the Payroll Overview Page
Create an instant check from the Payroll Overview page.
Enter Earnings and Deductions on an Instant Check Created in the Payroll Overview Page
Complete the following steps to enter earnings and deductions data and to calculate the instant check.
Recreate a Pay for a Regular Payroll
To remove any manual changes you have made and revert to the original data on the pay, you can recreate the pay.
Manually Delete a Pay or Pay Data
You can view the payroll results to manually delete an item or an entire pay, as needed.
Run Pre-Check Audit Reports
Generate reports to audit your payroll information before closing your payroll.
- Generating the Pre-Check Calculation Errors report
- From the View or edit payroll results/instant check page, sorting your employees (Descending order) by Uncalculated or by Discrepancies
- From Things I Can Do, select Unresolved Payroll Items
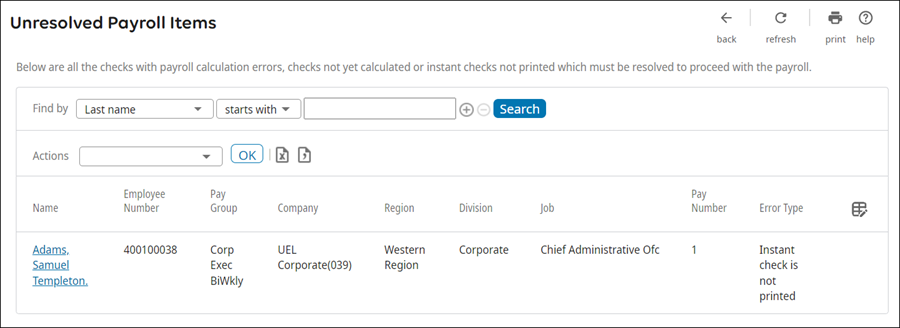
Generate and review these reports upon completion of changes to employees' pay.
Report Description Pre-Check DDA Listing Provides a listing of employees receiving direct deposits for this payroll, categorized by bank account. Pre-Check Detail Listing Provides a complete gross-to-net breakdown, detailing all earnings, taxes, and deductions, by employee. Verify several employees, especially those employees who have changes effective on this payroll. Pre-Check Exceptions Provides an audit of the current payroll with potential issues to employee payments. Review for any inconsistencies before printing checks. If the report is blank, there are no import exceptions. Pre-Check Deductions by Deduction Code Provides the current employee, employer, goal, and balance amounts for all deduction codes. Using the report filters, modify the report to include more or less deduction codes to review. Pre-Check Earnings Listing Provides a listing of all earnings paid, by code, to each employee for the current payroll. Verify the hours entered for each earnings code. Pre-Check Summary Liability Listing Provides information for UKG Pro Tax Filing and Wage Attachment Disbursement services. This report provides a total projected funding for net pays, tax, and wage attachment disbursement. Use this report to identify the total funding amount for which the company is responsible. Additionally, this report provides current payroll totals for the grouping selected. The report also provides subtotals based on the Sorting selection.
Pre-Check Summary Listing Provides a grand total of all your earnings, deductions, and taxes (including employee and employer amounts). It also provides a total for live checks and direct deposits. Employees Not Paid Edit Listing - Current Period Provides a list of active employees who have not been paid for the current pay period. Note From People Analytics, you can run the Accruals Data From Other Sources Delivered Report, which reports on accruals data from UKG Pro WFM and UKG Ready. Refer to the Accruals Data from Other Sources Delivered Report in People Analytics job aid in the UKG Community Library for instructions.Coordinate any necessary adjustments with payroll personnel: - Payroll personnel enter adjustments and recalculate payroll
- Restart notification process to appropriate site personnel approver
The appropriate site personnel can return signed copy of total page indicating approval.
Finish Payroll
Finish Payroll
During the Finish Payroll process, several steps are completed automatically as your payroll is printed, distributed, and posted to history.
Create the Direct Deposit File
Create a direct deposit file for each pay group.
The checks are paid from the same bank.
The checks belong to employees in the same pay group.
The checks share the same pay date.
Confirm receipt and totals with your bank.
Once the checks have been printed, the payroll cannot be modified.
- From the Payroll Overview page, select Print. All calculated transactions are printed, and direct deposits (DDAs) are generated. If a third party prints the DDAs, the check export files are generated.
- From the File Transfers page, review your Direct Deposit print file.
- Validate that your bank file totals balance to your Pre-Check Summary Liability Listing (specific to bank required process).
- Verify the deposit amounts using the Direct Deposit Register standard report.
Print Pay Documents
Print employee pay checks for each pay group.
The Pay Documents are available from the File Transfers page (Menu > Administration > Reporting > File Transfers). The Check Positive Pay file is available when printing live checks.
Confirm receipt and totals with your bank.
Once the checks have been printed, the payroll cannot be modified.
Post the Payroll
The Finish step posts the pay data from the temporary batch tables to the employee pay history.
- From the Payroll Overview page, select Finish payroll. The payroll information from the temporary batch tables is posted to the employee pay history.
- Review the reports generated when the payroll is posted.
Close the Payroll
Close your payroll to finish the payroll process. Once the Finish step is completed, the payroll is closed and the next scheduled payroll is now available to start.
- From the Payroll Overview page, select Finish payroll. When completed, the pay period is closed and all accumulators are updated. All scheduled export files are generated, including ACH Direct Deposit, Wage Attachments, Tax Liability, and Checks.
- From the Monitoring page, verify the status of the automated files if you do not see copies of the file.
- Notify your payroll team that wage files have been sent.
- Request the Wage Analysis report.
- Send finance funding documents within your organization.
- Communicate to your bank and provide the Direct Deposit Files, Positive Pay Files, and negative positive pay file for any voided checks.
Create and Print Reports
Create and Print Reports
After your payroll is completed, generate the audit reports, balance the payroll totals, and process your General Ledger.
Confirmation and Balancing
Balance your completed payroll and create funding documents. Run additional posted payroll audit reports, as needed.
Several reports are generated when payroll is closed. These reports are also available for Canada payrolls (the letters "CAN" appear at the end of the report names to designate Canada reports).
Review these payroll audit reports:
| Report | Description |
|---|---|
| Detail Payroll Register | Provides a listing of all transactions for the pay period. Print this report each pay period and maintain it as the hard copy audit for pay statements issued to each employee. This report does not provide employer payroll amounts. |
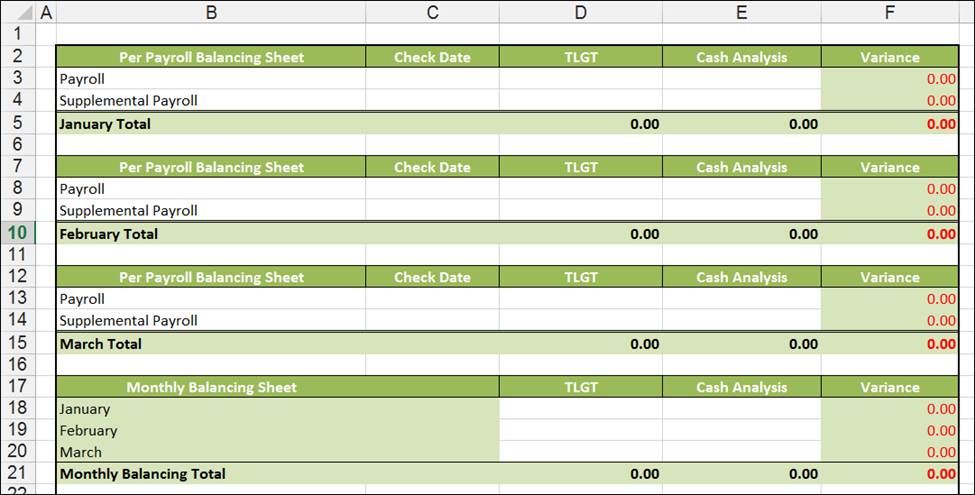
| Summary Payroll Register | Provides a grand total of the payroll's gross-to-net breakdown, detailing all earnings, deductions, and taxes for employee and employer amounts. This report should be used to reconcile the payroll with the Cash Analysis. |
| Pay Check Register | Provides those employees receiving live checks on this payroll. Includes the check number, pay date, net amount, and more. |
| Direct Deposit Register | Provides those employees receiving direct deposits on this payroll. Includes bank information and deposit amounts. |
| Detail Deductions by Deduction Code | Includes deduction subtotals, by deduction code, for the pay period or periods selected and includes information for each employee. Used for Deductions included on the Wage Attachment export. |
| Retro Tax Adjustments Reconciliation Detail | Provides list of any tax changes that are retroactively applied to previous payrolls. The liabilities from these tax changes are applied to the current processed payroll. This report should be used to reconcile with the Cash Analysis. |
| Tax Liability Grand Total | Provides the aggregate federal, state, and local tax liabilities incurred for the pay period or periods selected. Use this report each pay period to obtain the tax deposit amounts for the taxes incurred for the pay period. The report can also be run for any pay period in order to make tax deposits, balance Forms 941, and verify Forms W-2 totals. |
In addition to these reports, the following Canada post payroll reports are available:
- Negative Wage Detail (CAN)
- Pensionable and Insurable Earnings Review (PIER)
- Employees Not Paid Edit Listing (CAN)
- Tax Liability Grand Total (CAN)
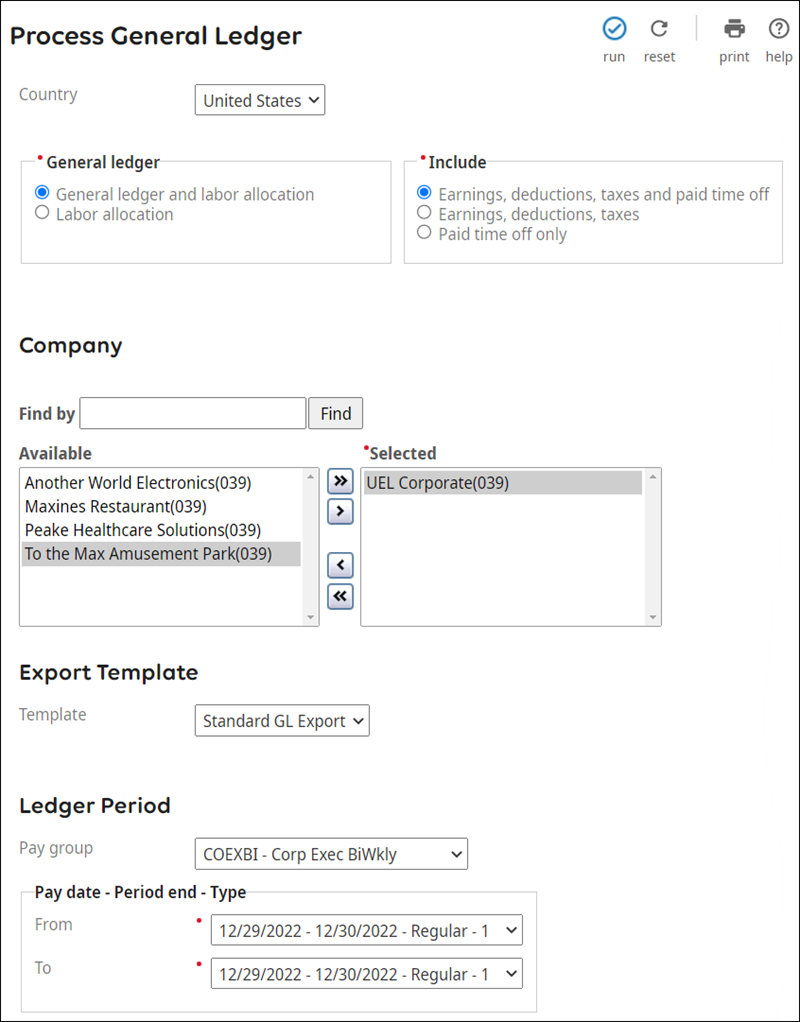
Create General Ledger and Labor Allocation Export
After your payroll is completed, create the General Ledger (GL) Report and Export Files.
After processing your General Ledger, the GL Summary Distribution and GL Summary Suspense reports appear in the Completed tab of the Standard Reports page. The GL Export file appears on the File Transfers page.
-
When an individual pay group is selected, the Pay Date - Period End - Type option appears. Select the applicable Pay Date - Period End - Type value from the drop-down list for the From and To fields.
Note
When the All value, indicating all pay groups, is selected in the Ledger Period section, enter the From and To dates for the calendar period or use the Calendar icon to select the dates.
Complete Payroll History Balancing Worksheets
Balance your payroll totals using the balancing worksheets available from the UKG Community Library.
- Year-End Payroll History Balancing Worksheet for US
- Year-End Payroll History Balancing Worksheets for Canada
- Payment Services Balancing Worksheet
Tax Filing & Wage Attachment Reporting
Balance tax filing and wage attachment reporting to validate your payroll information with Tax Filing Services.
For detailed information on Tax Filing Reports, refer to the Tax Filing Services Reports job aid in the UKG Community Library.
For detailed information on Wage Attachment Reports, refer to the Wage Attachment Services Reports job aid in the UKG Community Library.
Export Files
Export all payroll-related files to your Third Party Vendors.
- General Ledger
- Accounts Payable (A/P) data
- Benefit data
Undo a Payroll Process
Undo a Payroll Process
In certain scenarios, it is more efficient to undo a process than it is to edit individual checks. When a payroll process is undone, the process is available to run again.
- Start Payroll
- Create Payroll Work Tables
- Bring in Pay Data, Verify Pay DataNote If your payroll includes pay data from UKG Pro WFM, when you Undo the Bring in Pay Data step, the data from UKG Pro WFM remains available and you are not required to resubmit the pay data.
- Calculate Payroll
If the Cancel Pay Data & Lose Changes step is not available, the previous payroll step must be undone to remove the pay data. Any payroll process initiated after checks have been printed cannot be undone. No other changes can be made to the payroll until the Undo process completes.
Undo does not remove any of the pay group's payroll reports from the Completed Standard Reports or File Transfers pages. If payroll reports are generated upon completion of the Undo process, ensure that you are viewing the most recent versions and the correct data.
An audit report is available from the View Pay Data History page (Payroll Processing > Payroll Gateway > Things I Can Do section > View Pay Data History). This page reports the processes that were completed successfully for the pay group's selected pay period. The report shows the user who completed the process and the date of completion. Information from the Payroll Process History report can be exported in .XLS or .CSV format by selecting the format from the Actions drop-down list.
- Select the Undo option. Once the Undo process is initiated, the
status updates dynamically. If an attempt is made to undo a payroll process that cannot be
undone, a warning message appears.

Process Payroll by Status
Payroll by Status
To process payroll for multiple pay groups at the same time, use the By Status page to process several payroll processes at once.
When processing a payroll By Status, the Process Pay page provides a central area for viewing, selecting, and processing payrolls simultaneously for multiple pay groups. Each listed pay group displays the next available steps to process depending on the payroll model.
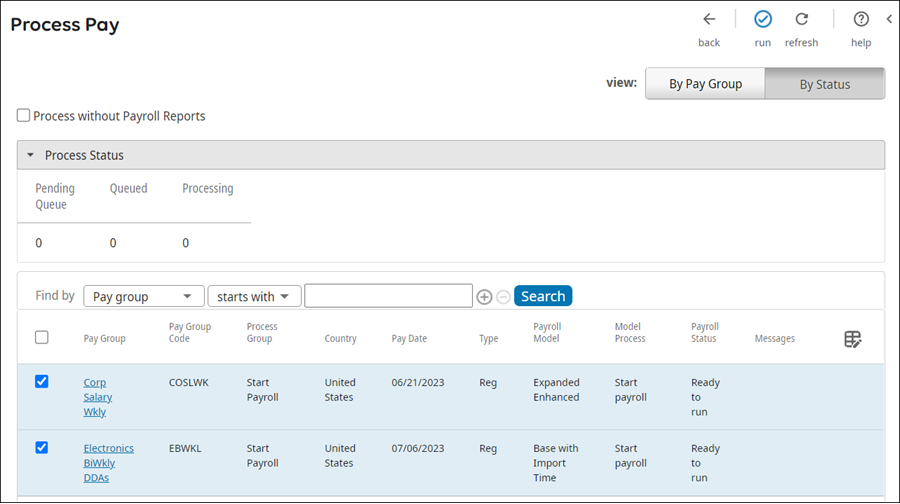
From the Process Pay page,you can:
- View and select up to 500 pay groups per page
- Search and sort pay groups according to a variety of options
- View the Process Status of running processes
- Bring in pay data for multiple pay groups
- Identify failed payroll processing and review errors before taking corrective action
The Undo Payroll Process function is only available from the Payroll Overview page and cannot be completed when processing By Status.
Based on security access given to pay groups for roles assigned to administrators, the Process by Status may or may not display all pay groups available.
Process Payroll by Status
The By Status page displays all pay groups you have access to. This page displays helpful information such as the process group, payroll model, model process, and payroll status for each pay group.
As you process multiple payrolls, you can modify and run a single process for a payroll by selecting the pay group link. The Payroll Overview page appears, enabling you to modify the payroll or run single processes, as needed.
- Select Run. This Process Group and
Model Process columns indicate which payroll process is running.
The Payroll Status column dynamically updates every 15 seconds and
indicates when a process is pending queue, queued, or processing. Select
Refresh to see the updated pay groups.
 Note
NoteDo not navigate from the Process Pay page until the processes in pending queue are complete. When Pending Queue appears as 0, you are able navigate away from the page while the rest of the queued processes continue to process.
- Once you make your selections, select Run to bring in pay data
and begin processing all selected groups.
- If you are uploading pay data files, you can select templates to import time for multiple pay groups. You can select multiple files for each pay group and for each template or import a single file using multiple templates.

© 2024 UKG Inc. All rights reserved. For a full list of UKG trademarks, visit https://www.ukg.com/trademarks. All other trademarks, if any, are the property of their respective owners.
This document and all information contained herein are provided to you "AS IS" and UKG Inc. and its affiliates (collectively "UKG") make no representation or warranties with respect to the accuracy, reliability, or completeness of this document, and UKG specifically disclaims all warranties, including, but not limited to, implied warranties of merchantability and fitness for a particular purpose. The information in this document is subject to change without notice. The document and its content are confidential information of UKG and may not be disseminated to any third party. No part of this document or its content may be reproduced in any form or by any means or stored in a database or retrieval system without the prior written authorization of UKG. Nothing herein constitutes legal, tax, or other professional advice. All legal, tax, or other questions or concerns should be directed to your legal counsel, tax consultant, or other professional advisor. All company, organization, person, and event references are fictional. Any resemblance to actual companies, organizations, persons, and events is entirely coincidental.