Enroll in a Life Event
Select a Life Event
Select a life event on the Life Events page. You can view the description, message, status, and audit information for each life event.
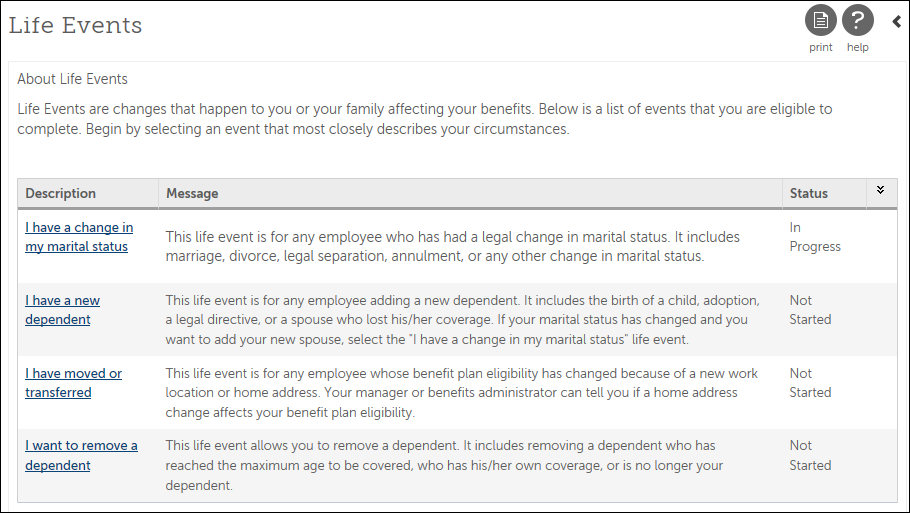
- From the Life Events page, select the Description link for the applicable life event. The About This Life Event page appears.
- Review the life event information, as needed.
Enter Life Event Information
The About This Life Event page provides specific information related to this life event. The Draft button allows you to enter and save some information now and continue the election at a later time.
- At the When Did This Happen field, enter a date for the life event, if needed.
- At the What Was the Reason field, select a reason, if needed.
- Select Next. Either the Verify Beneficiary and Dependent Information page or a required/optional plan page appears.
Verify Beneficiaries and Dependents
Verify information for employees' beneficiaries and dependents on the Verify Beneficiary and Dependent Information page. This page includes summary information for each contact name, relationship, and designation.
Enroll in a Plan
Depending on the benefit plan and deduction/benefit type, you may select one or more benefit plans. The Current Plan section displays deduction/benefit plans in which you are enrolled for the deduction/benefit type as of the current system date.
The Steps section displays the About Life Events or About Open Enrollment and Confirm Your Changes steps. A Verify Beneficiary and Dependent Information step also appears, if applicable. In cases where only a single plan can be selected for the deduction/benefit type, all plans appear on one Select a Plan page. When multiple plans can be selected for the deduction/benefit type, each plan appears on a separate page. You must select or decline each plan. For example, for the Flexible Spending Account plan type, you may select or decline dependent care or health care.
Evidence of insurability (EOI) may be required for life insurance plans. A message appears stating that evidence of insurability is required for amounts surpassing the amount the company has configured as the guaranteed issue amount for a particular plan. The maximum benefit amount that can be elected appears.
Based on the valid dependent relationships configured by your company for the Open Enrollment plan, only those dependents who match the relationship configured for the plan will appear for enrollment. For example, while you may have "spouse", "child", and "brother" configured as dependents in your contacts, the plan you are enrolling in may only have spouse and child configured as valid dependent relationships for plan enrollment.
If the plan includes benefit options, the options may be displayed in alphabetical order or by employee option cost in ascending order, depending on your company configuration.
Review and Submit Elections
Review the election information on the Confirm Your Changes page. This page contains personal information as well as the selected and declined benefits. You can compare current benefits to the newly selected benefits. Selected plan details may include covered family members, pay period cost, and beneficiaries.
- From the Confirm Your Changes page, review the selected and declined benefit type and plan details including covered family members, plan beneficiaries, and cost information.
- Return to the applicable page to complete changes, as needed.
- Select Draft to continue the election at a later time or select Submit to complete your elections now. If you select Submit, you cannot make any changes without the assistance of your Benefits Administrator.
- Select OK, the Confirmation page appears.
- Select Print to print a summary of your elections.
- Select Close.
© 2023 UKG Inc. All rights reserved. For a full list of UKG trademarks, visit https://www.ukg.com/trademarks. All other trademarks, if any, are the property of their respective owners.
This document and all information contained herein are provided to you "AS IS" and UKG Inc. and its affiliates (collectively "UKG") make no representation or warranties with respect to the accuracy, reliability, or completeness of this document, and UKG specifically disclaims all warranties, including, but not limited to, implied warranties of merchantability and fitness for a particular purpose. The information in this document is subject to change without notice. The document and its content are confidential information of UKG and may not be disseminated to any third party. No part of this document or its content may be reproduced in any form or by any means or stored in a database or retrieval system without the prior written authorization of UKG. Nothing herein constitutes legal, tax, or other professional advice. All legal, tax, or other questions or concerns should be directed to your legal counsel, tax consultant, or other professional advisor. All company, organization, person, and event references are fictional. Any resemblance to actual companies, organizations, persons, and events is entirely coincidental.