Configure the UKG Pro to NetSuite Integration Guide
Configure the UKG Pro to NetSuite Integration Guide
UKG Pro to NetSuite Integration
Using Integration Studio Designer (powered by Informatica Cloud) and Integration Events, you can configure integrations to automatically update NetSuite when your UKG Pro general ledger is run.
To use this solution, you must have access to a NetSuite user that has Web Services enabled and has access to Informatica Cloud. For information on configuring Informatica Cloud to access your data, review the Get Started with Integration Studio Designer guide available in the UKG Community Library.
Informatica Cloud, provides in-depth documentation for the NetSuite integration. Access Informatica's documentation for the NetSuite connector titled at the following URL: https://community.informatica.com/docs/DOC-4340.
Before configuring your integration with NetSuite, it’s important to review and understand the setup of UKG Pro’s GL distributions and NetSuite’s journal entries. Mapping data from UKG Pro is easier if the results of UKG Pro's GL distributions match the NetSuite account.
For this integration, NetSuite recommends a maximum 1,000 journal line items for import.
NetSuite Integration Configuration Steps
There are four main tasks to complete to configure the UKG Pro to NetSuite Integration.
- Step 1: Prepare NetSuite for integration:
- Sync UKG Pro GL codes with NetSuite codes via .CSV import.
- Step 2: Complete configurations in Informatica Cloud to define how GL data is to be sent
from UKG Pro to NetSuite:
- Configure the UKG Pro and NetSuite connections.
- Migrate the GL for Migration data mapping from the UKG Informatica Cloud organization to your suborganization.
- Configure the GL for Migration data mapping to meet your needs.
- Create the GL mapping configuration task.
- Step 3: Configure UKG Pro to activate the NetSuite integration:
- Configure NetSuite Settings.
- Subscribe to the General Ledger Integration Event and attach the GL mapping configuration task.
- Step 4: Run the first GL and monitor the NetSuite integration.
These main tasks cover how to integrate your UKG Pro GL data with NetSuite. You can also configure UKG Pro employee demographic data to integrate with NetSuite. There is a pre-configured data mapping available to help you configure this integration as well. Refer to the Configure Data Mapping for Netsuite Employee Demographic Integrations job aid for configuration steps.
NetSuite .CSV File Import
To sync data between UKG Pro and NetSuite, NetSuite must be able to match UKG Pro IDs and codes with its own IDs and codes. You can associate UKG Pro codes with NetSuite codes via NetSuite’s .CSV import functionality.
Examples of data that may need to be synced between the two systems include GL Chart of Accounts, employee IDs, and location codes.
There are four steps required to use the .CSV import functionality to sync the NetSuite Chart of Accounts to the UKG Pro Base Accounts
- Step 1: Export the Base Account codes from UKG Pro.
- Step 2: Export the Chart of Accounts from NetSuite.
- Step 3: Create the .CSV file that specifies how the codes from UKG Pro match the codes in NetSuite.
- Step 4: Import the .CSV file into NetSuite.
These steps cover how to create the .CSV to sync the data for the NetSuite Chart of Accounts. You can create and import additional .CSV files as needed (for example, for Employee IDs and Locations Codes).
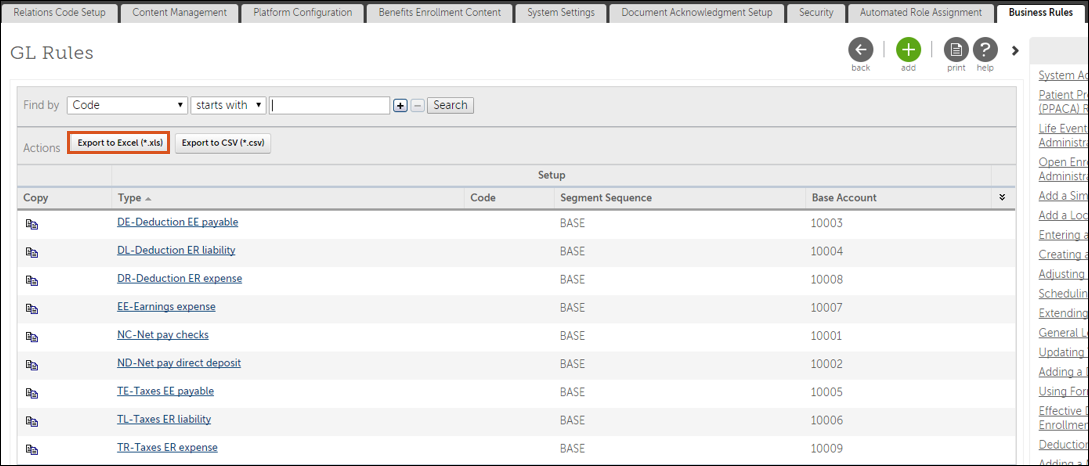
Export the Base Accounts from UKG Pro
To create the .CSV file for import into NetSuite, you must export the related Base Accounts from UKG Pro.
-
Select the Export to Excel (*xls) button to export the Base Accounts to Excel.
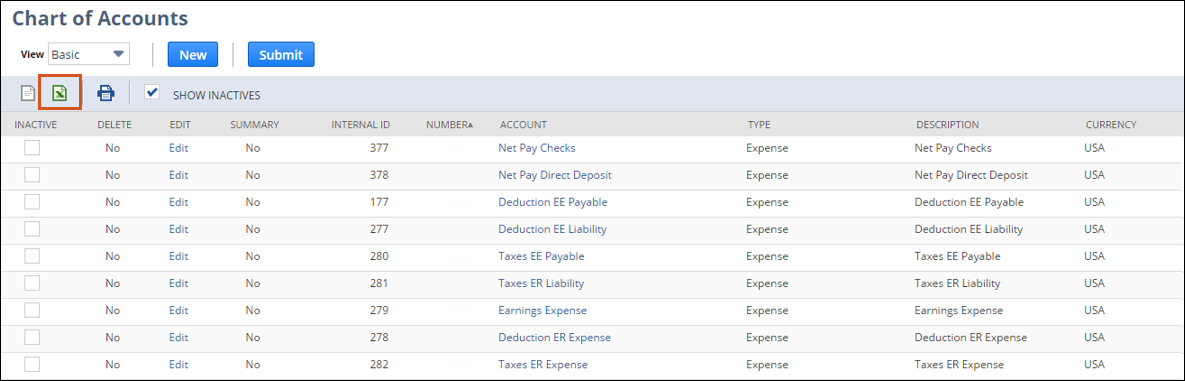
Export the Chart of Accounts from NetSuite
To create the .CSV file for NetSuite, you must export the Chart of Accounts from NetSuite.
-
Select the Excel icon to export the Chart of Accounts to Excel.
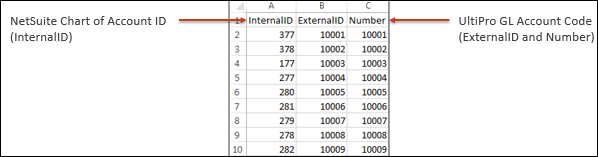
Create the .CSV Import File for NetSuite
The .CSV import file defines how the data from UKG Pro relates to the data from NetSuite.
-
Save the Excel file as a CSV (comma delimited) file.
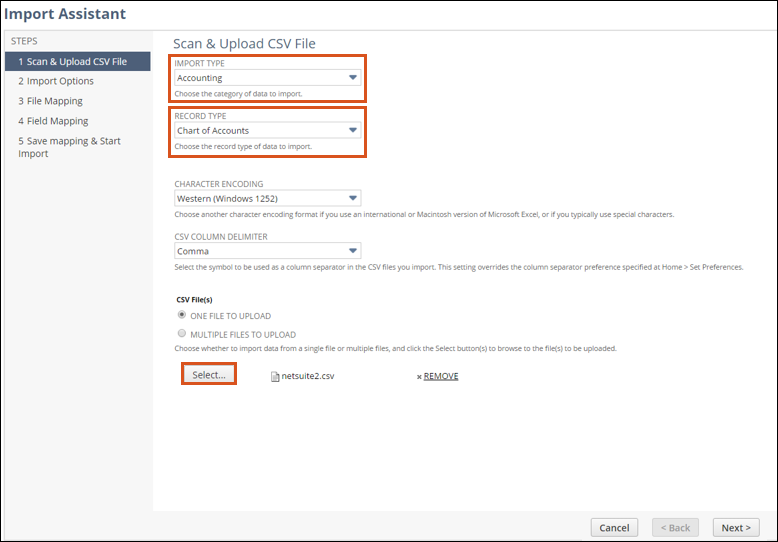
Import the .CSV file into NetSuite
Once the .CSV import file is created, you are ready to import the file into NetSuite.
-
From the CSV File(s) section, use the Select button and browse to the .CSV file.
-
From the Data Heading section, select Update.
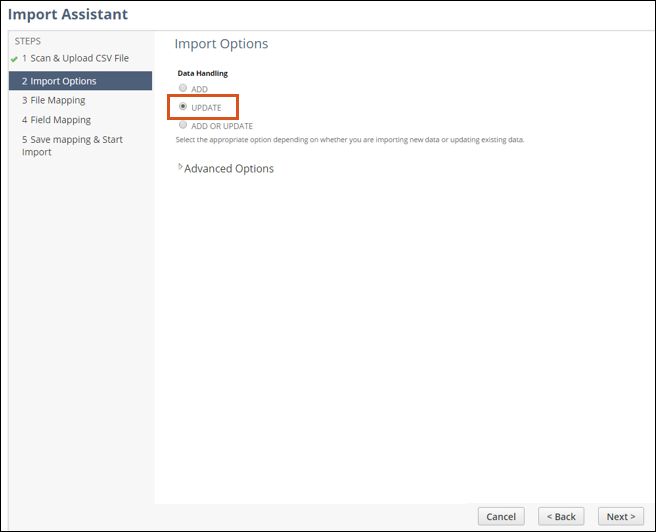 Note
NoteYou can choose Add or Update if you are importing UKG Pro Base Accounts that do not have a corresponding NetSuite Chart of Accounts record or if you are configuring the Chart of Accounts for the first time.
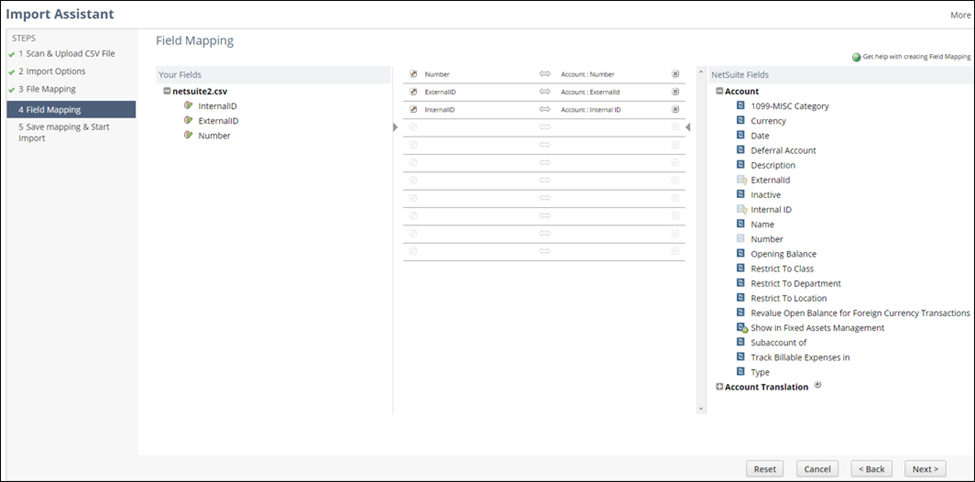
-
Verify the field mapping in the center of the page. The mapping should be complete if you used the InternalID, ExternalId, and Number headers in the .CSV file. If you used different headers, map each field by dragging the header from the Your Fields column to the center column. Then, drag the corresponding NetSuite field from the NetSuite Fields column to the center column.
-
From the Import Map Name field, enter the import map name.
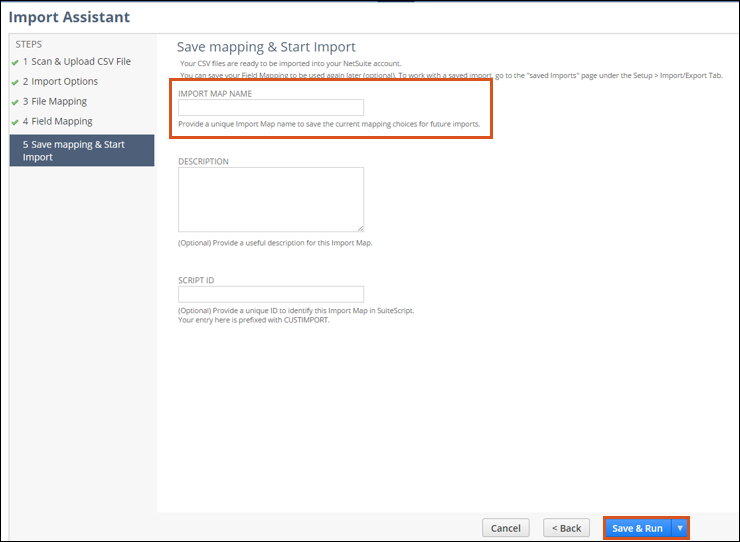 Note
NoteDo not enter a Script ID.
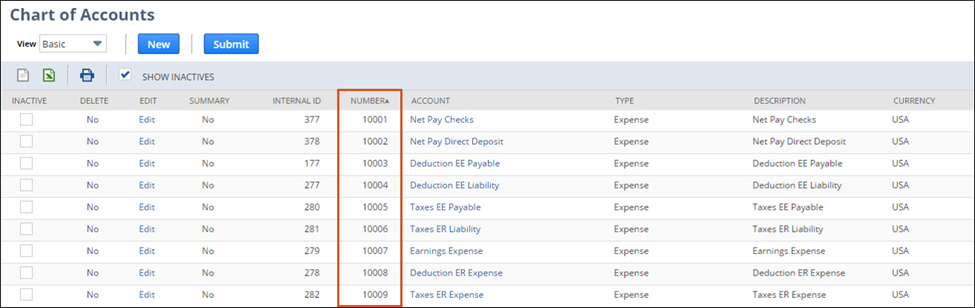
-
Navigate to the Chart of Accounts page in NetSuite to verify the import. The UKG Pro Base Accounts appear in the Number column to indicate that the
import was successful.
NetSuite Integration Connections
To integrate UKG Pro and NetSuite, you must configure an UKG Pro connection and a NetSuite connection.
- UKG Pro - Establishes a secure connection between Informatica and UKG Pro
- NetSuite - Establishes a secure connection between Informatica and NetSuite.
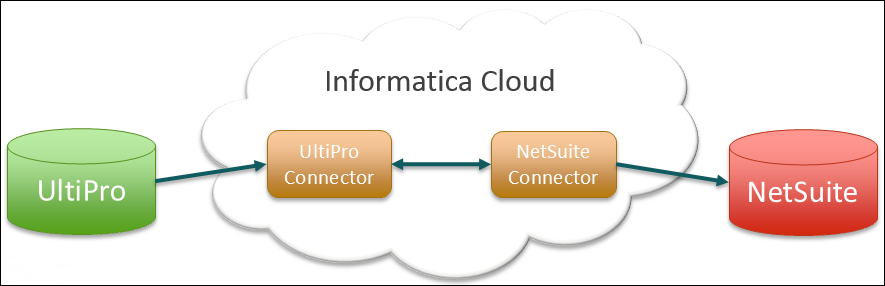
Once these connections are established, you attach these connections to the data mappings to define how the data from UKG Pro is to flow to NetSuite.
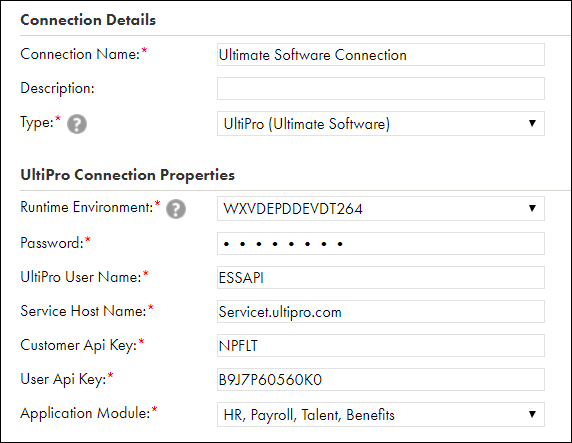
Create the UKG Pro Connection
Create the UKG Pro connection from the Connections page of Informatica Cloud. The connection is necessary to extract data from UKG Pro and holds the connection information for a specific endpoint.
The Informatica secure agent must be installed on your designated server before you create the UKG Pro connection.
You should also have the following information before beginning this task:
- Service Account user name and password
- Customer API Key
- User API Key associated with the Service Account
- Location of the installed secure agent
-
From the Connections page, select New Connection. The New Connection page appears.
- Enter a unique name for the connection in the Connection Name field.
- Enter an optional description in the Description field, if desired.
- From the Type drop-down list, select UKG Pro (UKG). The UKG Pro Connection Properties
section appears.

-
From the Application Module drop-down list, select the applicable application module.
For most general UKG Pro integrations, select HR, Payroll, Talent,
Benefits.
 Note
NoteThe application modules are explained as follows:
- The HR, Payroll, Talent, Benefits application module is used to extract HR, Payroll, Talent, and Benefits data, including integrations triggered by an Integration Event.
- The Integration Events application module is only used to extract a list of completed UKG Pro Events on-demand.
- The Other application module is used for Time Management integrations.
Create the NetSuite Connection
To move data to NetSuite from UKG Pro using Informatica Cloud, you need to create and configure a connection to NetSuite in Informatica Cloud.
To begin, log in to Informatica with the credentials provided to you from UKG.
The Informatica Secure Agent must be installed on your designated server before you can create the NetSuite Connection.
You should also have the following information before beginning this task:
- Location of the installed secure agent.
- NetSuite account login information (this web services account must be granted access to Transactions > Make Journal Entry.)
- NetSuite account number
Import Data Mappings for NetSuite Integrations
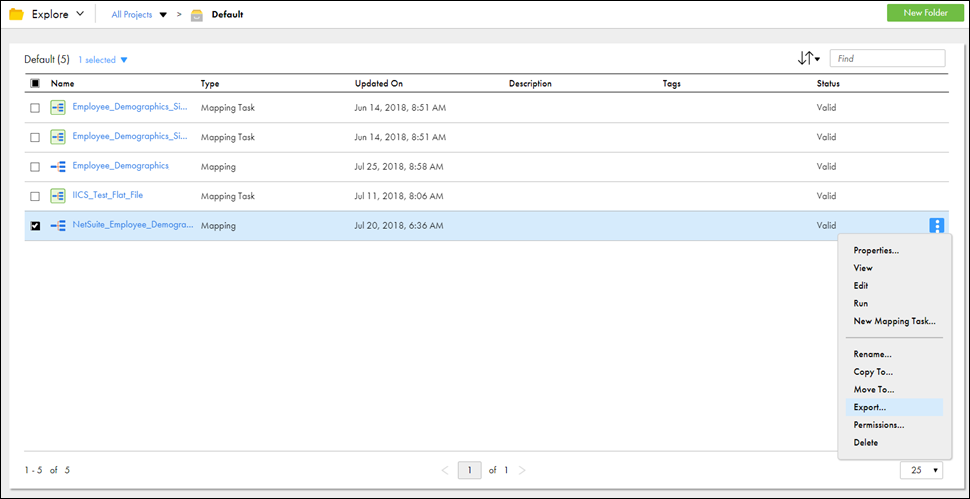
The pre-configured GL for Migration and EE Demographics for Migration data mappings can be used in your NetSuite integration.
These pre-configured data mappings are located in our Informatica Cloud organization. Submit a case to request credentials to access the data mappings. We will provide you with a username and password, enabling you to import the data mappings to your Informatica Cloud suborganization.
-
From the Default pane, select the mappings you wish to import and select the Actions menu for that mapping. For NetSuite general ledger integrations, make sure you select the GL for Migration data mapping. For NetSuite employee demographic integrations, make sure to also select EE Demographics for Migration.
-
At the My Jobs drop-down list, select Export to view the exported mapping.

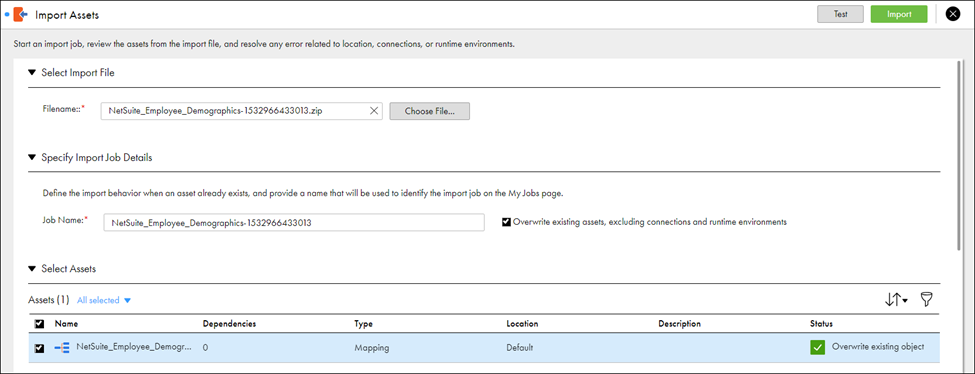
-
Select Open. The Import Assets page displays.
Configure the GL For Migration Data Mapping
The Mappings feature of Informatica Cloud enables you to define how the GL data should move from UKG Pro to NetSuite.
You can create a new GL data mapping; however, UKG provides data mappings that you can use. After you migrate the GL for Migration data mapping to your suborganization, these steps guide you through configuring the data mapping to meet your needs.
Currently, NetSuite does not import UKG Pro component company identifiers as external IDs. If you are a OneWorld customer, running separate GLs for specific component companies, identify the NetSuite Subsidiary Internal ID for each component company before beginning. Then, you can edit the expression in the GL for Migration data mapping to identify the subsidiary.
To identify the InternalID for the subsidiary in NetSuite:
1. From NetSuite, use the search functionality to search for Subsidiaries.
2. From the Subsidiaries page, note the Internal ID for each component company.
-
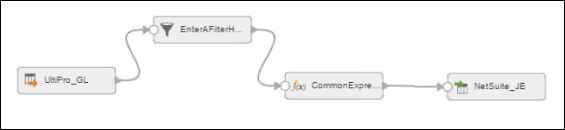
From the Mappings page, select the GL for Migration mapping. The pre-configured shapes appear in the canvas.
-
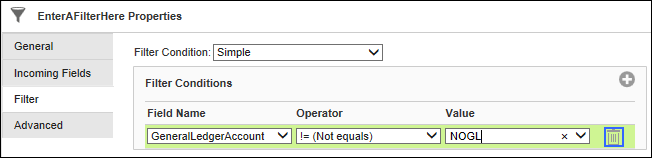
From the canvas, use the EnterAFilterHere shape to filter the data coming from UKG Pro.
Note
If UKG Pro contains account numbers in the GeneralLedgerAccount field that should not be passed to NetSuite, you can configure a Simple filter condition to prevent that account from being included in the integration.
For example, GeneralLedgerAccount !=(Not equals) NOGL or any other account number that should be filtered out.
Create the Mapping Configuration Task for General Ledger
The mapping configuration task is the integration task that you will attach to the Integration Event in UKG Pro. When the event occurs, this integration task is triggered automatically in Informatica Cloud and the data from UKG Pro is sent to your target.
-
Select Next to navigate to the Schedule step where you can enter the e-mail notification options for this task, if desired.
Tip
We do not recommend using e-mail notifications until after the integration is tested. After testing is complete, return to this step and complete the following:
- Select the Use Custom Email Notification Options for this Task radio button.
- Enter the e-mail addresses of the individuals who should receive Failure, Warning, and Success notifications from Informatica Cloud.

NetSuite Settings
System administrators must enable the NetSuite Integration status from the NetSuite Settings page.
The setting is OFF by default. When the Integration Status is configured as YES, the NetSuite Integration section is available from the Process General Ledger page (Menu > Administration > Reporting > General Ledger).
If GL Tasks have not been configured from Integration Studio yet, an informational message appears in the NetSuite Integration section.
Additionally, when Integration Status is configured as YES, the NetSuite - Journal Entries link appears in the Things I Can Do section of the Process General Ledger page. This link provides users with single sign-on access to NetSuite. This link can be secured to specific roles in Role Administration.
In order for users to have single sign-on access to NetSuite from the NetSuite – Journal Entries link of the Process General Ledger page, single sign-on settings must also be configured in NetSuite and the user must have appropriate permissions in NetSuite.
Configure NetSuite Settings
You must enable the Integration Status on the NetSuite Settings page to enable the NetSuite Integration section and the NetSuite - Journal Entries link in the Things I Can Do section on the Process General Ledger page (Menu > Administration > Reporting > General Ledger).
The settings are OFF by default. You must have your NetSuite Account ID number available when you enable the integration status.
Subscribe to the Integration Event for NetSuite
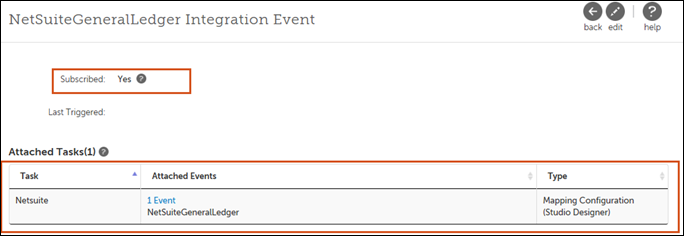
For the NetSuite integration configuration, you must subscribe to the NetSuiteGeneralLedger event from the Integration Events page in UKG Pro.
You can subscribe to an event before or after you configure the mapping configuration task in Informatica Cloud; however, the integration tasks cannot be attached to events until they are configured in Informatica Cloud.
-
Select Save.
Send General Ledger Data to NetSuite
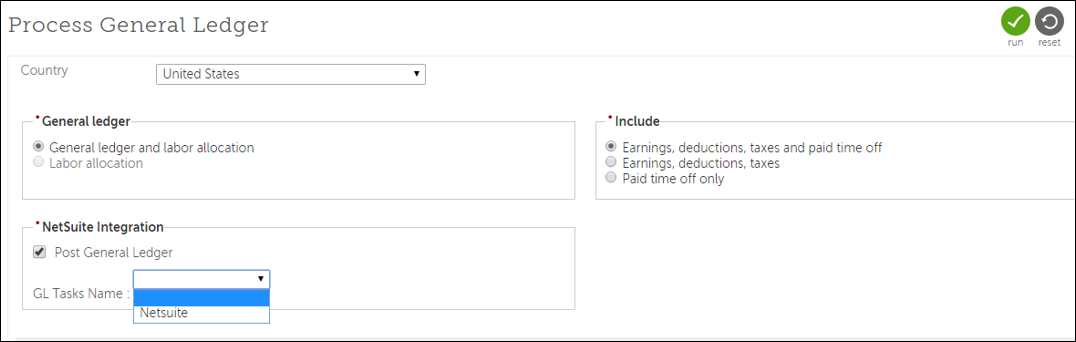
Once the NetSuite integration configuration is complete, users can choose to send the GL data to NetSuite from the NetSuite Integration section of the Process General Ledger page.
-
From the GL Tasks Name drop-down list, select the applicable NetSuite task.
Monitor the NetSuite Integration
Monitoring and reporting integrations between UKG Pro and NetSuite can be helpful when troubleshooting unsuccessful integrations. Each application (UKG Pro, Informatica, and NetSuite) includes their own monitoring tools.
After the GL is run, there are multiple places where you can monitor the integration of data between UKG Pro and NetSuite.
- From UKG Pro, navigate to Menu > Administration > Integration Studio > Activity Log to view the status of integration from within UKG Pro.
- Identify the task. If UKG Pro successfully connected with Informatica Cloud to trigger the integration with NetSuite, a status of Completed appears.
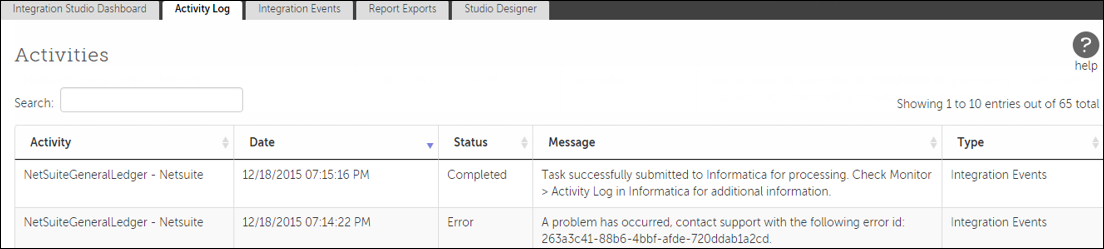 Note
NoteIf an error is received, an error has occurred in UKG Pro and the request to trigger the integration task was not submitted to Informatica Cloud. Submit a ticket with the error ID from the Message column.
- To receive notifications if UKG Pro fails to connect to Informatica Cloud (and Informatica Cloud does not receive the request to trigger the task), navigate to the Event Notifications page (Menu > Administration > Integration Studio > Integration Events > Event Notifications). Select Edit and enter the e-mail addresses of the individuals who are to receive the error e-mail. Select Save.
- Select the task's Name link to view the details.

- From NetSuite, navigate to Transactions > Financial > Make Journal Entries > List. The list of journal entry records appear.
- From the Quick Sort drop-down list, select Recently Created.
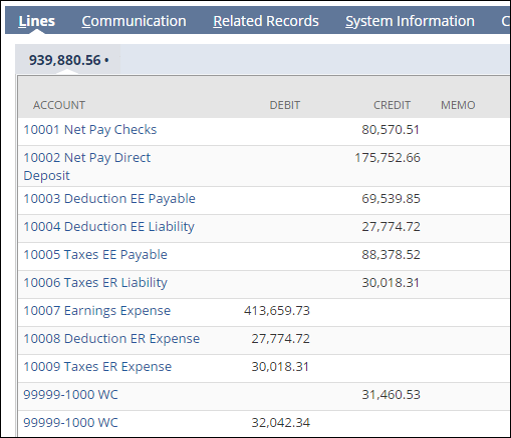
- Select the entry's View link. The details of the Journal Entry record appears.

- Compare the data that displays with the GL reports from UKG Pro.
© 2023 UKG Inc. All rights reserved. For a full list of UKG trademarks, visit https://www.ukg.com/trademarks. All other trademarks, if any, are the property of their respective owners.
This document and all information contained herein are provided to you "AS IS" and UKG Inc. and its affiliates (collectively "UKG") make no representation or warranties with respect to the accuracy, reliability, or completeness of this document, and UKG specifically disclaims all warranties, including, but not limited to, implied warranties of merchantability and fitness for a particular purpose. The information in this document is subject to change without notice. The document and its content are confidential information of UKG and may not be disseminated to any third party. No part of this document or its content may be reproduced in any form or by any means or stored in a database or retrieval system without the prior written authorization of UKG. Nothing herein constitutes legal, tax, or other professional advice. All legal, tax, or other questions or concerns should be directed to your legal counsel, tax consultant, or other professional advisor. All company, organization, person, and event references are fictional. Any resemblance to actual companies, organizations, persons, and events is entirely coincidental.