Set Up a Company Bank - United States
Bank Configuration Considerations
Successfully configuring a company bank is critical to successful payroll processing. Depending on your business configuration, you may need to create a Service Request to successfully implement a new or modified company bank.
You can initiate the configuration of a new bank and then save the information as a draft.
You must create a Service Request to successfully complete the configuration. An incorrect or incomplete configuration may inadvertently stop payment to the pay group. You cannot successfully link a bank to a pay group or test a new bank without the assistance of UKG.
You may be able to complete minor modifications to an existing bank without contacting UKG.
A Service Request can take up to 4 to 6 weeks to complete.
Create a Service Request to Create a New Bank
A Service Request will include the configuration in UKG Pro and coordination with UKG Payment Services, as needed.
Company Banks Business Rule
To process a payroll, you must establish at least one bank.
General bank account information
Direct deposit file layout information
Log DX information
Check printing defaults and options
ABA fraction information
If your company uses direct deposit, positive pay, or electronic check reconciliation, obtain the related information from your bank's cash management department before establishing the bank in the system. This information may include a direct deposit script and reconciliation criterion. You should also establish a transmission schedule with your bank to set up specific dates and a time window to transmit direct deposit data and positive pay files.
Modify Existing Company Bank Considerations
For any of the following modifications, best practice recommendations are to create a new bank and complete all of the configuration steps, including testing, before using the updated bank:
Change to a different bank
Routing number
Account number
Print MICR
Any changes on the Direct Deposit tab
For other modifications such as updating the print check options or changing the logo or signature, you can update and save those changes yourself, as needed.
Add a Company Bank
To process a payroll, you must establish at least one bank.
- From the Business Rules page, search for and select Bank.
- Select Add.
Complete the Bank Info tab
Complete the required fields on the Bank Info tab.
- Country (Required) – Select the country of the banking institution.Note
When you select the country, additional relevant fields appear.
Code (Required) - Enter a unique code to identify the bank.
Bank description (Required) - Enter a description with a maximum of 40 characters.
Routing number (Required) - Enter the ABA routing number assigned to that banking institution. When you save the bank code, the system validates the routing number.
Account number (Required) - Enter company's account number with the bank. When typing this information, do not include any dashes or spaces between numbers.
Banking Institution - Assign a banking institution to enable the ability to recreate check file or direct deposit files. If a banking institution is not selected, files cannot be recreated. Note: You cannot recreate files in the portal.
Telephone - Enter the bank's telephone information.
Address - Enter the bank's address.
Point of Contact - Enter a name.
Complete the Check Options tab
Configure formatting options to use for printing payroll checks and direct deposit advices.
Complete Payroll Checks, Instant Checks, Image Files, and DDA Numbers
Complete the fields in the Check Options page to customize the format of payroll checks when they are printed.
MICR
Printing the magnetic ink character recognition (MICR) code on pay checks requires a special toner cartridge with magnetic toner, as the MICR line on the check is read by a magnetic reader.
If you are printing MICR coding on pay checks, the following are the required bank symbols.
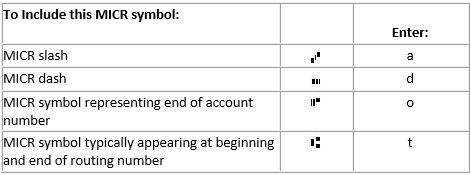
Complete the MICR Fields
Magnetic ink character recognition (MICR) establishes whether the system prints the check MICR code during the check printing process. When you install the application, the fonts required for printing the MICR line on checks are included.
ABA Fraction
ABA Fractions specifies the format for ABA fraction required on checks if you print MICR checks.
The Use fraction line option designates that a fraction line separates the upper digits from the lower digits of the ABA fraction.
Complete the ABA Fractions Fields
Complete the steps to enter the ABA Fractions information.
- Select the Use fraction line option, if applicable.
- Enter the digits that display in the upper and lower portion of the ABA fraction.
- Enter the digits that display to the immediate right of the ABA fraction, if needed.
Select Print Options
Select the items in the Print Options section to customize information you want to display on the printed checks.
Allow reprint check numbers
Assign different number on overflow page
Check cashing institution
Check number
Company name
Company phone number
DDA Amount
DDA Number
Employee Address
Employee address in caps
Pay rate on stub
Salary pay rate with detail earnings
Show accruals
Sort in address window
Suppress offsets
Total hours worked
Use DBA name for company
Use PAY TO THE ORDER OF - Display PAY TO THE ORDER OF on check formats. Available when one of the following updated forms is selected for payroll checks or instant checks: CATOP (California Version of Top Check), TIPTOP (Tip Credit OT Top Check), WKJTOP (Week and Job OT Top Check), and CAOTOP (California OT Top Check).
Complete the Direct Deposit tab
For a pay to be directly deposited into employee bank accounts, you establish the direct deposit information for your company's bank.
The National Automated Clearing House Association (NACHA) is responsible for the Automated Clearing House (ACH) Network electronic payments system. The Direct Deposit tab establishes the layout of the NACHA file that you transmit to your bank. Your bank may process the NACHA file or, if the bank does not have distribution capability, the bank transmits the file to an ACH clearing house for disbursement of payroll funds to employee banks.
Main Account fields -Shows the routing number and account number information entered on the Bank Info tab.
- ACH Routing Number - displays the routing number identifying the bank that will receive the direct deposit transmission.Note If your bank has disbursement capabilities, the ACH bank route number may be the same number as the bank's routing number. The number is different if the ACH file is transmitted to another branch location or to an automatic clearing house.
Prenote Days - The Prenote days field establishes the minimum amount of time required between the issuance of a pre-note record for an employee deposit account and the creation of live deposit records for that account.
The bank uses the prenote record to test the direct deposit transfer for the employee. When you set up an employee for direct deposit, the employee's payroll information is marked as prenote in the direct deposit file for this number of days. During this pre-note period, no actual deposit amounts are sent to the employee's deposit account. The employee receives a payroll check for the period of time their direct deposit is marked as prenote.
When a payroll is processed for the employee where the pay date is later than the date of the first prenote plus the number of prenote days, the system automatically converts the employee's pay statement to direct deposit. The employee's direct deposit record is changed from prenote to direct deposit when the payroll is posted.Note The default number of prenote days is 6 (the minimum recommended by NACHA); however, it is not a requirement that direct deposit records be prenoted.NACHA ASCII file - Select the pre-defined ASCII file format for the direct deposit NACHA file.
- NACHA file options - Establishes options that can be included when the NACHA file is created.
Include Blocking Factor - The Include blocking factor option designates that the NACHA file includes trailing nines in the footer.
Include Debit 6 Record - The Include debit 6 record option creates a summary '6' record in the NACHA containing the total direct deposit debit. Some clearinghouses may require this.
Include FEIN in Debit 6 Record - The Include FEIN in debit 6 record option designates that your company's Federal Employment Identification Number (FEIN) is included in the summary '6' record.
Include Employee Name in Debit - The Include employee name in debit option designates that the employee's name is displayed in the detail record. Employee records in the NACHA file are also in the '6' record, however.
NACHA file path - Enter the file path of the default NACHA file created from the backoffice. This field is necessary only when you run the payroll from UKG Pro backoffice.
- NACHA record positions
- Immediate Origin Number - Immediate origin number is typically your company's FEIN. (Record 1, positions 14 - 23)Note Depending on the bank's requirements, the Immediate origin number may be preceded by the number 1. If a 1 does not precede the origin number, insert a space before typing your origin number.
Company Name - Company name is simply your company's name. (Record 5, positions 05 - 20)
Foreign exchange indicator - Available only when the Ascii format is STD International ACH Transaction. Create a Service Request when modifying this value.
Discretionary Data - The Discretionary data field designates optional information required by the bank. (Record 5, positions 21 - 40)
- Company ID - Company ID is your company's FEIN that populates from the Immediate origin number field. You can modify this field. (Record 5, positions 41 - 50)Note Depending on the bank's requirements, the Company ID may be preceded by the number 1. If a 1 does not precede the origin number, insert a space before typing your origin number.
Company Description - Company description describes the content of the direct deposit file. Typically, this description reads Payroll, unless your bank requires something different. (Record 5, positions 54 – 63)
Originating DFI ID - The Originating DFI ID is a bank-assigned routing number required by some banks. (Record 5, positions 80 - 87)
- Individual ID Number - Some banks or clearing houses may require an identification number in the '6' detail record. Use this option to populate one of the following options in the summary record. (Record 6, positions 40 – 54)
To use this as the ID: Select this: Employee's number Employee Number Company's FEIN Company's FID # Blank records Blank Employee's social security number Employee's SSN Trace number - (US ONLY) This information comes from the NACHA specifications
Company ID - (US ONLY) Obtained from the bank and is unique to a bank account
Originating financial institution - (US ONLY) This information comes from the NACHA specifications
Complete the Log DX tab
The Log DX tab allows you to designate up to four header records or sign-on records for the direct deposit file.
The Log DX records contain information, such as the company's identification information and password assigned by the bank. This information is specified by the cash management department of the bank, usually in the form of a "script" including the fields and data that are included in each record. These records enable you to communicate with your bank through modem and communication software. Some banks require multiple records because their banks use clearinghouses through which the files are transmitted. You can enter up to four Log DX records, each containing up to 80 positions.
LogDX1 - Designates the information that your bank requires in the first header record of the direct deposit file.
LogDX2 - Designates the information that your bank requires in the second header record of the direct deposit file.
LogDX3 - Designates the information that your bank requires in the third header record of the direct deposit file.
LogDX4 - Designates the information that your bank requires in the fourth header record of the direct deposit file.
Save the Bank Business Rule as a Draft
To save the information you entered for the new company bank without losing your changes, save the business rule as a draft.
- After you complete the basic bank information and the required fields, select the Save as draft button.
- Create a Service Request to complete the rest of the information and testing.
Test the Bank Business Rule
As a general rule, you must create a Service Request to successfully complete testing with the bank.
Common Scenarios for New Bank Creation
The following examples are common scenarios when creating a new bank. These examples detail some of the tasks that may assist you with when you create a Service Request.
To complete testing and coordinate with your bank and services
To transmit files from UKG Pro
To leverage UKG Print Services live checks
Scenario: Direct Deposit NACHA or AFT file requires transmission
- Security and Connections
- Delivery path and folder
- Test and verify successful transmission to the bank and the file is successfully processed without missing or bad data
- Bank approves specs, formatting, and ability to process the file received
- Coordinate switching from test to production and confirming successful first payroll
Scenario: Payment Services with live check printing
- Configure Check Export Template - format the data and the position of the data that prints on the check
- Configure Check Format - the output file type generates as an ASCII file
- Set up file automation to send the file to Print Services
- Test with Print Services that the file is received successfully and can be processed without missing or incorrect data
- Coordinate when ready to switch to production and verify the first payroll run is successful
Scenario: Live check printing is required without Payment Services
- Configure Check Export Template
- Configure Check Format
Scenario: Payment Services with a Positive Pay file
- Configure the Positive Pay Export Template
- Add the Positive Pay Template to the Check Format output
- Set up automation for UKG Pro Data Exchange Services (UDES) to transmit the file to the bank
- Test with the bank to make sure the file is received and can be processed with no missing or bad data
UKG will also coordinate with the bank when ready to switch to production and verify that first payroll run is successful.
Scenario: Payment Services with manual printing
- Determine if a duplicate bank is needed for manual check printing or if a separate bank setup is required (based on the check export template)
- Configure the check format
- The output is usually a PDF sent to your inbox to be printed in-house
- Order pre-printed check stock (from UKG); no testing needed
- Order blank check stock (from UKG or not); requires ordering MICR Ink/Toner, and test printing is recommended
- Coordinate or make any necessary updates needed to go from test to production
Scenario: Payment Services for Tax Filing
- Obtain authorization forms (impounding/reverse withdraw) customer approval
- Connect with bank for authorization and approval as well and confirm account information for the funding
- Test the funding request
- Switch from test to production
- Coordinate and ensure that the first payroll run is successful
Scenario: Ceridian Tax Services (CTS) is required
- Configure file generation and data transmission to Ceridian Tax Services
- Perform testing
- Switch from test to production
- Confirm and ensure that the first payroll run is successful
Scenario: Manually Print and Transmit all Files
No Service Request is required.
If you need assistance, you can submit a case and support will contact you as quickly as possible.
Scenario: Minor Modifications to Existing Banks
No Service Request is required.
Logo
Print options
Signature
Adding PTO/Accruals
Edit the starting check number
Change the bank used for tax funding
- Create or modify a bank for manual checksNote Testing updates to Print Options before running a live payroll is recommended. If you need assistance, you can submit a case and UKG will contact you as quickly as possible.
© 2025 UKG Inc. All rights reserved. For a full list of UKG trademarks, visit https://www.ukg.com/trademarks. All other trademarks, if any, are the property of their respective owners.
This document and all information contained herein are provided to you "AS IS" and UKG Inc. and its affiliates (collectively "UKG") make no representation or warranties with respect to the accuracy, reliability, or completeness of this document, and UKG specifically disclaims all warranties, including, but not limited to, implied warranties of merchantability and fitness for a particular purpose. The information in this document is subject to change without notice. The document and its content are confidential information of UKG and may not be disseminated to any third party. No part of this document or its content may be reproduced in any form or by any means or stored in a database or retrieval system without the prior written authorization of UKG. Nothing herein constitutes legal, tax, or other professional advice. All legal, tax, or other questions or concerns should be directed to your legal counsel, tax consultant, or other professional advisor. All company, organization, person, and event references are fictional. Any resemblance to actual companies, organizations, persons, and events is entirely coincidental.