Configure a Life Event in UKG Pro Benefits
Manage Life Events in UKG Pro Benefits
Life events describe common changes to an employee's life situation, such as a change in marital status or having a child.
Life events may require employees to make changes to their benefit elections outside of open enrollment periods. Benefits administrators can configure life events to include the benefit groups, types, plans, options, messages, and settings that are specific to each event and the needs of different employee populations.
View the Life Events Session Page
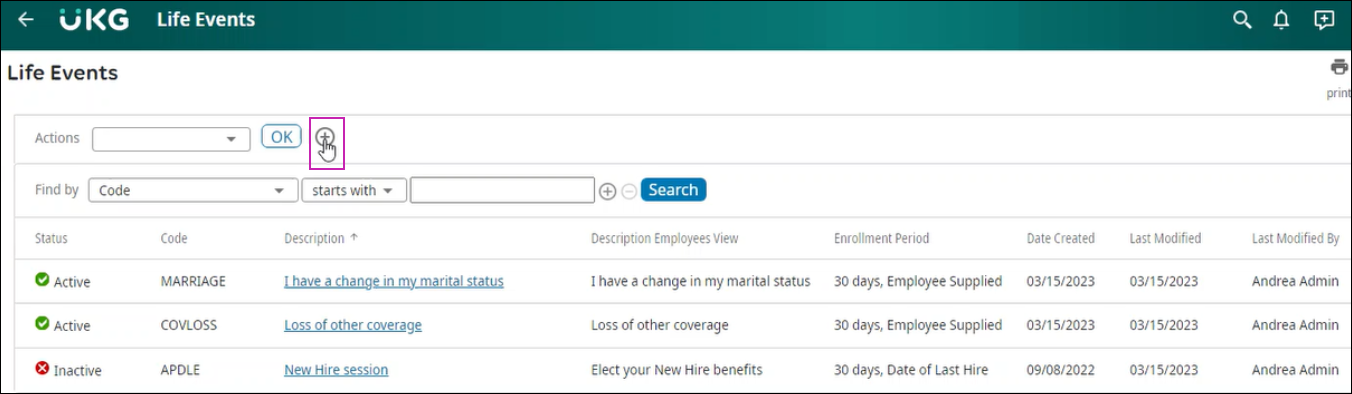
Benefits administrators can view a list of existing life event sessions on the Life Events page.
The information that is provided for each life event includes the status, code, description (both for the administrator and the employee), and enrollment period as well as audit information such as date created, last modified, and last modified by.
- From the Life Events page, view the list of existing life events sessions noticing their status, either Active or Inactive.
Add a New Life Event Session
Benefits administrators can add a new life event using the Actions menu bar.
- From the Life Events page, select the plus '+' next to the Actions menu bar.
The Life Events Details page appears and provides three ways to create a life event.

Copy an Existing Life Event
You can create a copy of an existing Life Event session in the UKG Pro Benefits solution to save time and reduce the potential for errors.
Choose the life event to copy and then select which parts to copy. You can copy the enrollment period, messages, change reasons, administrator options, and deduction/benefit groups. Once the life event is copied, you can make additional modifications before finalizing the configured life event.
During the copy process, administrators must enter a life event code, confirm the action to copy the session, and review any warnings or errors that may have prevented any portions of the existing session from being copied. Administrators can then make any final manual configuration changes as needed before activating the new life event.
View the Copied Session
The newly copied session appears on the Life Events session list page in an Inactive status. The copy process includes several validations to ensure the session contains valid information.
In cases where the session was not successfully completed, warnings and errors appear. Review the session and address warnings and errors before finalizing.
Review the Validation Messages in the Report
A report that contains warning and error messages is available for copied life events that have validation issues. Review the validation messages in the report and make changes to the copied session before finalizing.
Use a Template to Create a Life Event
Benefits administrators can use a template to create a life event session.
Using a template is not required, but it can help get you started with creating a new life event, especially if the life event is based on the following common types of life events.
- I am a new employee
- I have a change in my marital status
- I have a new dependent
- I have moved or transferred
- I want to remove a dependent
Begin by selecting the Use a template for settings, descriptions, and messages of common life event option and then choose your desired template from the drop-down menu.
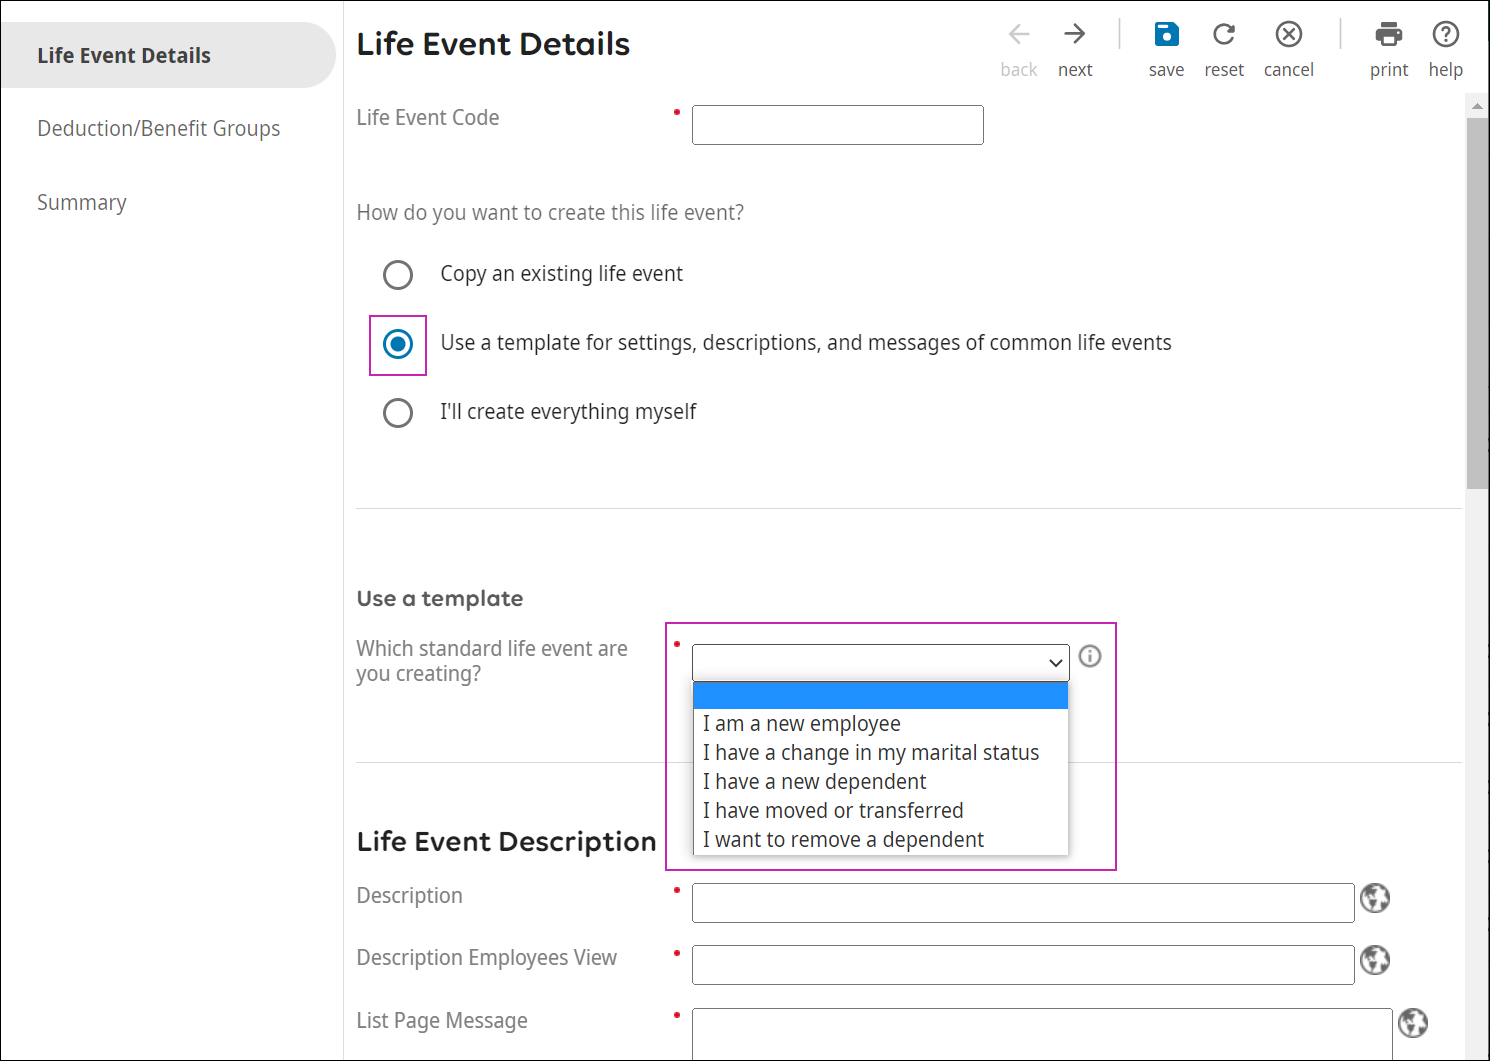
When using a template, many fields pre-populate with sample settings, including descriptions, messages, and enrollment periods. You can also edit these to meet your needs.
A life event session's status is managed on the Life Events Details page where you can activate or inactive the session for employees. During setup, make sure that the session is inactive.
Manually Create or Edit a Life Event
Manually create a life event using the I'll create everything myself option and enter specific information, including the code, description, employee message, enrollment period, valid change reasons, and administrator options.
Whether you manually create a life event or edit one that was either copied from an existing life event or started from a template, continue through the session setup process to add or change the groups, types, plans, and qualifiers.
- Add or change details for a Life Event
- Add or change details for a deduction benefit group
- Add or change deduction/benefit types for a life events session
- Add or change plans for a life events session
- Review and complete a life events setup
Add or Change Details for a Life Event
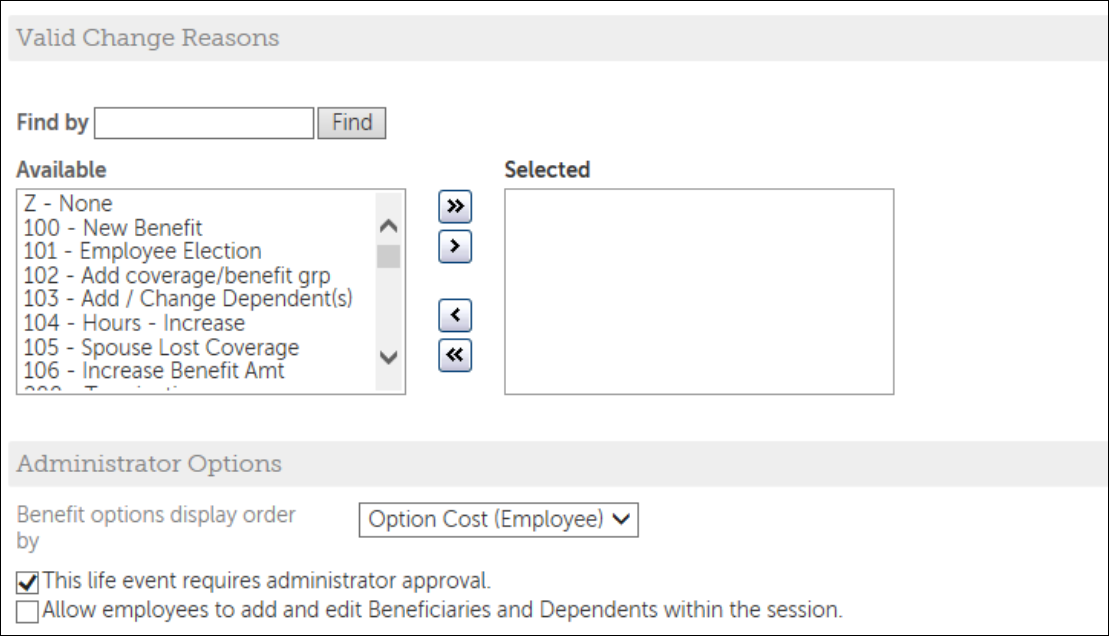
Add or change details for a life event on the Life Events Details page. Enter information specific to the life event including code, description, employee message, approvals, employee activities for this event, enrollment period, and valid change reasons.
Use the Life Events List page and Employee Welcome messages to communicate helpful information, links, and other guidance about each life event to your employees. Customize messages to include basic HTML, formatting, document attachments, and Web links.
- In the Enrollment Period section, define the length of time the employee has to complete this life event.
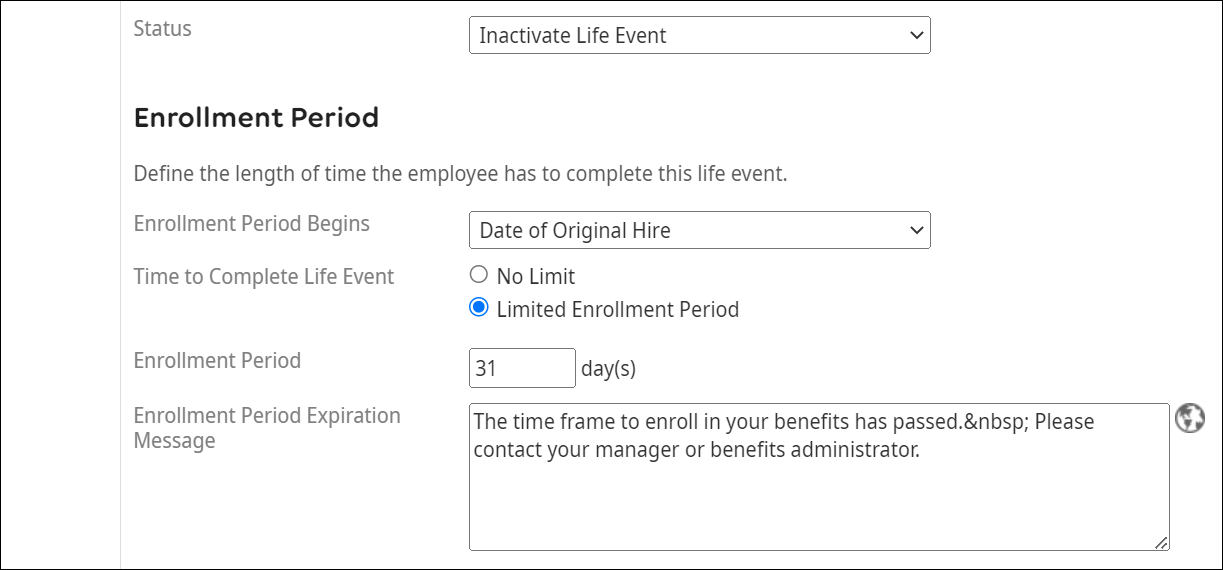
- From Enrollment Period Begins, select any of the following:
- Date of Benefits Seniority – indicates the date that is used specifically for those deductions that are also benefits. This date is tied to waiting periods and benefits eligibility.
- Date of Original Hire – indicates the date when the employee was first hired. The is the default field. . Using this date may limit rehired employees' ability to use the life event.
- Date of Last Hire – indicates the date when the employee was last hired This field is recommended for new hire life events.
- Employee Supplied - indicates the date that the employee must provide and reflects the date the life event took place. This option is recommended for qualifying life events.Note To ensure that rehires can enroll in benefits upon rehire, it is recommended to select either the Date of Last Hire or the Date of Benefits Seniority when configuring life events for new employee enrollments.
- In the Time to Complete Life Event area, select one of the following:
- No Limit – indicates that there is no enrollment time limit for when employees can make elections for the life event. Typically, this option is selected for HSA or 401(k) plans where the amounts can change at any time. When selected, the Enrollment Period Expiration Message is hidden.
- Limited Enrollment Period. - indicates that there is an enrollment time limit. Typically, this option is selected for life events where the carrier or plan rules have a time limit for enrollment from the date of the event.
- Select the Enrollment Period Expiration Message field. An Expiration Message box appears. Enter a message and include specific formatting.
- Select Save. The Details page appears.
- From Enrollment Period Begins, select any of the following:
- From the Messages section, enter messages in the following fields:
- Employee Welcome Message
- Beneficiaries and Dependents Message
- Confirm Your Elections or Changes Message
- Confirmation MessageNote You may want to remind employees to print a copy of their Confirmation page before selecting Submit as they may not have access to this page in the future if there are eligibility changes after submitting their elections.
The messages will appear for the employee in the applicable area of the life event.
Note Messages can provide your employees with additional information regarding the life event. Customize messages to include basic formatting, HTML, document attachments, and website links.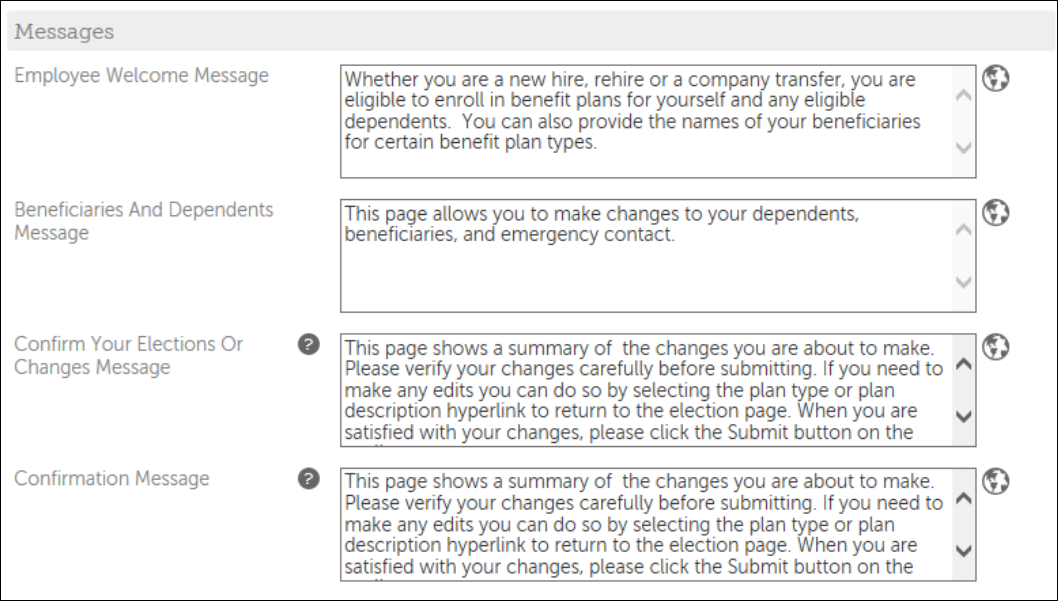
- If adding and editing beneficiaries and dependents is permitted, check the Allow employees to add and edit Beneficiaries and Dependents within the session box.
Add or Change Deduction/Benefit Groups for a Life Event Session
The Deduction/Benefit Groups List page designates which benefit group(s) are assigned to the session.
Add or change a Deduction/Benefit Group on the Deduction/Benefit Group List page. At a minimum, a single benefit group with at least one benefit plan is required to activate a life events session.
Add or Change Details for a Deduction/Benefit Group
The Add/Change Deduction/Benefit Group page designates specific deductions/benefit plans applicable to the deduction/benefit group from within a life events session.
Add or change the deduction/benefit group on the Add/Change Deduction/Benefit Group page.
Add or Change Deduction/Benefit Types for a Life Events Session
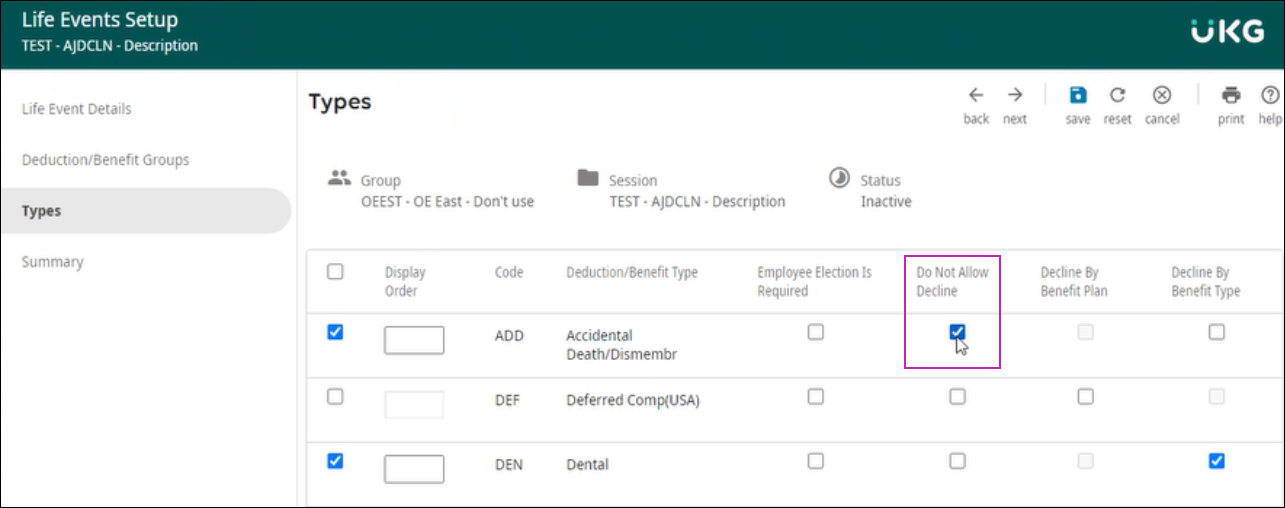
Add or change deduction/benefit types and related data for this benefit group on the Select Deduction/Benefit Type page for this life events session.
The Deduction/Benefit Type business rule determines the information displayed for each deduction/benefit type and availability of the Decline by Benefit Plan or Decline by Benefit Type check box. When a deduction or benefit allows multiple deductions, the Decline by Benefit Plan check box is enabled. When a deduction or benefit does not allow multiple deductions, the Decline by Benefit Type check box is enabled.
- For the selected deduction/benefit type, choose whether to allow employees to decline the plans offered under each benefit type:
- Do Not Allow Decline - This option is selected by default. When deselected, UKG Pro automatically checks either the Benefit Plan or Benefit Type box based on the configured business rule.
- Decline by Benefit Plan
- Decline by Benefit Type
- Do Not Allow Decline - This option is selected by default. When deselected, UKG Pro automatically checks either the Benefit Plan or Benefit Type box based on the configured business rule.
Add or Change Plans for a Life Events Session
Add or change specific deduction/benefit plans for this benefit group on the Select Deduction/Benefit Plan page for this life events session.
Plans are displayed by deduction/benefit type. Also, use this page to identify any plan that an employee can decline.
The Deduction/Benefit Type business rule determines options and behavior for specific deduction/benefit plans.- When a deduction or benefit allows multiple deductions, the employee can select one or more deduction/benefit plans or depending on the configuration, decline all plans.
- When a deduction or benefit does not allow multiple deductions, one plan must be configured as a plan that can be declined.
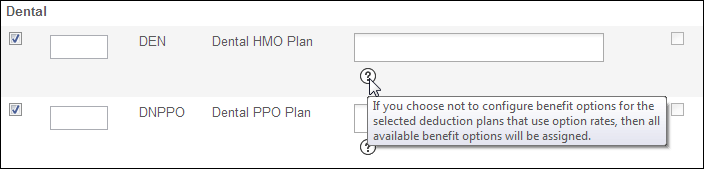
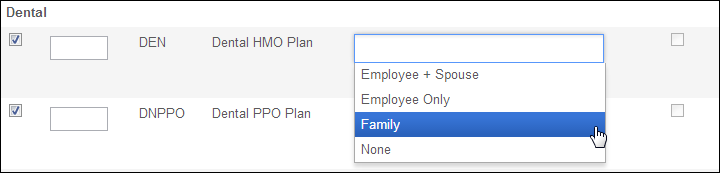
Benefit options can be configured by plan for Life Events. For the selected deduction plans that use option rates, configure benefit options by selecting the configurable Benefit Options field and selecting the applicable options. If you choose not to configure benefit options for the selected deduction plans that use option rates, then all available benefit options will be assigned.
Plan contingencies (linked plans) are offered in Life Events. When you have plan contingencies, which are configured in the Deduction/Benefit Plans business rules, for plans in a Life Events session, use the Display Order feature to display the deduction/benefit type containing the plan to be elected first prior to displaying the deduction/benefit type containing subsequent plan contingencies. This requires an employee to enroll in one plan before enrolling in another plan.
The most common plan contingency scenarios occur for High Deductible Health Plans/Health Savings Account Plans and Employee Supplemental Life/Dependent Life Plans.
- Informational message:
- Configurable benefit options:
- From the Select Deduction/Benefit Plan page, for each deduction/benefit type, check one or more deduction/benefit plans to be included for this deduction/benefit group.
- At the Display Order field, enter the sort order field number to display the deduction/benefit plans during the employee life event session.
- At the Configurable Benefit Options field for those plans that use Option Rates, it is recommended to leave the benefit options blank (unselected), unless you want to limit the selection. When left blank, all benefit options appear in the life event session. If you need to add a new benefit option in the future on the plan level, the options will appear in the life event election page. If you choose to limit the selection, you can select to configure the benefit options. Once approval occurs for that life event and the deduction/benefit group, you no longer have the ability to add a new benefit option to that benefit plan in the future.
- Check at least one Employee Can Decline Plan boxes.
- Select Next.
Add Qualifiers for a Life Events Session
Add qualifiers to a benefit group for a life events session on the Add/Change Qualifiers page.
Any qualifiers configured for the selected deduction/benefit group will also appear. Qualifiers can be used to restrict employees in a life events session by matching additional information aside from the benefit group. Only those employees meeting the benefit group qualifiers will be added to that benefit group within that session.
Review and Finish a Life Events Setup
Review the life events details on the Summary page.
Review general information such as descriptions, list page message, approval information; enrollment period information; additional message you may configure for the employee welcome message and beneficiaries and dependents message; benefit groups, benefit types, benefit plans, and qualifiers.
© 2023 UKG Inc. All rights reserved. For a full list of UKG trademarks, visit https://www.ukg.com/trademarks. All other trademarks, if any, are the property of their respective owners.
This document and all information contained herein are provided to you "AS IS" and UKG Inc. and its affiliates (collectively "UKG") make no representation or warranties with respect to the accuracy, reliability, or completeness of this document, and UKG specifically disclaims all warranties, including, but not limited to, implied warranties of merchantability and fitness for a particular purpose. The information in this document is subject to change without notice. The document and its content are confidential information of UKG and may not be disseminated to any third party. No part of this document or its content may be reproduced in any form or by any means or stored in a database or retrieval system without the prior written authorization of UKG. Nothing herein constitutes legal, tax, or other professional advice. All legal, tax, or other questions or concerns should be directed to your legal counsel, tax consultant, or other professional advisor. All company, organization, person, and event references are fictional. Any resemblance to actual companies, organizations, persons, and events is entirely coincidental.