Hire Employees (International)
Hire Employees (International)
Hire or Rehire International Employees
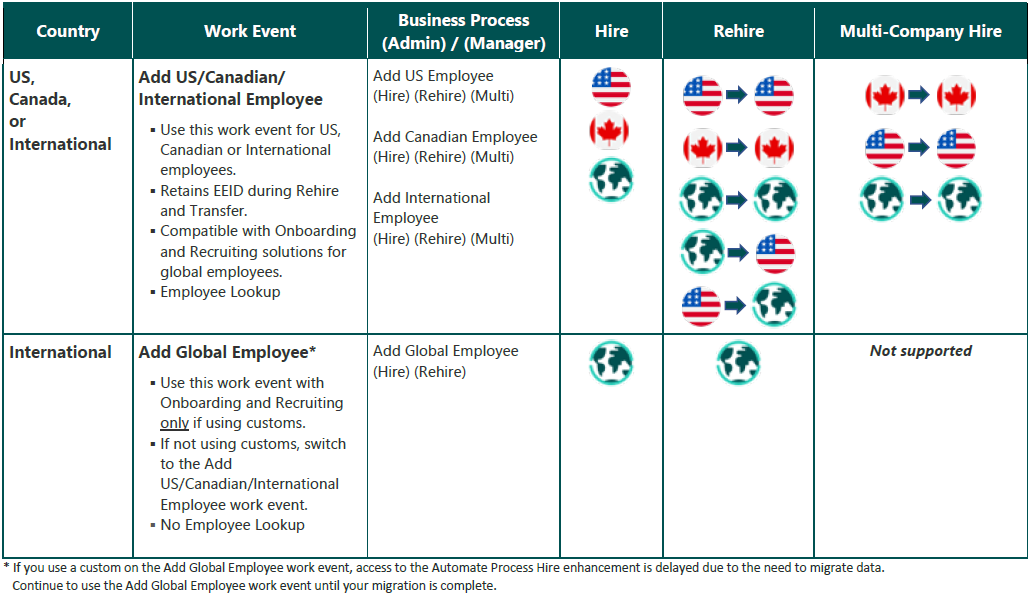
International employees can be hired or rehired to component companies using the Add US/Canadian/International Employee work event. The table describes the work event, lists the related business processes, and supported employee transactions (hire, rehire, and multi-company hire) for each country.
Refer to the US. Canadian, and International Employee Hiring, Transferring and Rehiring Readiness Checklist in the UKG Community Library to ensure your system is configured with the required business processes.
 This work event provides key steps to complete the hiring process, including how to enter personal, job, and payroll information. An additional step is required for employers who have a time management solution.
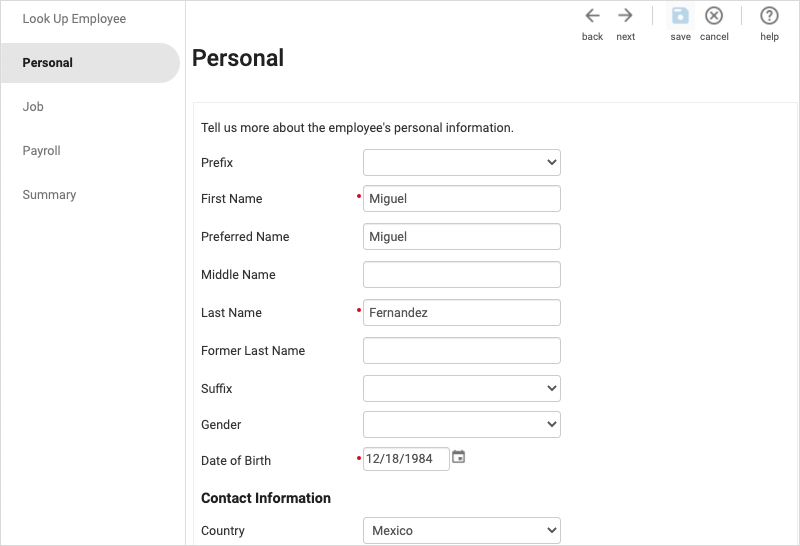
Hire International Employee Configuration
System administrators must configure access to the tools and processes needed to hire international employees before you begin the hire or rehire process. The configuration includes:
- Add US/Canadian/International Employee Web Access Rights
- Add International Employee Business Processes
Change National ID Business Process
- Enable Name and Employee Number Record Search (optional)
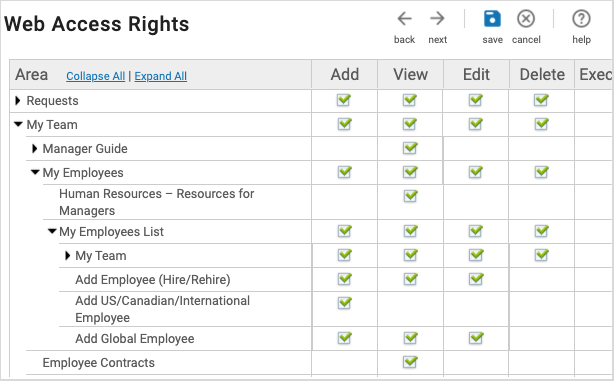
Enable Add US/Canadian/International Employee Web Access Rights
System administrators must enable web access rights for the Add US/Canadian/International Employee work event for Employee Administrator and Manager roles.
-
From the Web Access Rights page, expand My Team for your manager role or Employee Admin
for your employee administrator role, then expand My Employees and My Employee List.
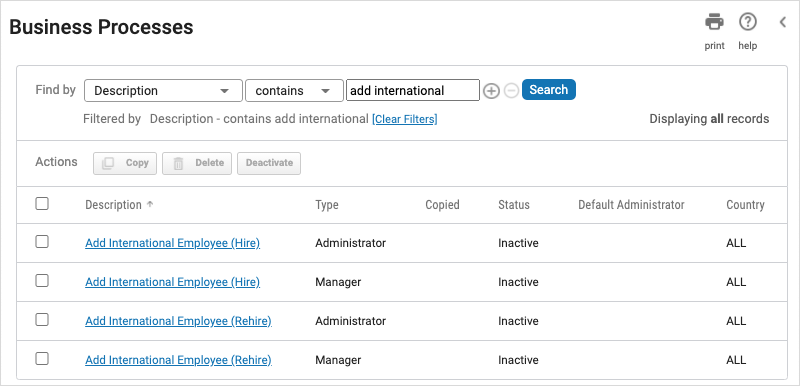
Enable Add International Employee Business Processes
System administrators must configure the Add International Employee (Hire/Rehire) business processes, including preference and notification options, using the settings for each role type (Manager and Employee Administrator).
-
From the Business Processes page, use the Find By fields to search for the Add
International Employee business process and select Search.
Enable Name and Employee Number Record Search
Employers have the option to enable the Name and Employee Number search fields on the Look Up Employee page of the Add US/Canadian/International Employee work event. Hiring managers can perform a more thorough record search using the additional fields before hiring or rehiring an employee.
-
Switch the Search for Employee Duplicates toggle to YES to search by Name and Employee
Number when using the work event.
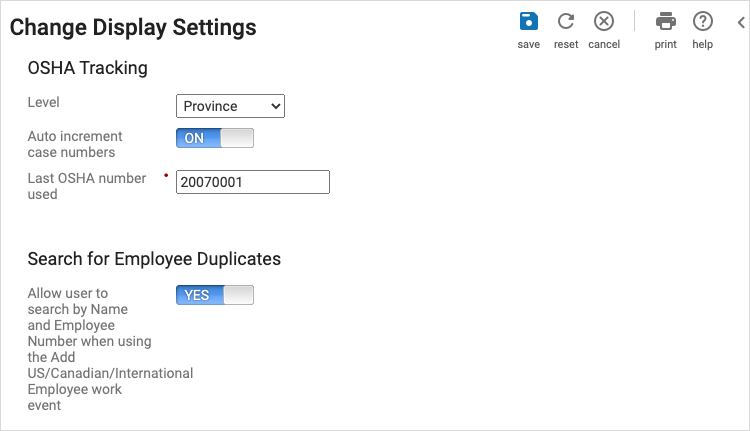 When the search and related US/Canadian/International Employee business processes are enabled, employee administrators and managers can enter the name (first, last) and employee number as search criteria to find potential record matches. Record matches are not limited by role-based security qualifiers.Note If the manager does not have access to view the actual employee record, administrators must first obtain the employee's National ID of the country in which they were originally hired.
Hire an International Employee Process
Once the system administrator completes the configuration requirements, international employees can be hired or rehired to component companies using the Add US/Canadian/International Employee work event.
After you complete the hiring process, you can make additional updates to an employee’s job-related information using different work events, including the Change Organization or Change Job work event.
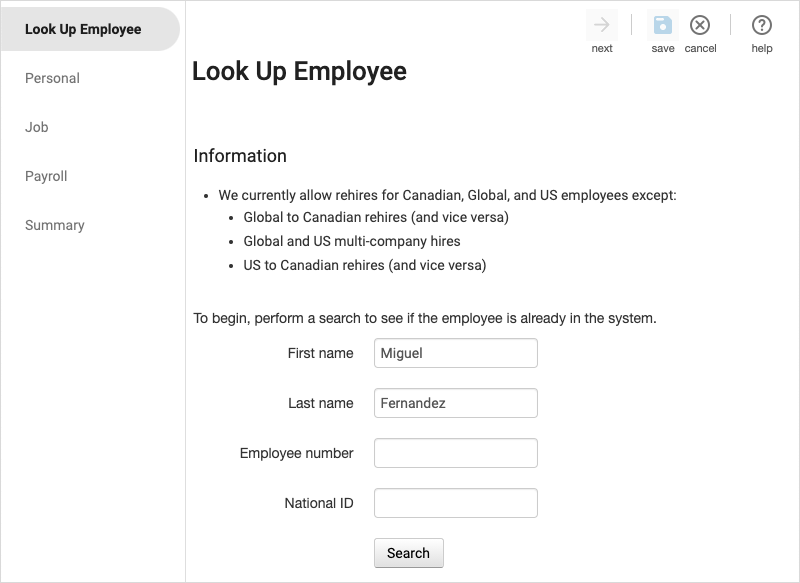
Look Up Employee
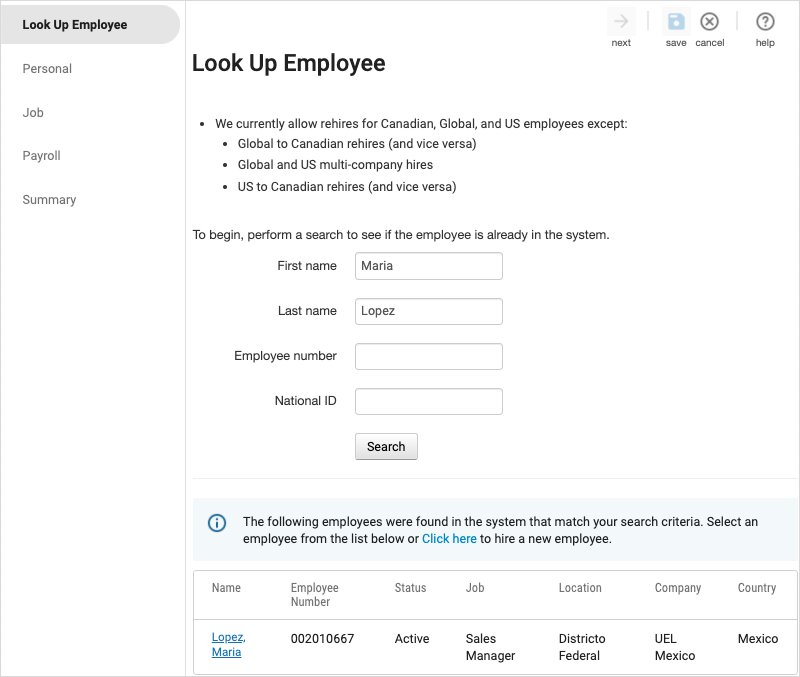
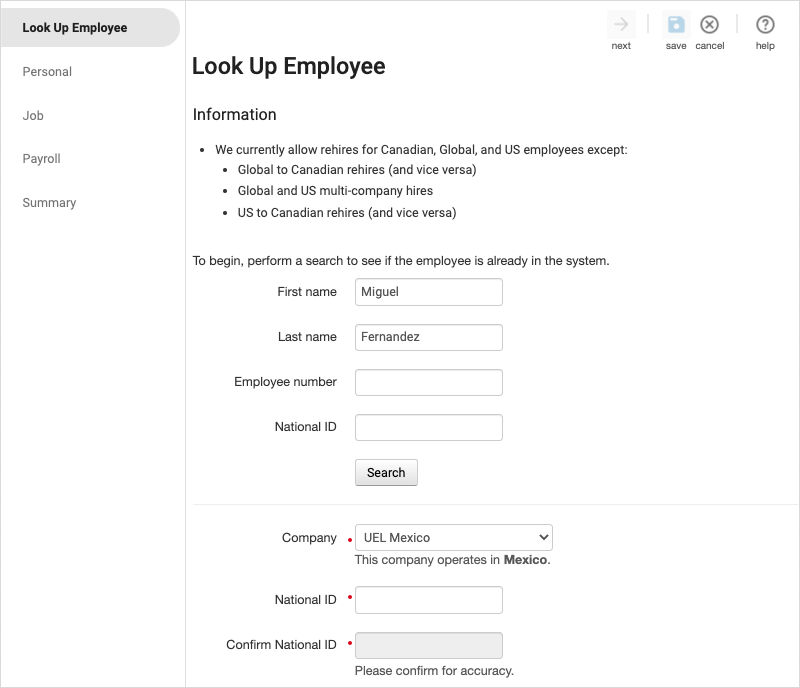
Rehire former employees, regardless of the country location, by beginning the hire or rehire process with an employee record search. Identify and locate rehires by name, employee number, or national ID to minimize duplicate records.
- From the Lookup Employee page, enter the information you have for the employee to
determine if the employee is already in UKG Pro. Complete one of the following:
- If a match is found, select the employee record to proceed with the rehire or
multi-company hire process. Enter the employee's national identification information
for the country in which you are hiring or rehiring them.Important If you are not qualified to see this employee, you must provide the National ID from the original hire country in order to proceed with the rehire process.
- If a match is not found, the message, “No employees match the search criteria,”
appears. Select the Click here link to hire a new employee and then select the company
for which you are hiring. Enter the National ID and then reenter the number to
confirm.
- If a match is found, select the employee record to proceed with the rehire or
multi-company hire process. Enter the employee's national identification information
for the country in which you are hiring or rehiring them.
- Select Next to go to the Personal page.
Add Employee Personal Information
Add or change personal information for an employee on the Personal page of the Add US/Canadian/International Employee work event.
Add Employee Job Information
Add or change job information for an employee on the Job page of the Add US/Canadian/International Employee work event.
- From the Job page, enter the employee's hire date. This date automatically populates in the Seniority and Benefits Seniority Date fields, but can be changed if needed.
- Enter the employee's seniority date. This date is used to calculate the employee's length of service. It is also used to calculate how the employee accrues PTO and leave balances.
- Enter the employee's benefit seniority date. This date is used with benefit waiting periods to establish eligibility and coverage start dates.
- Enter the employee's next salary and performance review dates. The defaults for these dates are based on the company-level settings established during company configuration, but can be overwritten if necessary.
- Select the Job.
- Enter an alternate job title.
- Select a location.
- Enter a mailstop.
- Select a project, supervisor, division, department, region, and team lead.
- Select Next to go to the Payroll page.
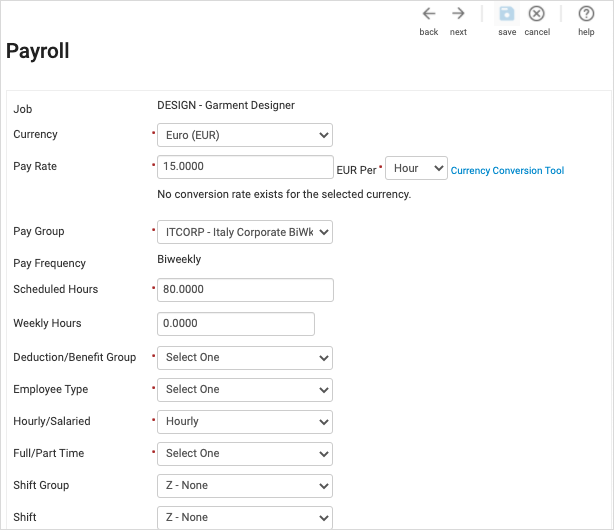
Add Employee Payroll Information
Add or change payroll information for an employee on the Payroll page of the Add US/Canadian/International Employee work event.
- At the Pay Frequency section, ensure the following required fields are completed,
otherwise pay rates will not calculate and the transaction cannot be saved: Scheduled
hours employee type, and whether the employee is hourly or salaried, full-time or
part-time, and the employee’s benefit group.
Add Employee Time or Workforce Management Information
For organizations with a time or workforce management solution, a separate page displays after the Payroll step in the Add Employee and Add US/Canadian/International Employee work events. The fields will vary based on the solution that your organization uses.
| Time Management Solution | Product Key | Resource |
|---|---|---|
| UKG Pro Time Management | TIME (previously UTM) | Add UKG Pro Time Management Settings for a New Employee |
| UKG Pro Time and Attendance | UTA | Add UKG Pro Time and Attendance Settings for a New Employee |
| UKG Pro Time Classic | UPT | Add UKG Pro Workforce Management Classic Settings for a New Employee |
| UKG Pro Scheduling Classic | UPS | Add UKG Pro Workforce Management Classic Settings for a New Employee |
| UKG Pro Workforce Management | WFDT | Add UKG Pro Workforce Management Settings for a New Employee |
| UKG Pro Time and Scheduling | WFRT | Add UKG Pro Time and Scheduling Settings for a New Employee |
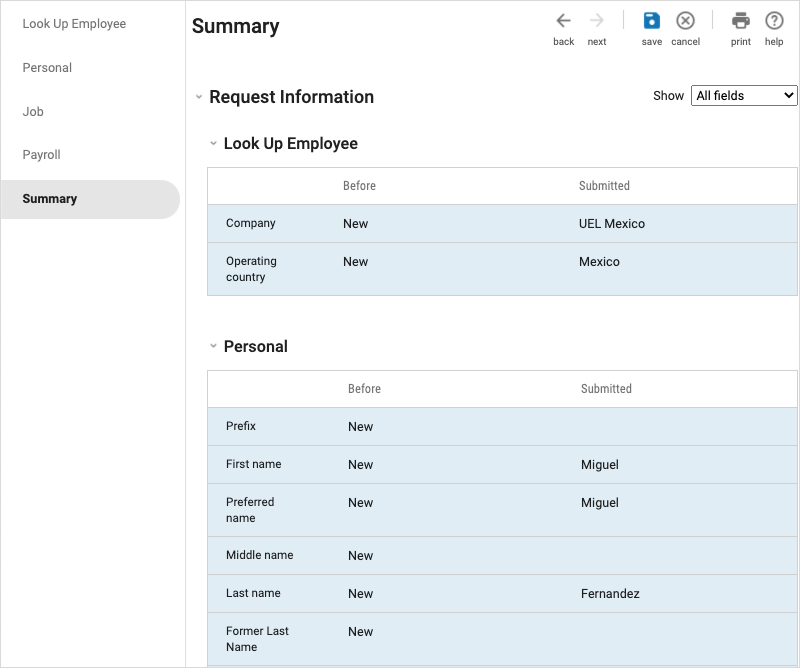
Review and Submit Request Information
Review the information entered from the request on the Summary page. Return to the applicable page to make any changes, if needed.
- Select Back to return to a previous page to make changes.
© 2023 UKG Inc. All rights reserved. For a full list of UKG trademarks, visit https://www.ukg.com/trademarks. All other trademarks, if any, are the property of their respective owners.
This document and all information contained herein are provided to you "AS IS" and UKG Inc. and its affiliates (collectively "UKG") make no representation or warranties with respect to the accuracy, reliability, or completeness of this document, and UKG specifically disclaims all warranties, including, but not limited to, implied warranties of merchantability and fitness for a particular purpose. The information in this document is subject to change without notice. The document and its content are confidential information of UKG and may not be disseminated to any third party. No part of this document or its content may be reproduced in any form or by any means or stored in a database or retrieval system without the prior written authorization of UKG. Nothing herein constitutes legal, tax, or other professional advice. All legal, tax, or other questions or concerns should be directed to your legal counsel, tax consultant, or other professional advisor. All company, organization, person, and event references are fictional. Any resemblance to actual companies, organizations, persons, and events is entirely coincidental.