Navigate the Roster
The Roster
The Roster is the primary tool used by schedulers to view the daily schedule where you can manage work codes and fill vacancies.
Roster information is grouped by shift and then listed by area such as by station or unit. The roster is a virtual assumption of the schedule based on assignment data. As work codes are added and employees are moved, work code records shift from virtual to actual.
Roster views are created in a way that is meaningful for each organization and there may be various views to accomplish different goals. The appearance of your roster has been decided by your organization.
Roster Navigation
Use the applicable navigation path for your solution.
UKG TeleStaff Navigation Path
UKG Pro WFM and UKG TeleStaff Navigation Path
Alarms Panel
In the UKG TeleStaff solution, the Alarms panel on the Roster displays roster alarm notifications and unfilled vacancies applicable to the selected roster view.
- From the Roster, select the Alarm clock symbol to open the Alarms panel and view alarms.
- Select the vacancy details in the Alarms panel to select the vacancy on the Roster.
- To close the Alarms panel, select the X.
Show People Panel
In the UKG TeleStaff solution, the Show People panel icon opens the Locate People panel and displays a list of all people within the selected roster view.

People Filter
In the UKG TeleStaff solution, the People Filter itself targets information and limits the list of people based on the parameters you define. The filter window contains subcategories to filter by and employees with the selected attributes are included in the filter.
| Filter Example | Description | Configuration |
|---|---|---|
| Specialty Not Working on Roster Day | Returns anyone that is not working on the target day that matches a specialty. | |
| Not working on roster day | Returns anyone that is not working on the target day. | |
| Can Act As Job Title Not Working on Target Day | Returns anyone that is not working on the target day that matches a Job Title. | |
| On Duty and Available | Returns people assigned to a shift that are not on leave or overtime elsewhere and are available for hold-over or call-in. |
|
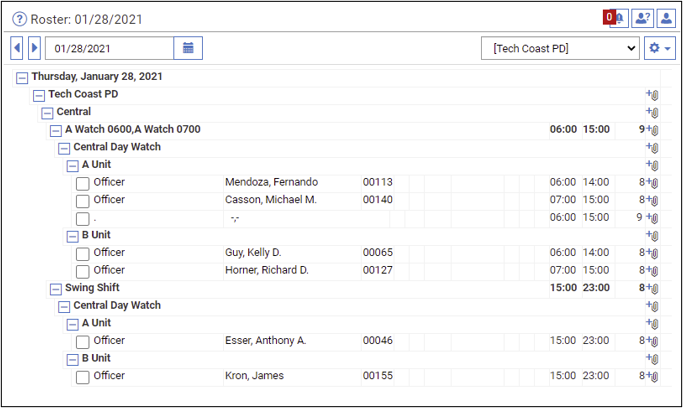
Roster Symbols
In the UKG TeleStaff solution the roster has many icons and symbols available to help you identify what is happening for the selected roster view.
The Roster displays a lot of information at once so it is important that you understand the symbols. This image and table review the key areas of the Roster.
- Calendar Icon - Indicates the date of the Roster. Selecting the Calendar icon opens a calendar where you can easily select a different roster date to view.
Bracketed Job Title - Indicates the employee is unassigned. Typically unassigned employees do not have a home location and fill-in for units or positions that need more support.
Red Question Marks - Indicates a vacancy. These vacancies generally require a back-fill and serve as an indicator to the scheduler that they need to be filled.
Hyphen Comma Hyphen - A suppressed vacancy. Suppressed vacancies generally do not need to be filled.
Phone Icon - The system is in the process of outbounding a vacancy offer, a message, or a notification of the assignment details to the employee.
Yellow Triangle - The employee in the position fails to meet the qualifications of the position. Positions may have certification requirements which require the employee to have required qualifications.
Pending Notification - Indicates queued outbound activity and the employee has not yet been notified.
Red Number - Indicates the priority in which vacancies are to be filled.
Notes - The employee in the position has a work code note. Only the employee and their superiors can view the details of a note.
Roster View - Indicates the selected roster view. The Roster only displays data for the selected roster view. Having multiple roster views grants schedulers the ability to view scheduling information necessary for various scenarios.
Alarms Notifications - Opens the Alarms Panel which displays all outstanding roster alarms for the selected roster view.
Person - Opens the People Filter which you can use to filter off-duty employees when filling vacancies.
Alarm Bell - Indicates a roster count issue or vacancy that needs to be filled. Depending on your configuration, you may need to manually initiate the back-fill process.
© 2024 UKG Inc. All rights reserved. For a full list of UKG trademarks, visit https://www.ukg.com/trademarks. All other trademarks, if any, are the property of their respective owners.
This document and all information contained herein are provided to you "AS IS" and UKG Inc. and its affiliates (collectively "UKG") make no representation or warranties with respect to the accuracy, reliability, or completeness of this document, and UKG specifically disclaims all warranties, including, but not limited to, implied warranties of merchantability and fitness for a particular purpose. The information in this document is subject to change without notice. The document and its content are confidential information of UKG and may not be disseminated to any third party. No part of this document or its content may be reproduced in any form or by any means or stored in a database or retrieval system without the prior written authorization of UKG. Nothing herein constitutes legal, tax, or other professional advice. All legal, tax, or other questions or concerns should be directed to your legal counsel, tax consultant, or other professional advisor. All company, organization, person, and event references are fictional. Any resemblance to actual companies, organizations, persons, and events is entirely coincidental.