Administrators can personalize a notification with images and hyperlinks. The steps in this topic pertain to the Email step for notifications (Settings > Notifications > select notification or select Add to create a new notification).
Important:
Any images that you want to add to your email notifications must be public images; they cannot be located on a private website or behind a login. For questions about hosting images, contact your IT team.
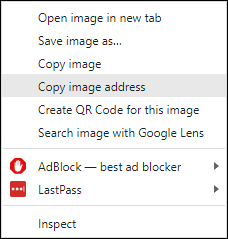
- To create a header, right-click on the public image you want to use, and then select Copy Image Address.
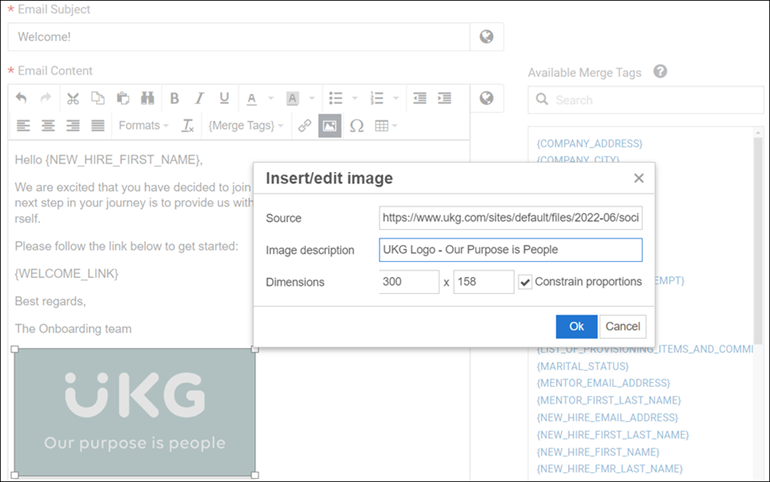
- Click in the Email Content section of your notification, and then select the Insert/Edit Image icon in the taskbar.
- Complete the Insert/Edit Image pop-up window.
- Paste the image address into the Source field.
- To improve the accessibility of your email for assistive technology users, enter a description of the image. At the Image Description field, include information such as the title of the destination page. It is best practice to avoid using generic terms such as Read More or Click Here when creating a description or display text for a hyperlink.
- Adjust the dimensions as needed.
- Select OK.
- To create an image on one side with text on the other side of the email, move the cursor to where you would like the image to appear and insert a 2x1 table by selecting the Table icon in the taskbar.
- Click in the column of the 2x1 table where you would like the image, and then follow the previous steps to add a public image. Be sure to adjust the dimensions as needed.
- Click in the other column to add your text. Use Onboarding's merge tags to personalize your email.
- Select Table Properties to further customize the table you created.
- To turn an image into a clickable link from the email content, click on the image you wish to add a link to.
- Select the Insert/Edit Link icon in the taskbar.
- Complete the Insert Link pop-up window.
- Paste the web address into the URL field.
- To improve the accessibility of your email for assistive technology users, enter the display text and title. At the Text to Display field, include information such as the title of the destination page.
- Select OK.
Note:
These same instructions apply when creating a job board and email notifications in UKG Pro Recruiting.

