Transfer an Employee to a New Policy Group

Within Time Off, administrators, and optionally managers, can transfer an employee from one policy group to another.

By default, all administrators are assigned the POLICY_GROUP_TRANSFER permission, which is required to transfer an employee to a new policy group. If your organization would like managers to have this authorization, then permission must be assigned to that role (Settings > Roles).

On the Policy Group Transfer page, the employee's name is a link that goes to a summary of the transfer for that employee. The summary includes the effective date, current and new policy groups, mapped policies, unmapped policies (balances lost), starting balance for the new policy group, and transferred time off requests.

As the transfer steps are completed, each section name listed at the top of the page is a link that takes you to that page.

You can filter by employee name, employee number, current policy group, or new policy group. You can also choose to view the following transfer statuses:
  • Pending

  • Completed

  • Completed with Variance

  • Failed

Navigation: Menu > Administration > Employee Admin > Time Off > Policy Group Transfer
  1. Select Create New Transfer.
  2. Complete the General Details:
    1. Enter or search for the employee's name. The information icon displays the selected employee's name, number, and component company.
    2. Enter the effective date. Each date must be in the future or within the current pay period. The calendar dates that cannot be selected are grayed out. Any changes to the balances after today are not considered in the transfer. The calculations are one time only.
    3. Select the new policy group, and then select Next.
  3. Complete the Current Policy Details:
    1. Review the current policy balances and the pending and approved requests.
    2. Select the Transfer Balances option to transfer the balances from the current policy. If this option is not selected, old balances will be removed and no balances will be added to the new policy.
    3. Select the Transfer Requests option to transfer the outstanding requests. If this option is not selected, old requests will be canceled, and the new policy will not contain any new requests until they are created.
    4. Select Next.
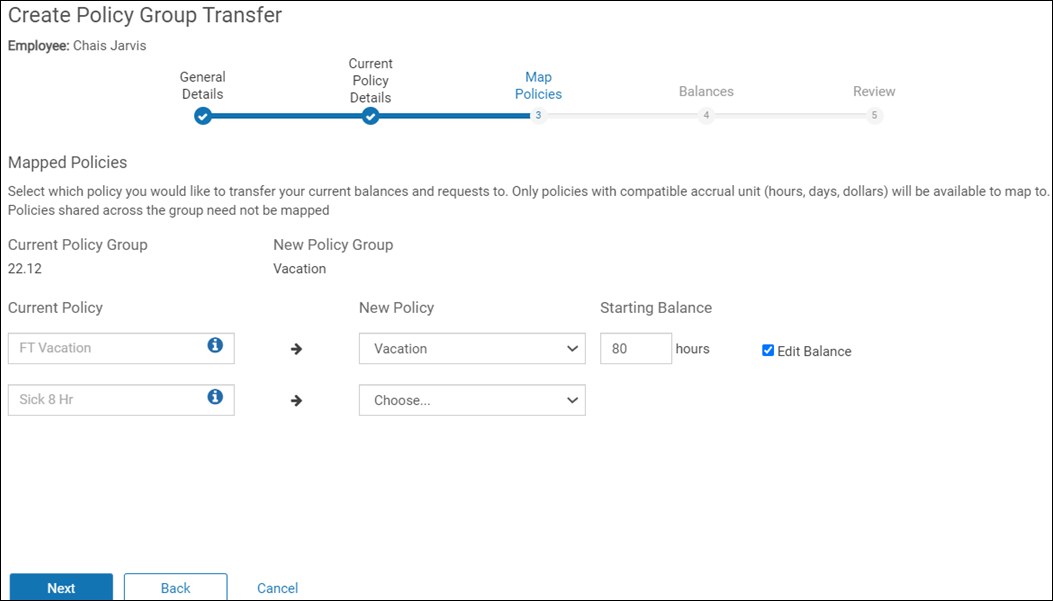
  4. Complete the Map Policies:
    1. For each current policy listed, select the new policy name. Hover over the information icon to view details about each current policy, including current balances and the dates of any time off requests.

      Create Policy Group Transfer page showing the Current Policy Details step where policies are mapped

      Note:

      • If a policy exists in both the existing and new policy groups, then it is not listed as a current policy to be mapped.

      • You must map hours to hours, days to days, and dollars to dollars. If you need to map from one policy type to another, such as an hours policy to a days policy, review Change an Employee's Policy Group Assignment.

    2. Edit the balance for each policy, if applicable. Select the Edit Balance checkbox, and then enter the hours.
    3. Select Next. If you do not map a current policy, a message appears asking if you are certain that you want to continue with unmapped policies.
  5. Complete the Balances:
    1. If there are policies in the new group that do not map from policies in the current group, enter the starting balance for each policy.
    2. Select Next.
  6. Review the policy group transfer, and then select Save.

    You are returned to the Policy Group Transfer page where your transfer is listed in a Pending status. Select Refresh to update the status. Select the employee's name link to review the transfer details.

    On the employee's Assignments tab (My Team > select employee), the Policy Group section displays the past and current policy groups. Under Transaction Type, you can filter to list only manual transactions.

    If you have been assigned the MANAGER_MANUAL_TRANSACTION permission, you can edit manually created transactions (Time Off tab > History link). Transactions are shown as hyperlinks in the Effective Date column. The History page includes the transactions related to all policy group transfers; the Notes icon includes a description (for example, Closing Balance). The Requests tab lists the affected time off types (for example, sick time in a canceled status if it was not mapped to a new policy group).

Related Topics