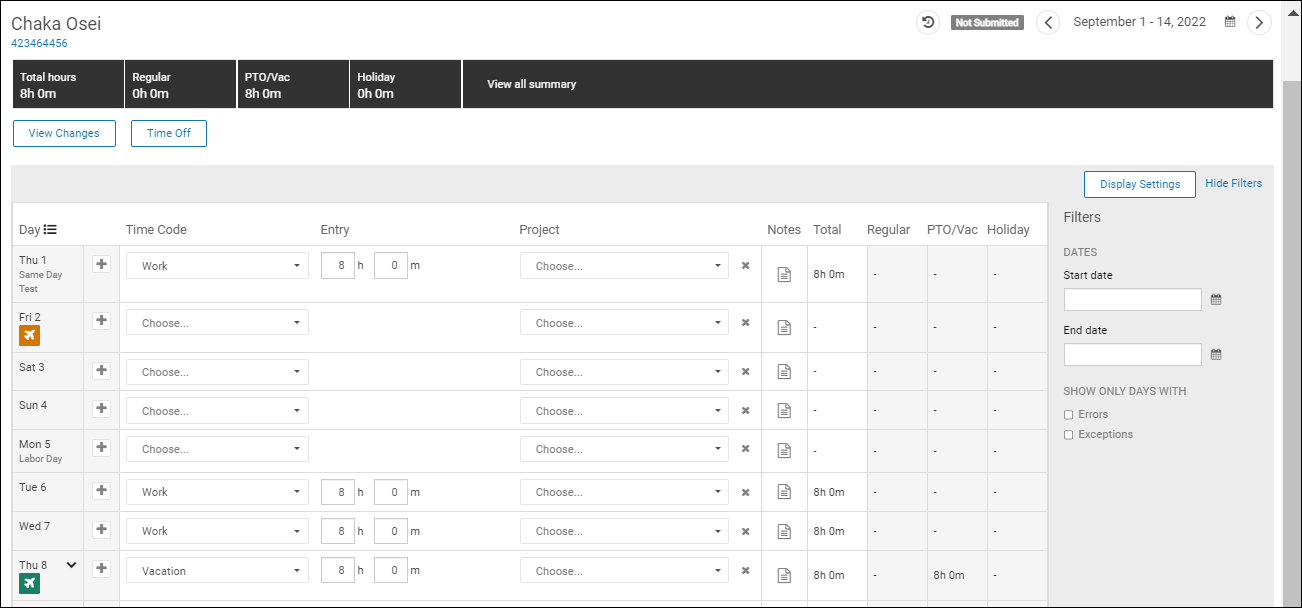
Time Classic enables you to quickly review and approve or reject your employees' timesheets so you can focus on your work. In addition, you can complete the time tracking and management tasks via a mobile device. Any errors and exceptions are listed so you can review and correct them immediately.
- Mass submit, mass reject, mass approve, or mass unapprove submitted timesheets. (These permissions must be assigned on the Create Role page or Edit Role page [Settings > Roles > create or edit a role].)
- Approve or reject an individual employee's timesheet.
Navigation: Menu > My Team > Workforce Management Classic > Time Classic > Team Timesheets
- Select the pay period.
- Select the timesheet configuration group and pay group. (For Duration, employees key in their time worked and use a time entry timesheet; for Time Clock, employees clock in and out and use a time clock timesheet.)

Only active pay groups appear in the drop-down list. If a pay group end date overlaps or is in the middle of another pay group's end date, the pay group is grayed out and italicized in the list.
- Select the arrow icon to the right of the column titles to choose the columns to display and the display order.
- Apply timesheet filters, if necessary. You can choose to show only timesheets with errors or exceptions, or only active or inactive employees.When a filter is applied, a blue bar appears above the employee list stating how many employees are hidden by the selected filter. If you navigate away from the Team Timesheets page and return to it, the selected filters still apply.
Note:
If the Employee Status filter is applied, you will only see timesheets for active or inactive employees. Once inside the timesheet, a horizontal divider appears above the applicable days on the employee timesheet (for example, Employee on Leave from December 2, 2019 to December 6, 2019). The divider does not display for employees who are active, except in the period in which they changed from inactive to active.
- Select a team to view only the timesheets of your direct reports. The team remains until a different one is selected.
- Select an employee's timesheet from the list. If you select filters and then navigate away from the page and return to it, the selected filters still apply within the same session. If you select Hide Filters, the filter panel remains hidden when you log out and back in and when you navigate to another page.

Note:
Below the employee's name, select the employee's ID to view the employee summary. The summary includes employee number, supervisor name, primary job, hire date, seniority date, and pay group.
- To show or hide errors and exceptions for a specific time period (for example, until the end of the day or the end of an employee’s assigned schedule), select Display Settings. The Display Settings panel includes several options:
- Show all – Show on all days, including future days.
- Hide only future days – Hide on future days only.
- Hide until end of shift – Only show on the current day when the scheduled end time has arrived.
- Hide until end of day – Only show on the current day when the day has ended.
After an option is selected, the timesheet updates immediately and the selection is remembered even after you log out.
Note:
Errors and exceptions will always be shown on prior days, and time off related errors will always be shown on all days.
- To view timesheet details, select the option from the detail menu of the Day column:
- Timesheet Range Details – Changes how the totals are shown at the bottom of the timesheet.
- Timesheet Status Details – Displays the individual timesheet status for each day.
- If an employee's timesheet has not been submitted, you can select Submit for Approval.
- Complete any necessary changes. For duration timesheets, you can add hours, including adding hours to multiple days by selecting Enter Duration. For time clock timesheets, you can fix a missing punch, add punches to a “no-show” day, add a duration of time, and add a transfer punch if the employee worked multiple jobs in a single day.
Note:
If the timesheet has been configured to display a Labor Metrics column, you can select a labor metric value to specify where to charge time worked (for example, the department name or location).
- Select the Notes icon and complete the pop-up window.
- Enter any notes about an entry (for example, why an employee was late). Next, select the day to attach the notes to, and then select Post. These notes are helpful for timesheet tracking purposes. (Employees can view notes entered by managers or administrators.)
- Select the Delete icon ("X") next to a note to delete it and then select Post. The MANAGER_DELETE_NOTES permission must be assigned for the Delete icon to appear.
- Select Approve or Reject. After you select Approve, the timesheet status changes to Approved. The employee is automatically notified that the timesheet was approved or rejected.
- To access the Time Off panel, select the Pending or Approved Time Off Request icon below the specific date, or select Time Off. The panel displays the employee's planned requests and balances; it does not include canceled or rejected requests.
- Select to approve a request for an assigned employee, or request time off for the employee.
- Select the Time Off link to open the employee's Time Off page in a separate browser tab.
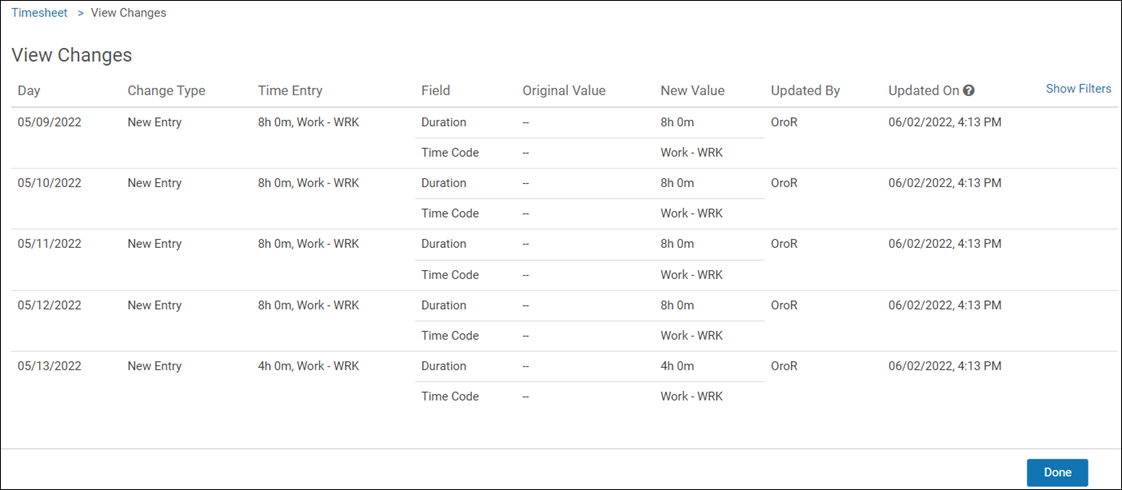
- Select View Changes to view changes made to the timesheet, including who made the changes and when. Typical changes include new punches, modified punches, and deleted entries.

- In the optional Filters section, enter the dates in which to view changes.
- Select the type of change you want to view (New Entry, Modified Entry, Deleted Entry, Applied Meal Waiver, Applied Break Waiver, Removed Meal Waiver, Removed Break Waiver, Waived Untaken Meal, Waived Untaken Break, Unwaived Untaken Meal, Unwaived Untaken Break, Enabled Holiday Eligibility, or Disabled Holiday Eligibility).
- Select the field changes to view (Location, Duration, Start Time, End Time, and Time Code).
- Select the individual whose changes you want to view.
- Select Done to return to the employee timesheet.
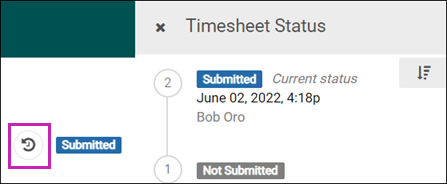
- To view a complete history of timesheet status changes, select the Timesheet Status History icon.

The Timesheet Status panel displays the following:
- Preferred name of individual who made the changes
- Date and time when the status changed
- All the statuses the timesheet went through
- Rejection notes attached to Rejected and Retro-Rejected statuses
Note:
To view the rejection reason and comment, the employee role requires the EMPLOYEE_REJECTION_REASON permission, and the manager role requires the MANAGER_REJECTION_REASON permission.
If a timesheet is in an Approved or Submitted status and the employee has a pending time off request, a message appears indicating that the request cannot be completed. If the timesheet was manually approved and you have permission to unapprove it, then you can unapprove it, insert the approved time off, and manually reapprove the timesheet. If the timesheet was automatically approved, it is automatically unapproved and you can manually reapprove it. (The MANAGER_TOA_REQUEST_TIMESHEET_WARNING permission must be assigned to your role in the Time Off feature.)
If the ADMIN_TIMESHEET_UNAPPROVE permission has been assigned to you (Settings > Roles > Edit Roles), you can unapprove timesheets, make corrections, and approve the timesheet again. Employees are notified when their timesheets are unapproved, corrected, and approved again.
If you have retro edit permissions, you can edit a timesheet if the date is within the retro adjustment period. You can make retroactive time adjustments to an employee’s timesheet only during a specific period of time. Only those days that are available for retro edit, having a status of Exported, can be edited. When a retro calculation is exported for the current pay period, the timesheet remains in Approved status and the letter “R” appears on the day the edit was made. Retro calculations can be viewed after the retroactive edits are made on the timesheet.
If using a web clock, employees and managers can select the Call Back In and Call Back Out buttons to accurately record time and make adjustments. Time clock managers can view calculated values on timesheets to verify that inputs and outputs are correct. The calculated values display as the main information in place of the punches, but an Edit icon displays the punches.