Administrators can configure the information to display on employee timesheets by group, including hour types, schedules, and shift patterns. The Timesheet Configuration Group page lists all available timesheet configuration groups and identifies which ones are currently in use.
Navigation: Menu > Administration > Workforce Management Classic > Time Classic > Settings > Timesheet Configuration Group
- Select Create.

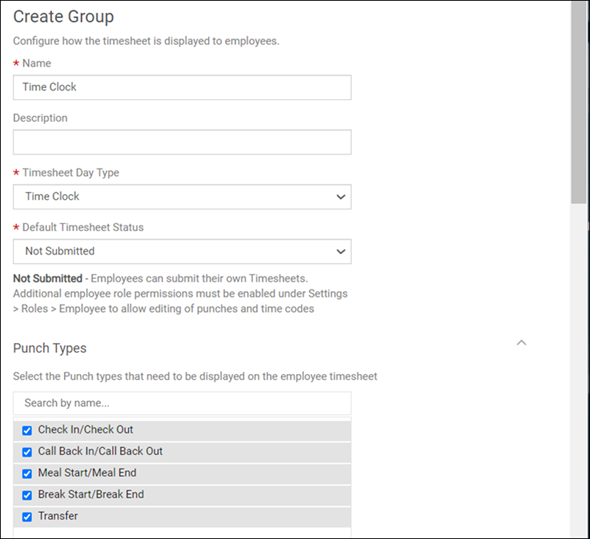
- Enter the name and description. "None" cannot be used as a name for the group.
- Select the timesheet type.
- If Time Clock is selected as the timesheet type, a Punch Types section appears so you can select the punch types that should appear on the employee timesheet (Check In/Check Out, Call Back In/Call Back Out, Meal Start/Meal End, Break Start/Break End, and Transfer).
- If Time Clock is selected as the timesheet type and you want
employees to have the ability to submit timesheets from the web application, select
Not Submitted at the Default Timesheet
Status field. When the status is changed to Not
Submitted for existing timesheet configuration groups, the timesheets
remain in a Submitted status until they are edited or rejected.
Note:
Be sure to assign the additional employee role permissions for time clock employees to edit their timesheets (Settings > Roles > Employee > EMPLOYEE_TIMESHEET_TIME_CLOCK_EDIT_NON_PUNCH permission or EMPLOYEE_TIMESHEET_TIME_CLOCK_EDIT_ALL permission).
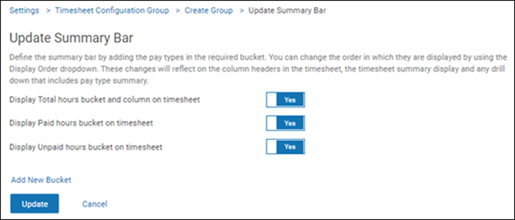
- At the Timesheet section, select the Edit (pencil) icon to open
the Update Summary Bar page where you can add pay types for the
group you are configuring. These summaries apply to the right side of the timesheet and
the summary bar at the top of the timesheet.

- Select Yes next to the pay type you want to add.
- Select Add New Bucket to add a new item.
- Select Update to save and return to the Create Group page.
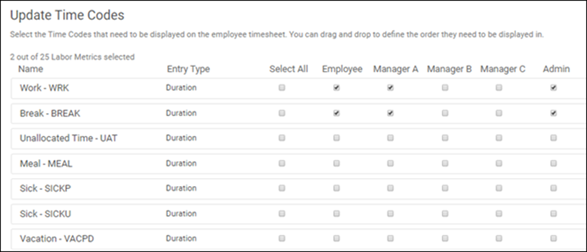
- Select the Edit icon next to the Time Code section. The
Update Time Codes page appears.

- Check the boxes for the roles that should have access to the specific time code when a timesheet is edited. Different users can have access to different time codes on a timesheet. For example, a manager may have access to time codes that employees do not. (To ensure permissions have been assigned to a role, verify the role [Settings > Roles > select the role link].)
- Drag and drop the codes into the order they should be listed.
- Select Update to return to the Create Group page.
- Select the Edit icon next to the Add Labor Metrics
section.
- On the Update Labor Metrics page, select the labor metrics that should display on the timesheet.
- If a selection for a specific labor metric must be made on a time entry timesheet, select the Required checkbox next to the labor metric. Employees and managers must select a labor metric before saving the timesheet.
- Drag and drop the items into the order they should be listed.
- Select Update to return to the Create Group page.
- Complete the timesheet details.
- Select whether to allow the timesheet data to be copied.
- Select whether to show custom and statutory holidays, schedules, and shift patterns on the timesheet.
- For time entry timesheets, select whether to allow employees to select dates for time entry. For time clock timesheets, select whether to show a notification message on the timesheet for unprocessed punches.
- For time clock timesheets, select whether to allow out of sequence punch types on the punch clock. When this option is selected, the Punch Clock page displays an Other button that lists available punch types.
- Select whether to show pay type summaries at the day level. If No is selected, pay type summaries will be displayed for each scheduled shift. If Yes is selected, pay type summaries will be aggregated for the day.
- Select whether to allow all roles access to the time code assigned on the employee profile.
- To hide a timesheet configuration group on the Team Timesheets page, select Yes at the Hide on Team Timesheets Page field.
- Select how time code, pay type, and labor metric should display on the timesheet: code only, name only, or code and name.
- Enter the number of rows per shift by default to be edited.
- Select the timesheet length. Before creating this, be sure to check if the pay schedule has changed.
- Select whether duration based employees can enter time using metric view. If this is selected, an Enter Duration button appears on the timesheet.
- Specify whether an attestation statement should be included; if Yes is selected, the default statement appears and you can edit it.
- Select Save.
- To change an employee’s assigned timesheet configuration group:
- Go to My Team and select the employee's name.
- Select the pencil icon in the Timesheet Config Group section.
- On the Add Timesheet Config Group pop-up, select the timesheet configuration group from the drop-down list. The None option is helpful for managers who do not need timesheets.
- Select the Add Range link to add start and end dates and times, as needed.
- Select Save.
If reassigning the configuration group for dates where the timesheet is created, you will be asked to confirm the deletion of timesheet records.