Onboarding system administrators can customize branding pages to create a unique onboarding experience for new hires. There is no limit to the number of branding pages that can be created.
Navigation: Settings > Branding
- From the Branding Settings page, select Add Brand to create a branding page, or select a Brand Name to edit.
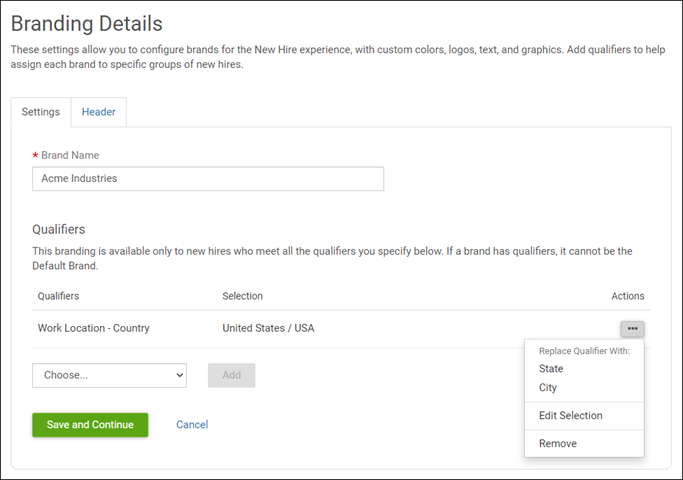
- From the Branding Details page, at the Settings tab, enter a Brand Name.
- At the Qualifiers step, you can associate the brand with
specific qualifiers. Select from the drop-down menu to determine which qualifiers the
brand should be associated with. You can qualify based on Component
Company, Employee Type,
Employment, and Work Location.
Note:
If a new hire matches multiple brands based on the selected qualifiers, or does not match any of the brands created, the Default Brand will display.
- The Work Location qualifier is considered an umbrella category. Umbrella categories are "OR" conditions, meaning you can qualify on one of the options, but not all. For example, if you select Work Location as a qualifier, a new window appears. From here, you select if the brand includes a qualifier of Country, State, or City, but not more than one.
- Select the desired qualifier option. Then select Next to see additional criteria if an umbrella category was selected.
- Select the applicable boxes for the desired criteria, then select Apply. All selected qualifiers display as a summary.
- To make any change to the selected qualifiers, select the
Actions menu.
- To edit the selected qualifiers, select Edit Selection and then make the necessary changes to the selected criteria.
- To delete a qualifier, select Remove.
- To change the qualifier option, select the applicable option listed under
Replace Qualifier With.
Note:
- Only those that are umbrella categories have the Replace Qualifier With option in the Actions menu.
- The designated default brand cannot include qualifiers. If qualifiers have been selected, the Make Default option will not be displayed in the Actions menu.

- Select Save and Continue.
- From the Branding Details page, at the
Header tab, customize the new hire landing page by applying
corporate branding elements.
- The brand can include company logos, background and text colors that match your
business, and a background image that appears throughout the new hire experience. All
branding elements within the template can be modified:
- Large logo (PNG, JPG, or GIF). Maximum size is 300KB (W 300 x H 65 pixels).
- Small logo (PNG, JPG, or GIF). Maximum size is 300KB (W 75 x H 25 pixels).
- Header background.
- Header links.
- Stripe.
- Background image (PNG, JPG, or GIF). Maximum size is 500KB (W 1500 x H 300 pixels).
- Welcome background.
- Welcome text color.
- Welcome text.
- A Preview option for both desktop and mobile devices is available to see what new hires experience when they enter Onboarding.
- The brand can include company logos, background and text colors that match your
business, and a background image that appears throughout the new hire experience. All
branding elements within the template can be modified:
- Select Save and Close.