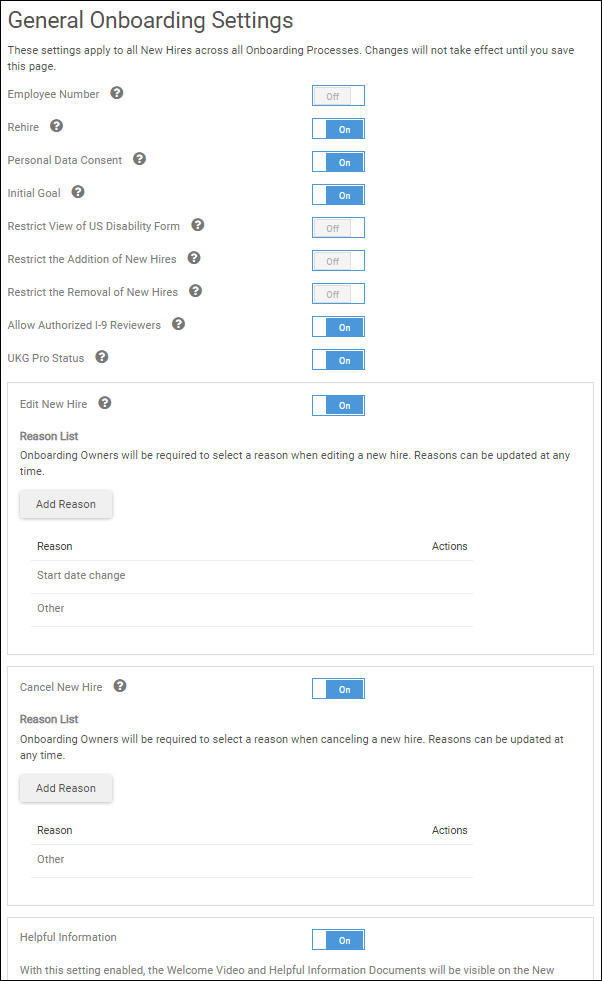
The General Onboarding Settings page is where you configure what appears to new hires to welcome them and show them the appropriate amount of information to get started with your organization.
General settings apply to all new hires across all onboarding processes. You select which options to activate.
Navigation: Settings > General
- Activate the Employee Number field to assign new hires an employee
number during onboarding. Numbers are assigned either optionally during Initial Review by
providing the new hire’s national ID or after the new hire provides a national ID during
the Launched status.

- To prevent a rehire notification tag from displaying in the new hire's status, select Off at the Rehire field.
- Activate Personal Data Consent to require new hires to grant
consent to the use of their personal data. If activated, the personal data consent message
appears when new hires first enter Onboarding.
Note:
The Consent template must be created in Consent settings in order to display on the page. New hires who provide consent can continue with their onboarding process. New hires who do not consent are prevented from continuing.
- Activate Initial Goal to provide new hires the option to enter an initial goal for themselves during the onboarding process. If not activated, the Initial Goal section and existing initial goals are no longer visible to new hires.
- To prevent onboarding owners and administrators from viewing a new hire's Disability Form, select On at the Restrict View of US Disability Form field.
- To restrict onboarding employee administrators from adding new hires, select On. If a person is assigned both the onboarding system administrator role and the employee administrator role, they can still add new hires.
- To restrict onboarding employee administrators from removing new hires, select On. If a person is assigned both the onboarding system administrator role and the employee administrator role, they can still remove new hires.
- Select On to allow onboarding owners the ability to assign an employee the role of Authorized I-9 Reviewer. Employees assigned this role can complete the Form I-9 tasks for a specified new hire.
Note:
The reviewer will have access to personally identifiable information (PII), including Social Security Number, for the person to whom they are assigned.
- At the UKG Pro Status field, select On for a notification tag to display if a new hire is sent to Process Hires or has an Active or Terminated status in UKG Pro. The status appears below the individual's name on the Completed New Hires page.
- At the Edit New Hire field, select On to allow onboarding owners to edit a new hire. Select Add Reason to add a reason (for example, Job Change), and then select Save. The character limit is 50, and the reason cannot contain greater than and less than signs (">" and "<"). There are two system-delivered reasons: Start Date Change and Other. You can add eight additional reasons that can be added, edited, or deleted at any time. Onboarding owners are required to select a reason when editing a new hire.
- At the Cancel New Hire field, select On to allow a new hire's status to be changed to Canceled if they will not be hired. If On is selected, select Add Reason to add reasons for the cancellation. For example, an organization may want a reason code of "Not Hired." If additional reasons are not added, then the default of "Other" is available.
- Activate Helpful Information to customize videos and documents that are visible to the new hire on the Onboarding home page. If the Helpful Information setting is not activated, any videos or documents listed are hidden and do not appear on the home page.
- Adding a Welcome Video allows you to include a video that you
would like new hires to watch. For example, you may want to include a video welcome
message from your CEO.
- Enter the Title and the Video URL.
- Select the Preview icon to view the video in a new browser window.
Note:
The Video URL field is for a YouTube video URL only, not a YouTube channel. If you do not want to upload a YouTube video, make sure both the Title and Video URL fields are blank.
- In the Helpful Information Documents section, include documents
that appear on the home page. Documents are added or removed in the Document
Library.
- Select the Preview icon to view the document in a new browser window.
- To Reorder how the documents appear, use the up and down arrows.
- Select Save.