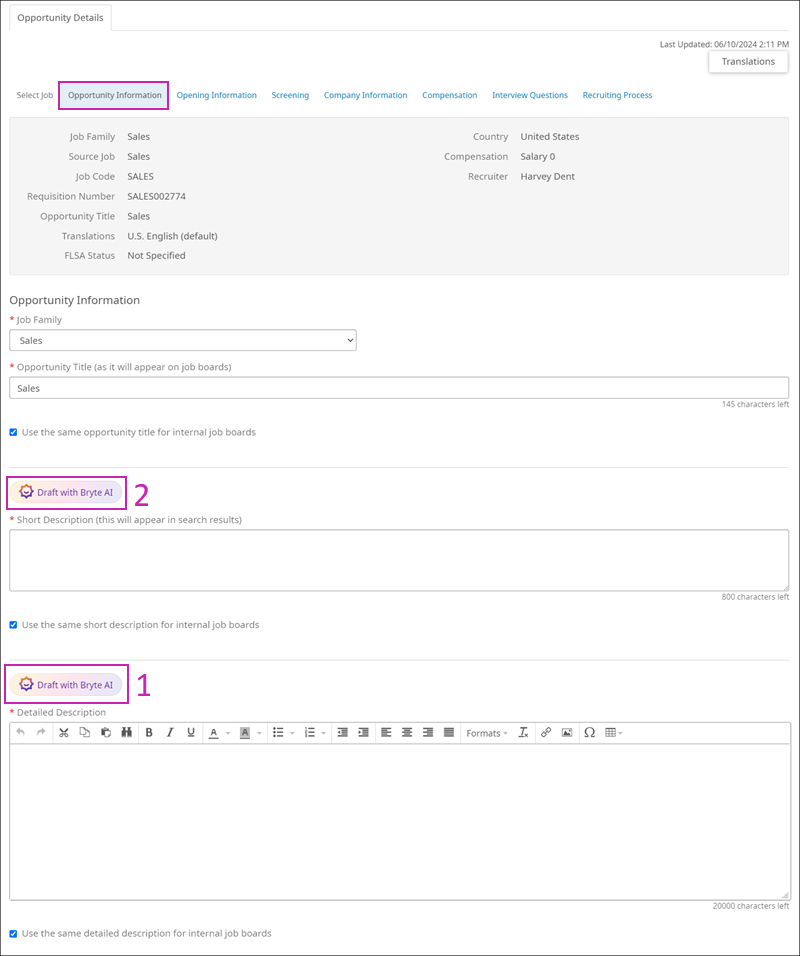
Recruiters (and Hiring Managers, if applicable) can use Bryte AI in the Opportunity wizard to create short and detailed job descriptions.
Your organization must be using Bryte AI in the UKG Pro solution and a Recruiting administrator must activate Bryte AI for job descriptions in Settings > Bryte AI.
Note:
- This feature is not available for Opportunities in Pending Approval or Closed status.
- Bryte AI only responds in U.S. English.
- Select an existing Opportunity or create a new one. The Opportunity wizard opens. The Bryte AIfeature is available on the Opportunity Information tab for the Short Description and the Detailed Description fields.
- Generate a Detailed Description. Select the Draft with Bryte AI button in the Detailed Description section. A pop-up window opens.
- Add at least one desired job skill to the Skills field. At least one Skill must be present for Bryte to generate a job description. For your convenience, Bryte AI pre-populates a list of skills from its taxonomy based on the U.S. English title of the Opportunity. You can add or remove skills as needed to refine the job description. The maximum is 25 skills.
- Once you enter at least one skill in the Skills field, select Generate. Bryte AI creates a job description based on the Job Title and the Skill(s) listed. Any information your Recruiting Administrator entered at the Company Information or Diversity Statement fields when activating Bryte AI also appears as part of the job description.
- (Optional) Use the thumbs up or thumbs down icons in the pop-up window to rate how helpful you find the generated content.
- Select the Insert and Replace button. Any text in the Detailed Description field is cleared and replaced by the Bryte AI-generated text.
- Review the Bryte AI-generated description to ensure it accurately represents the desired job posting. Manually edit the description as needed.
- If you are not satisfied with the detailed description, select Draft with Bryte AI again and choose more or different skills.
- Selecting Insert and Replace a second time will clear the first job description and insert the newly generated one.
Once you are satisfied with the Detailed Description, you can generate a Short Description.
Important:
You must have a Detailed Description before Bryte AI can generate a Short Description.
- Select the Draft with Bryte AI button in the Short Description section. A pop-up window opens, and the text of the Detailed Description displays. You cannot edit the text here.
- Select the Generate button. Bryte AI generates a short job description based on the content of the detailed description.
- (Optional) Use the thumbs up or thumbs down icons in the pop-up window to rate how helpful you find the generated content.
- Select the Insert and Replace button. Any text in the Short Description field is cleared and replaced by the Bryte AI-generated text.
- Review the Bryte AI-generated description to ensure it accurately represents the desired job posting. Manually edit the description as needed.
- If you are not satisfied with the Short Description, adjust the Detailed Description and select Draft with Bryte AI again.
- Selecting Insert and Replace a second time will clear the first job description and insert the newly generated one.
- (Optional) For both the Detailed and Short Descriptions, select the checkbox to use the same description for internal job boards. If left deselected, the description(s) will be used on external job boards only.
- Continue creating your Opportunity as usual.
Remember, you must generate a Detailed Description before generating a Short Description.
