Locations

Recruiting Administrators can configure the locations that are available for use in Opportunities.

To simplify the setup of your locations, Recruiting imports information about the tax locations that your organization has configured in UKG Pro. You can use the imported locations in your Opportunities.

Locations imported from UKG Pro cannot be deleted in the Recruiting solution. UKG Pro locations are indicated by a blue bar beside the location name in the list. These locations must be inactivated in UKG Pro > Menu > System Configuration > Business Rules > Locations.

If needed, you can also create new locations in Recruiting. These locations are not tied to a tax location in UKG Pro.

Navigation: UKG Pro Recruiting > Settings > Locations

  1. Select or create a location:
    • To create a new location, select Create Location.
    • To edit an existing location, select its address link in the Location column.
  2. In Name, enter the name that you want the location to have in Recruiting.
  3. In Location ID, enter an additional identifier for the location.
    The Location ID can be a store number, or other alphanumeric code that helps Recruiters identify the location.
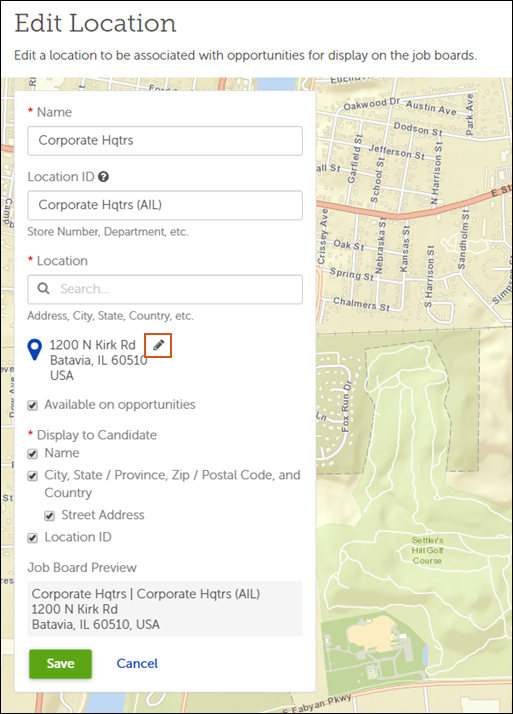
  4. To change the address of the location, select the edit icon. Enter the new address information, then select Continue.

    Edit Address icon in a Recruiting location

    Note:

    If the location is imported from a UKG Pro tax location, the address cannot be changed in Recruiting. These locations have a blue bar by their name in the Locations list. Make the changes in UKG Pro > Menu > System Configuration > Business Rules > Locations instead.

  5. To allow Recruiters to assign this location to Opportunities, select Available On Opportunities. To prevent this location from being available for Opportunites, deselect this box.
  6. In Display to Candidate, select the items you want candidates to see in the Opportunities that use this location.
    As you make changes, the Job Board Preview updates to show how the location will appear on job boards.
  7. Select Save.
Related Topics