Employee Maintenance Guide
Chapter 14
OSHA/Safety
Overview
The focus of this chapter is to explain how the system records and maintains Occupational Safety and Health Administration (OSHA) and accident information at the employee level.
The main topics covered in this chapter include:
§ Understanding OSHA/Safety Information
§ Viewing the Company OSHA/Safety Summary Window
§ Viewing the Employee OSHA/Safety Summary Window
§ Working with the Summary Window
§ Working with the Details Window
HIPAA
The Health Insurance Portability and Accountability Act (HIPAA) regulations require careful monitoring of access to protected health data. UltiPro includes a HIPAA security audit feature that helps companies, in their role as a covered entity, comply with HIPAA regulations.
The backoffice application tracks users who view, add, update, or delete health-related data, including OSHA incidents. The following information is captured:
- name of the user
- name of the viewed page
- type of action taken on the page (view, update, add, delete)
- data element that was modified
- employee ID (EEID) of the employee whose information is being viewed
The OSHA windows that are tracked include:
- OSHA/Safety Summary
- OSHA Safety - Employee and Company
- OSHA Safety - Accident or Exposure
- OSHA Safety - Injury/Illness
- OSHA Safety - Other
- OSHA Safety - Sharps detail
- OSHA Safety - Sharps employee comments
The reports that are tracked include:
- OSHA 101
- OSHA 200
- OSHA 300
- OSHA 300A
- OSHA 301
- OSHA Sharps
Understanding OSHA/Safety Information
The employee-level OSHA/Safety window is used to establish and maintain information pertaining to specific OSHA and safety incidents that occurred to a particular employee. All of the information recorded for OSHA/Safety is grouped together under the employee-level heading OSHA/Safety, also known as the EMPOSHA table, in the navigator outline.
UltiPro Table Structure
Employee-level tables for OSHA/Safety store information specific to each incident for each individual in the system. These tables contain OSHA and safety-related data including case numbers, types and descriptions of incidents, personal information regarding the injured, severity of illness or injury and reports.
Key Employee-Level OSHA Tables
The following is a summary of the employee-level tables associated with
OSHA/Safety records.
|
Table Name |
Description |
|
EMPOSHA |
Is populated when an OSHA incident is recorded through the OSHA/Safety window. The system automatically adds a single record to the Employee OSHA table each time a new OSHA incident is recorded. |
|
EMPPERS |
Contains employee non-company specific personal information. The Employee Personal table is not specific to any one company but is specific to the individual employee. |
|
EMPCOMP |
Contains employee company-specific information. A single employee can have more than one company record depending upon your organization structure. Each record is unique for a specific company. |
|
LOCATION |
Stores all location codes established at the master company level. |
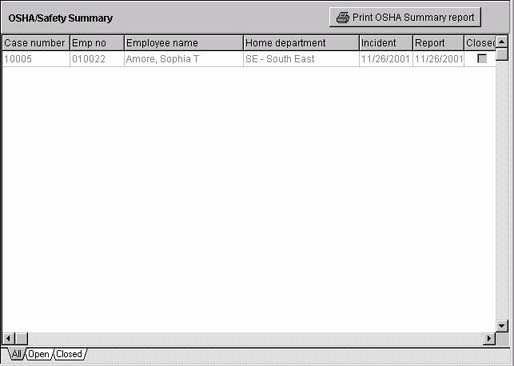
Viewing the Company OSHA/Safety Summary Window
The company OSHA/Safety Summary window provides a quick view of all incidents specific to a company. Except for the Print OSHA Summary report button, the information on this window is display only and cannot be modified in any way.
To access the company OSHA/Safety Summary window, from the OSHA/Safety menu select View/Edit.

Viewing the Employee OSHA/Safety Summary Window
The employee OSHA/Safety Summary window provides a quick view of all incidents specific to an employee. Except for the Print OSHA Summary Report button, the information on this window is display only and cannot be modified in any way.
Accessing Specific OSHA/Safety Information
To access an employee's OSHA/Safety summary
information:
1. From the Employee menu, select View/Edit.
2. From the navigator outline, select OSHA/Safety. The OSHA/Safety Summary window appears.
3. Select the employee.
4. Select the incident you want to view.
Note: You can use the filter tabs on the bottom of the Summary grid to filter the information to show All recorded incidents, only Closed incidents or only Open incidents.
Working with the Summary Window
All of the fields on the Summary window are display only (except for the Print OSHA Summary Report button).
Print OSHA Summary Report
The Print OSHA Summary Report button displays the standard reports interface so that you can produce the OSHA 200 and OSHA 300 log summary reports.
Case Number
The Case number field displays the case number for this incident. Whether this number is manually assigned or automatically incremented is established on the Human Resources window of the Master Company Setup window.
Emp No
The Emp no field displays the employee number of the employee involved in the incident for this company.
Name
The Name field displays the employee's name. The format is last name, first name, then middle initial.
Home Department
The Home department field displays the code and description of the employee's OSHA reporting department at the time of the incident. The organization level field that appears is established on the Human Resources window of the Master Company Setup window.
Incident
The Incident field displays the date that the incident occurred.
Report
The Report field displays the date that the incident was reported.
Closed
The Closed check box designates whether the incident is currently opened or closed. If this box is selected, the incident is closed.
Working with the Details Window
The Details window is where you can establish, view or modify OSHA/safety information for an employee. It is divided into the following sections:
§ Employer and employee information
§ Accident or exposure details
§ Injury or illness information
§ Other details such as treatment and report preparer information
Note: The OSHA/Safety Detail window is exactly the same whether it is selected from the company or the employee level.
OSHA/Safety Required Fields
You must enter the following information in order to complete an employee's
OSHA/safety record.
|
§
Employer name |
§ Employee name |
|
§
Case number |
§ Home department |
|
§
Location |
§ City |
|
§
State |
§ Zip code |
|
§
Incident date |
§ Incident type |
|
§
Employer notified |
§ Description of the injury or illness |
|
§
Date of report |
§ Location of event |
|
§
Preparer name, position, and phone number |
§ Time employee began work |
The
following information is required when the case is a sharps incident.
|
§
Work area |
§
Procedure |
|
§
Type |
§
Brand |
|
§
Model |
|

Establishment Name and Address Information
The Establishment name and address grid displays the employer's address information.
Name
The Name field allows you to select the employer's facility where the injury or illness occurred. The information in this field is populated from the Location (LOCATION) table.
Address 1 & 2
The Address 1 & 2 field displays the main and supplemental address information for the work location selected. This information is populated from the Location (LOCATION) table.
City
The City field displays the name of the city where the work location is located. This information is populated from the Location (LOCATION) table.
State
The State field displays the name of the State where the work location is located. This information is populated from the Location (LOCATION) table.
Zip Code
The Zip code field displays the zip code of the city and state in which the work location is located. This information is populated from the Location (LOCATION) table.
Employee Name
The Employee Name field displays the employee’s name.
Case Number
The Case number field is for the incident case number. Whether this number is manually assigned or automatically incremented is established on the Human Resources window of the Master Company Setup window.
Employee and Company Tab
The Employee and company tab stores information about the employee to whom the incident occurred.
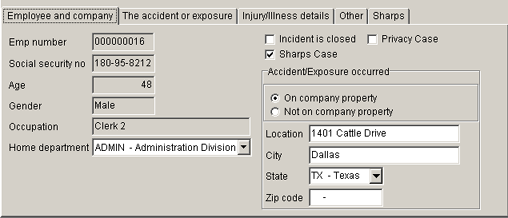
Emp Number
The display-only Emp number field shows the employee number of the affected employee for this company.
Social security no
The display-only Social security no field shows the employee's social security number.
Age
The display-only Age field shows the employee's age at the time of the incident.
Gender
The display-only Gender field shows whether the employee is male or female.
Occupation
The display-only Occupation field shows the employee's job description at the time of the incident.
Home Department
The Home Department field s a required field showing the employee's department at the time of the incident. The organization level field that appears is established on the Human Resources window of the Master Company Setup window.
Incident is Closed
The Incident is closed check box designates whether the incident is currently opened or closed. When you select this check box, you are indicating that the incident is currently closed. The system default is no check mark.
Privacy Case
When the Privacy Case check box is selected, the employee's name is suppressed from the OSHA 300 report. The system default is no check mark.
Sharps Case
A “sharp” is defined by OSHA as “any object that can penetrate the skin or any other body part and result in an exposure incident.” When you select this check box, the Sharps tab becomes activated. The system default is no check mark.
Accident/Exposure Occurred
The Accident/Exposure occurred grid indicates whether this accident or exposure took place on the employer's property. Select whether or not the accident or exposure occurred on company property using the appropriate radio buttons.
Note: If the incident or illness occurred on company
property, the information defaults from the Address 1 field located in
the Establishment name and address grid, based on the establishment
address, but you can edit the information. For example, your company might have
a warehouse at a different address where there are no assigned employees, but
an employee doing inventory work out at that warehouse becomes injured. This
establishment name would not be in the picklist, but
it is still considered company property, therefore you can change the location
information.
If the incident or illness occurred off company property, you can manually
enter the information regarding the accident.
Location
The Location field displays the place where the incident or illness occurred.
City
The City field displays the city where the incident or illness occurred.
Note: If the incident or illness occurred on company property, the information is populated from the City field located in the Establishment name and address grid. If the incident or illness occurred off company property, you can manually enter the city.
State
The State field displays the state where the incident or illness occurred.
Note: If the incident or illness occurred on company property, the information is populated from the State field located in the Establishment name and address grid. If the incident or illness occurred off company property, you can select the state.
Zip Code
The Zip code field displays the zip code where the incident or illness occurred.
Note: If the incident or illness occurred on company property, the information is populated from the Zip code field located in the Establishment name and address grid. If the incident or illness occurred off company property, you can manually enter the zip code.
The Accident or Exposure Tab
The accident or exposure tab contains fields that relate to how and where the incident occurred.
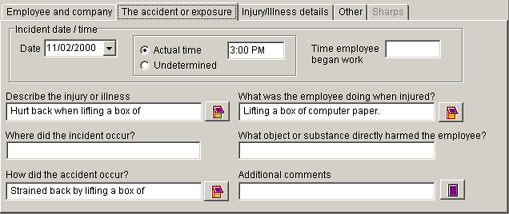
Incident Date/Time
The Incident date/time grid maintains the specific date and time information for the incident and employee.
Date
The Date field is the date the incident occurred. This field defaults to the system date, but can be modified as needed.
Actual time/Undetermined
The Actual time button and enter the time. If you know the exact time of incident, select the Actual time button. If not, select Undetermined.
Time employee began work
The Time employee began work field is a free-form text field, but you do need to enter a time that includes minutes and A.M. or P.M. (for example, 9:15 A.M. or 4:30 P.M.) Enter the time the employee began work.
Describe the injury or illness
The Describe the injury or illness field is an optional free-form text field that describes the illness or injury as a result of the incident. You can use the Notes icon to enter or modify more detailed information.
Where did the Incident Occur?
The Where did the incident occur field is an required free-form text field that describes where the incident occurred.
How did the Accident Occur?
The How did the Accident Occur? is an optional free-form text field that describes how the accident or exposure occurred. To view the entire description or to modify the description, click the Notes icon.
What was the Employee Doing When Injured?
The What was the employee doing when injured? field is an optional free-form text field that describes what the employee was doing when the event occurred. To view the entire description or to modify the description, click the Notes icon.
What object or substance directly harmed the employee?
The What object or substance directly harmed the employee is an optional free-form text field that describes the object or substance that caused the incident.
Additional comments
Enter any additional comments about the incident in this field.
Injury/Illness Details Tab
The Injury/illness details tab contains fields describing the incident classification, key dates, and treatment.
Incident classification
The Incident classification grid maintains information on the incident type, what kind, if any, illness type, and what body part is affected.
Incident Type
The Incident type field designates whether the incident is an injury or illness.
OSHA Illness
The OSHA illness field is to describe the type of illness. If the incident type is an illness, a selection must be made. The list of values that appears is from the system-level table OSHA Illness (OSHAILLNESS). If the incident is an injury, this field is unavailable.
Affected Body Part
The Affected body part field is a required field that describes the body part affected by the injury or illness. The list of values that appears is from the company-level Body Parts (BODYPARTS) table. If you do not enter the body part affected, the employee will not be included on the OSHA 300 report.
Key dates and treatment
The Key dates and treatment grid maintains all relevant date information pertaining to the incident.
Employer Notified
Employer notified field is the date the employer was notified of the incident. This field defaults to the system date, but can be modified as needed.
Absence Start
The Absence Start field is an optional field allowing you to enter the first day the employee reported being out due to an incident or illness. Do not include the actual date of the incident as part of the absence start.
Absence Stop
The Absence Stop field is an optional field allowing you to enter the last day the employee reported being out due to an incident or illness.
Restriction Start
The Restriction start field is an optional field allowing you to enter the first day the employee is restricted from working due to an incident or illness.
Restriction Stop
The Restriction stop field is an optional field allowing you to enter the last day the employee is restricted from working due to an incident or illness.
Actual days away from work
The Actual days away from work field is the total number of days the employee was out of work as a result of the incident. This field is only available if an absence stop date has been entered. This field is calculated by the system based on the absence start and stop dates. This field can be edited.
Days of Restricted Work
The Days of restricted work field is the number of days the employee was placed on restricted work as a result of the incident. This field is calculated by the system based on the restriction start and stop dates. This field can be edited.
Anticipated days away from work
The Anticipated days away from work field is the number of days the employee is anticipated to be away from work as a result of the incident.
Resulted in Employee's Death On
The Resulted in Employee's Death On check box designates whether the incident resulted in the employee's death. If the incident did result in death, enter the date of death. The system default for this field is no date.
The employee was treated in an emergency room
The employee was treated in an emergency room check box indicates whether the employee was treated away from the worksite at a hospital emergency room as a result of the incident.
The employee was hospitalized overnight as an in-patient
The employee was hospitalized overnight as an in-patient check box indicates whether the employee was hospitalized overnight as an in-patient as a result of the incident.
Other Tab
The Other tab contains fields describing the medical attention sought in relation to this incident.
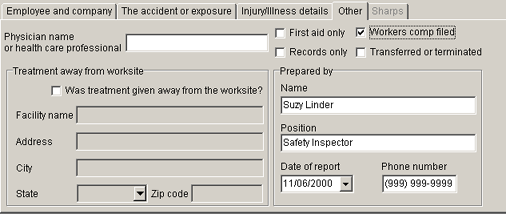
Physician name or health care professional
The Physician name or health care professional is an optional free-form text field listing the name of the doctor or health care professional that the employee went to for treatment.
First Aid Only
The First aid only check box designates whether this incident only required first aid. This indicates that the incident is not reportable to OSHA.
Records Only
The Records Only check box designates if you do not want the injury or illness to print on the OSHA 200 or OSHA 300 reports. This is useful for tracking all reported accidents.
Worker's Comp Filed
The Worker's comp filed check box designates whether a worker's compensation claim was filed for the incident. The system default for this field is no check mark.
Transferred or Terminated
The Transferred or Terminated check box designates whether the employee was permanently transferred or terminated due to an occupational illness or injury.
Treatment away from worksite
The Treatment away from worksite grid allows you to enter information about the facility where the employee received treatment if the treatment was away from the worksite.
Was treatment given away from worksite?
The Was treatment given away from worksite field is to determine if treatment was given away from the worksite. If selected, the Facility name, Address, City, State, and Zip code fields become available.
Facility Name
The Facility name field is an optional free-form text field listing the name of the hospital or other medical facility (for example, clinic) where the employee received treatment away from the worksite.
Address
The Address field is an optional free-form text field listing the address of the facility where the employee received treatment away from the worksite.
City
The City field is an optional free-form text field listing the city of the facility where the employee received treatment away from the worksite.
State
The State field is an optional free-form text field listing the state of the facility where the employee received treatment away from the worksite.
Zip code
The Zip code field is an optional free-form text field listing the zip code of the facility where the employee received treatment away from the worksite.
Prepared By
The Prepared by grid lists the date and person preparing the incident record. (required)
Name
The Prepared by field is the name of the individual who prepared the incident record. (required)
Position
The Position field is the job position of the individual who prepared the incident record. (required)
Date of Report
The Date of report field records the date the incident record was completed. This field defaults to the system date, but can be modified as needed. (required)
Phone number
The Phone number field is the phone number of the person who prepared the record. (required)
Sharps Tab
The Sharps
tab maintains Sharps injuries information. The following information is
maintained:
·
Type and brand of the device involved in the incident
·
Department or work area where the incident occurred
·
Explanation of how the incident occurred
In addition, Sharps incident reporting
requirements include:
·
Model number of the device involved
·
Job classification of the employee
·
Procedure being performed when incident occurred
·
Stage of the procedure when the incident occurred
·
Whether the device had any engineered injury protection devices
·
Whether the employee has an opinion that any engineered injury
protection device could have prevented the incident
·
Whether the employee has an opinion that any other engineering,
administrative, or work practice controls could have prevented the incident
Detail Tab
The Sharps
Detail tab allows you to enter specific information about the sharps
incident and about the sharp device.
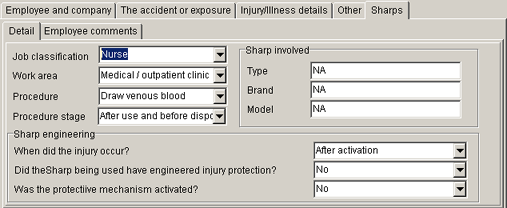
Job classification
Select the injured employee’s job classification.
Work area
Select the work area in which this Sharps incident
occurred.
Procedure
Select the procedure that was being performed when
the Sharps incident occurred.
Procedure stage
Select the stage of the procedure when the Sharps
incident occurred.
Sharp involved
In the Sharp involved grid, you enter specific information
about the sharp used in the incident.
Type
Enter the type of instrument that was responsible
for the Sharps incident.
Brand
Enter the brand of instrument that was responsible
for the Sharps incident.
Model
Enter the model of the instrument that was involved
in the Sharps incident.
Sharp Engineering
In the Sharp engineering grid, you enter specific
information about when the Sharps incident occurred as well as device safety or
protective mechanisms.
When did the injury occur?
Select when the Sharps injury occurred: before,
during or after activation.
Did the Sharp being used have engineered injury
protection?
Select whether the Sharps device was engineered
for safety.
Was the protective mechanism activated?
Select whether the Sharps protective mechanism was activated.
Employee comments tab
In the Employee
comments section, the employee’s opinion about sharps device protection
mechanism and workplace injury prevention are collected.
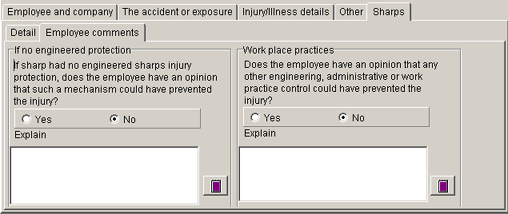
If no
engineered protection
Indicate whether the affected employee has a
protective mechanism issue and include the affected employee’s protective
mechanism comments.
Workplace
practices
Indicate whether the affected employee has a work practice issue and include the affected employee’s work practice comments.
1. From the Employee menu, select View/Edit.
2. From the navigator outline, select OSHA/Safety. The OSHA/Safety Summary window appears.
3. Select the employee.
4. Click the Add button.
5. In the Establishment name and address grid, select the employer's name and address information.
6. On the Employee and company tab:
-
Select the employee's home department.
-
Indicate whether the injury occurred on or off company property.
-
Select whether the injury is a privacy case.
-
Select whether the injury is a sharps case.
7. On The accident or exposure tab:
-
Enter the incident date and time.
-
Enter the time the employee began work.
-
Describe the injury or illness.
-
Enter where the incident occurred.
-
Describe how the incident occurred.
-
Describe what the employee was doing when the incident occurred.
-
List what object or substance harmed the employee.
8. On the Injury/illness details tab, enter the following information:
-
Incident type (if the incident is an illness, select an OSHA illness)
-
Affected body part
-
Employer notified
-
Absence start and stop
-
Actual days away from work
-
Days of restricted work
-
Anticipated days lost/restricted
-
If the employee died, the date of death
-
If the employee was treated in an emergency room
-
If the employee was hospitalized overnight
9. On the Other tab, enter the following optional information:
§ Physician name
§ If the incident is
§ for records only
§ first aid
§ was the employee transferred or terminated
§ was workers' compensation filed
§ combination of the above categories
§ If treatment was given away from workplace, include:
§ hospital name
§ address of hospital
§ Prepared by
§ Position in company
§ Date of report
§ Phone number of person who prepared the report
10.
On the Sharps tab, enter the
following information (this tab is only activated when Sharps case is selected on the Employee
and company tab):
§
Job classification
§
Work area
§
Procedure and stage of procedure
§
Type, brand, and model of sharp involved
§
When the injury occurred
§
If the sharp had any type of engineered protection and if it was being
used
§
Injured employee’s opinions on sharp used and injury prevention in the
workplace
11. Click Save.
To modify an existing incident record
1. From the Employee menu, select View/Edit.
2. From the navigator outline, select OSHA/Safety. The OSHA/Safety Summary window appears.
3. Select the employee.
4. Select the incident you want to modify.
5. Change the value in the field you want to modify.
6. Click Save.
1. From the Employee menu, select View/Edit.
2. From the navigator outline, select OSHA/Safety. The OSHA/Safety Summary window appears.
3. Select the employee.
4. Select the incident you want to close.
5. Select the Employee and company tab.
6. Select Incident is closed.
7. Click Save.
Printing OSHA Reports
OSHA Summary Reports
You can print an OSHA summary report for any employee or company with OSHA/Safety records, based on the incident date.
When you use the Print OSHA Summary report button, for all incidents
prior to
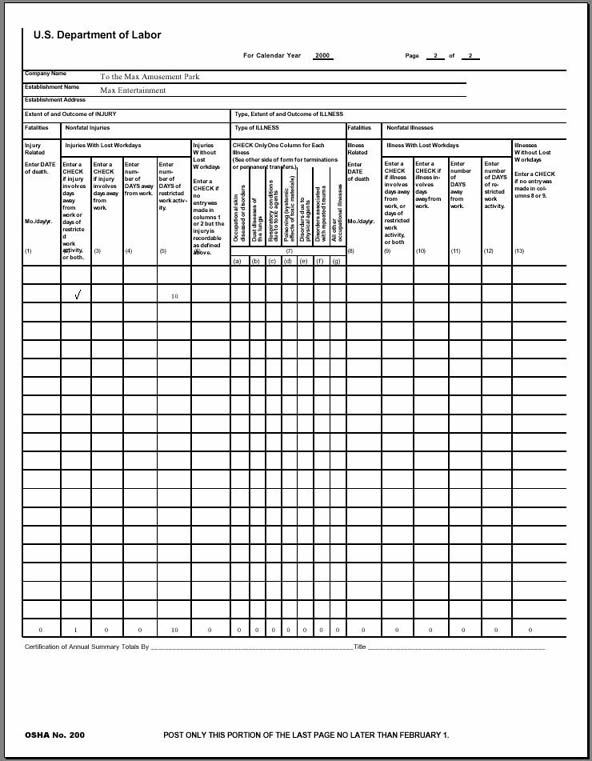
Examples of the different summary reports are below.
Report form, OSHA 200, for incidents prior to
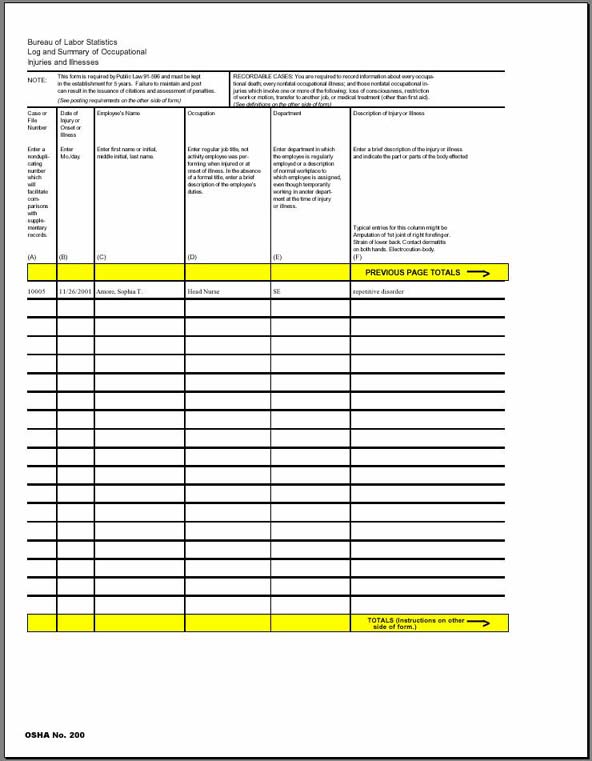
Report form OSHA 200, for incidents occurring prior to
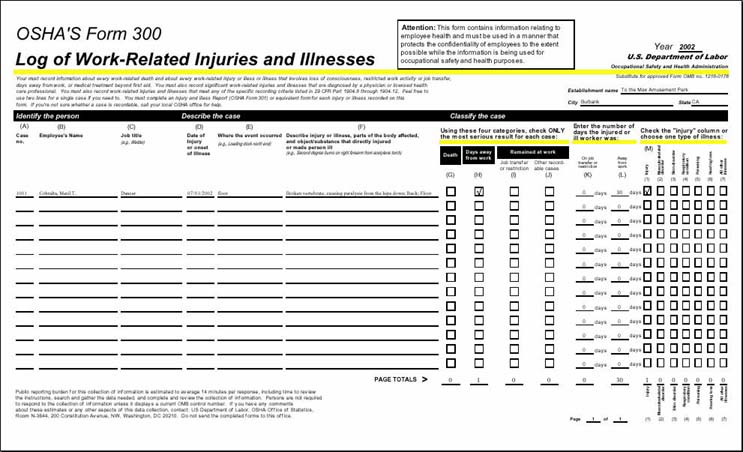
Report form, OSHA 300, for incidents occurring on
To
print OSHA summary reports:
1. From the OSHA/Safety menu, select View/Edit. Or, from the Employee menu, select View/Edit, then select OSHA/Safety. The OSHA/Safety Summary window appears.
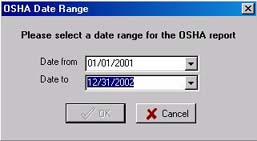
2. Click the Print OSHA Summary report button. The OSHA Date Range window opens.
![]()
3. Enter the date range in the Date from and Date to fields. The date range you enter will determine the type of OSHA form to be created.
4. Click OK.
Note: If you selected First aid only or Records only on the Other tab, no data for those specific incidents will appear in the OSHA summary reports.
Important: If you enter 2001 or earlier in the Date from field and 2002 or later in the Date to field, a report cannot be created.
You will receive the following error message:

Both the Date from and Date to fields must be either 2001 or earlier or 2002 or later.
OSHA Incident Reports
You can print an OSHA incident report for any employee with OSHA/Safety records, based on the incident date.
When you use the Print OSHA Incident report button, for all incidents
prior to
Examples of the different incident reports are below.
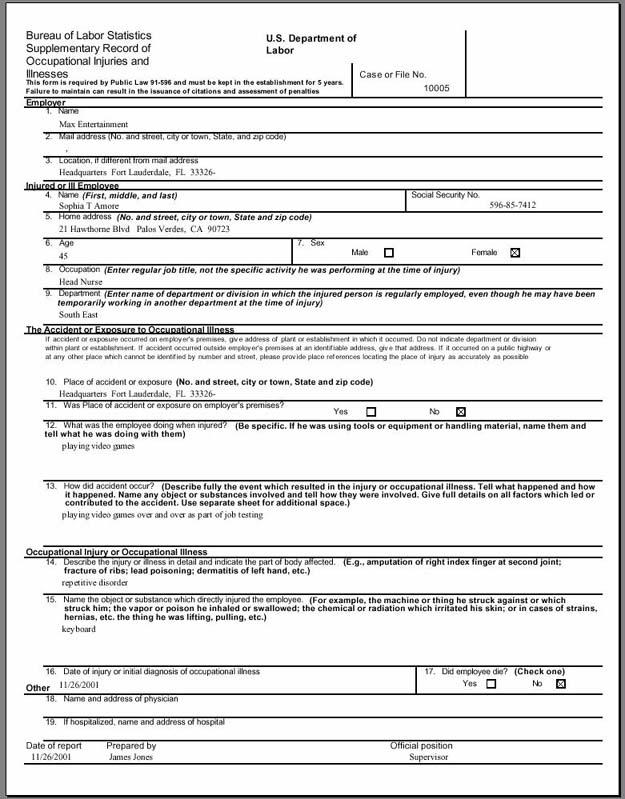
Report form, OSHA 101, for incidents occurring prior to December 31,
2001:
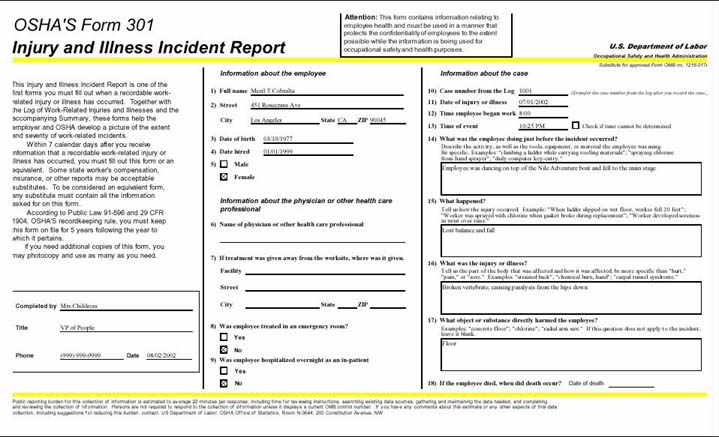
Report form, OSHA 301,
for incidents occurring on
To
print OSHA incident reports:
1. From the Employee menu, select View/Edit.
2. From the navigator outline, select OSHA/Safety. The OSHA/Safety Summary window appears.
3. Select the employee.
4. Select the incident you want to print.
5. Click the Print OSHA Incident report button. The OSHA Date Range window opens.
![]()
6. Enter the date range in the Date from and Date to fields. The date range you enter will determine the type of OSHA form to be created.
7. Click OK.
Important: If you enter 2001 or earlier in the Date from field and 2002 or later in the Date to field, a report cannot be created. You will receive the following error message:
Both the Date from and Date to fields must be either 2001 or earlier or 2002 or later.
OSHA Sharps Injury Log Report
For more information on printing the OSHA Sharps Injury Log report, refer to the Backoffice Standard Reports Guide.