Schedule an Interview

When you schedule an interview using the Calendar Integration feature, you can see interviewer availability, allow candidates to pick their interview times, and automatically provide a video conference link for Microsoft Teams or Google Meet, if configured by a Recruiting Administrator.

When you select one or more interviewers, an interactive calendar shows you the times when all the interviewers are available. Then you can:
  • Directly schedule an interview with a candidate for a specific day and time.
  • Offer candidates a selection of interview slots to choose from.
  • Create a video conference link for the interview.
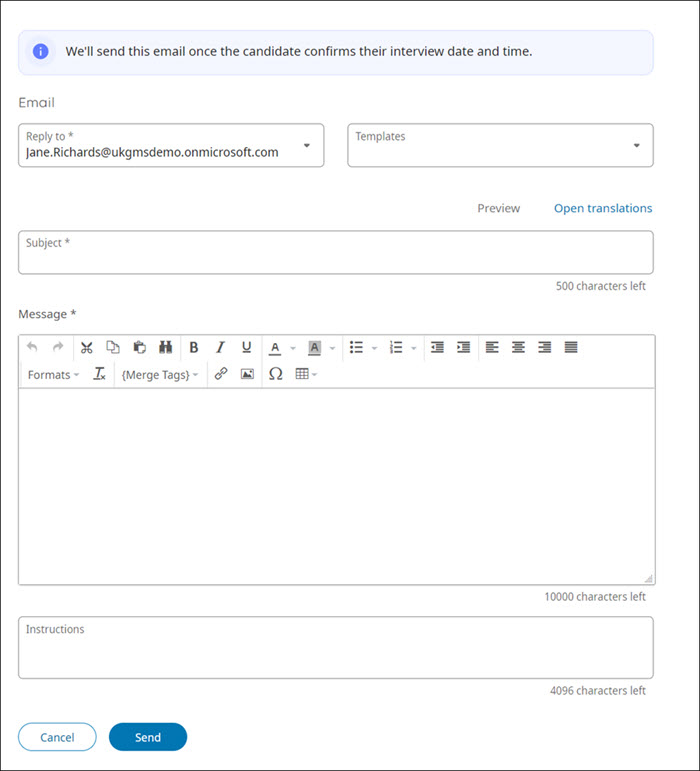
  • Compose an e-mail to applicants or select an Interview Confirmed email template to send when the interview is confirmed.
    • Directly scheduled interviews are confirmed when the invitation is sent.
    • Self-scheduled interviews are confirmed when the candidate selects an interview time.

Once an interview is confirmed, the Calendar Integration feature creates an appointment for the interviewers on your company calendar. This happens immediately for directly scheduled interviews, or when the applicant selects a time slot for self-scheduled interviews.

For information about setting up Calendar Integration, see the Interviews help topic.

Navigation: UKG Pro Recruiting > Opportunities

  1. Locate the Opportunity for which you want to invite applicants to interview, then select the number of applicants to that Opportunity.
    Recruiting displays the Opportunity's applicant list.
  2. In the applicant list, select one or more applicants that are in the Interview phase of your recruiting process.
  3. Select More Actions > Schedule Interview.

    Note:

    If the Schedule Interview action is not available, the selected applicants are not in a step of your recruiting process that has been assigned to the Interview phase. You might need to move the applicants to a different step of your process. If they are in the correct step, edit your recruiting process and ensure that the step is assigned to the Interview phase.

    If some of the applicants are in different steps of your recruiting process, a warning message appears. Before continuing, review the applicants and make sure that you want to invite them all to the same type of interview.

    The applicant selection only includes the applicants who are in the Interview phase of your recruiting process. Applicants in other phases are automatically removed from the list.

  4. In the Schedule Interview screen, set the basic properties of the interview:

    The top of the Schedule Interview page shows the Opportunity title, posting date, requisition number, locations, assigned Recruiter and Hiring Manager. Then it lists the candidates that you selected in the applicant list. After that are the Interviewers search box, the list of assigned Interviewers, the Interview Type selector, Location text box, Video conference toggle (if activated by an Administrator), Duration selector, End interview(s) early dropdown, and Candidate self-scheduling checkbox.

    1. In Interviewers, add or remove interviewers as needed.
    2. Select an Interview Type: Phone Screen / Phone Interview, Panel Interview, On Site Interview, or Virtual Interview.
    3. In Location, enter the location of the interview.
      The location text can be a physical address, or a URL to connect to an online meeting.
      • Location is required if Video Conferencing is set to Off.
      • Location is not required if Video Conferencing is set to On.
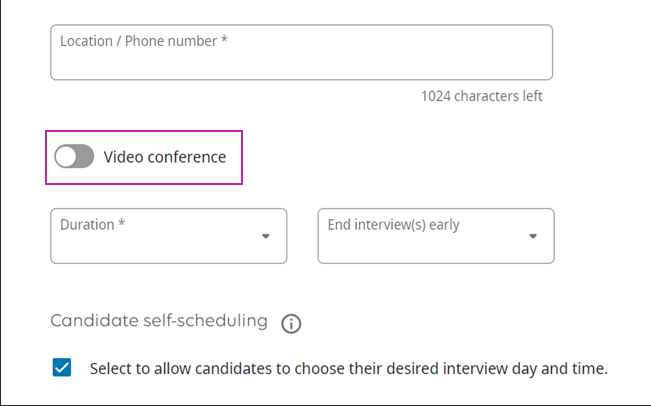
    4. (Optional) Turn to Video conference toggle On to automatically create a Microsoft Teams or Google Meet link for the interview. Video conferences do not require you to enter a location.

      A section of the Interview scheduling form with the Video conference toggle called out by a pink box.

      Note:

      The Recruiting Administrator must activate this feature. Please see the Interviews help topic.

    5. Select a Duration for the interview: 30 minutes, 1 hour, or 1.5 hours.
    6. (Optional) Select End interview(s) early and choose 5 minutes, 10 minutes or 15 minutes if you want the interview to end early (to give an interviewer time to prepare for the next candidate in back-to-back interviews, for example). Choose No Selection to schedule the interview for the full duration.
    7. Select the Candidate self-scheduling check box if you would like to let candidates choose their preferred interview time from a list you provide. 
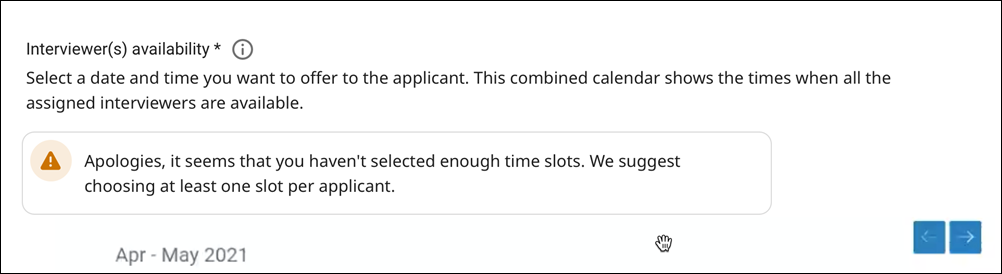
This box is selected by default if more than one candidate is selected, and deselected by default if only one candidate is selected. Deselecting this box while multiple candidates are selected will offer only one interview option for all candidates and presents an informational message: "Apologies, it seems that you haven't selected enough time slots. We suggest choosing at least one slot per applicant."

      The warning box stating, "Apologies, it seems that you haven't selected enough time slots. We suggest choosing at least one slot per applicant."

  5. In the Interviewer(s) Availability calendar, select a time slot for the interview. Then select Confirm.

    The Interviewer(s) Availability calendar allows you to position a block of time for the interview. The calendar allows you to select from the times when all assigned Interviewers are available. If any of the assigned Interviewers is unavailable during a half hour, that half hour is marked as Unavailable.

    On the calendar, available time slots are shown in green. Availability is based on the combined schedules of all the Interviewers you selected. If needed, you can change the Interviewer selections, and the calendar updates automatically.

    To view a different week, use the left/right arrow buttons at the top right of the calendar. To view different times of day, use the up/down arrows at the top and bottom left of the calendar.

  6. In the Email section, compose a message with the details of the interview or select an Interview Confirmed email template. This message is sent once the applicant confirms the interview for self-scheduling, or immediately if the interview is directly scheduled.

    The email editor in the Schedule Interview page. It includes the Reply To selector, the Subject text box, the Message text box with formatting options, and the Instructions text box.

    1. In Reply To, select the email address to use in the Reply-To field of the email.
      You can select your own email address, or the Default Return Address (configured in Settings > Email).
    2. Choose an option to send an email to the candidate once the interview is confirmed:
      • Select an Interview Confirmation Template if you have created one.
      • Enter a Subject and Message for the email. Format the message as needed. You can use merge tags to automatically insert specific details into the message body. For example, the merge tag {OPPORTUNITY_TITLE} will be replaced with the title of the Opportunity. To insert a merge tag, select it from the Merge Tags drop-down list.
    3. In Instructions, enter any special instructions required for the applicant to access the interview.

      The Instructions text is included in the .ics calendar file that is attached to the email. When the applicant imports the .ics file to their calendar, the appointment includes this text.

      For an on-site interview, you could include parking instructions or landmarks to help the applicant find the interview site. For an online interview, you could specify a meeting URL, ID, and passcode.

    4. To add translated Subject, Message, and Instructions text in another language, select Open Translations. Then, on the right side, select a target language and enter the translated text. Repeat as needed for other languages. You can select Close Translations when you are finished, if you want, and your changes are saved either way.
  7. To send the interview invitation, select Send.

    If candidate self-scheduling is not selected, the interview invitation is sent immediately to the candidate for them to accept or decline.

    If candidate self-scheduling is selected, they are first sent a form email inviting them to choose their preferred interview time, either by following a link in the email or by logging in to your recruiting site and navigating to My Presence > Interviews. Once they have selected a time, your custom interview invitation is sent.

    If you selected a video conference, the link is sent to the candidate and added to the interviewer's calendar automatically once the interview date and time is confirmed (immediately for direct scheduling, or by the applicant for self-scheduling).

    Both events are added to the Candidate Notes (UKG Pro Recruiting > People > select candidate > Notes) for information and tracking purposes.
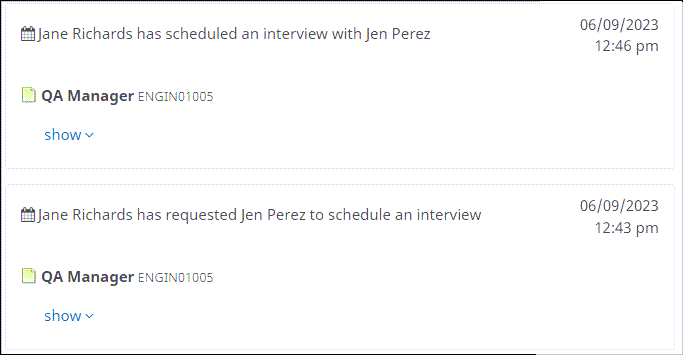
    Candidate notes page showing two entries. The first says Jane Richards has requested Jen Perez to schedule an interview. The second says Jane Richards has scheduled an interview with Jen Perez.

    Note:

    The interview organizer will receive a calendar notification when the applicant accepts or declines the imported calendar invitation.

    Important:

    Interviews cannot be rescheduled. The recruiter must make a new event, send it to the candidate(s), and manually delete the old event from their calendar.

Related Topics